Control panel
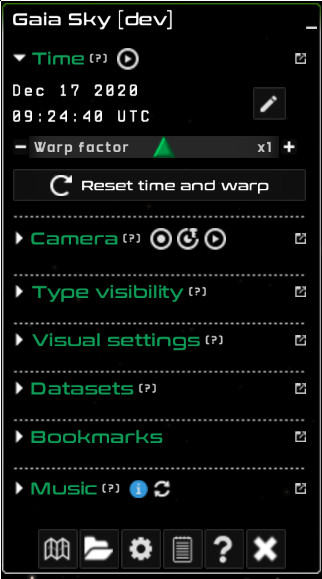
The Gaia Sky control panel is divided into seven panes, Time, Camera, Type visibility, Visual settings, Datasets, Objects, and Music.
|
|
Collapsed control panel |
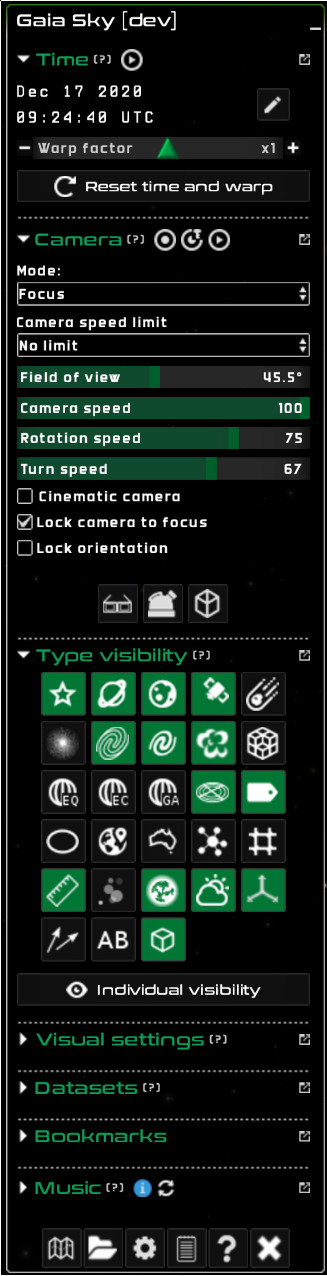
Expanded control panel |
The seven panes, except for the Time pane, are collapsed at startup. To expand them and reveal its controls just click on the little arrow bottom
icon ![]() at the right of the pane title. Use the arrow right icon
at the right of the pane title. Use the arrow right icon ![]() to collapse it again. Panes can also be detached
to their own window. To do so, use the detach icon
to collapse it again. Panes can also be detached
to their own window. To do so, use the detach icon ![]() .
.
Time
Play and pause the simulation using the ![]() /
/![]()
Play/Pause buttons in the time pane, or toggle using Space. You can also change time warp, which is expressed as a scaling factor, using the provided Warp factor slider. Use , or ![]() and . or
and . or ![]() to divide by 2 and double the value of the time warp respectively.
to divide by 2 and double the value of the time warp respectively.

Warp factor slider
Camera
In the camera options pane on the left you can select the type of camera. This can also be done by using the Numpad 0-7 keys.
There are eight camera modes:
Free mode – the camera is not linked to any object and its velocity is exponential with respect to the distance to the origin (Sun).
Focus mode – the camera is linked to a focus object and it rotates and rolls with respect to it.
Game mode – a game mode which maps the controls wasd + mouse look.
Spacecraft– take control of a spacecraft and navigate around at will.
Gaia FOV (1, 2, both) – the camera simulates either of the fields of view of Gaia, or both.
For more information on the camera modes, see the Camera modes section.
Additionally, there are a number of sliders for you to control different parameters of the camera:
Field of view – control the field of view angle of the camera. The bigger it is, the larger the portion of the scene represented.
Camera speed – control the longitudinal speed of the camera.
Rotation speed – control the transversal speed of the camera, how fast it rotates around an object.
Turn speed – control the turning speed of the camera.
You can lock the camera to the focus when in focus mode. Doing so links the reference system of the camera to that of the object and thus it moves with it.
Hint
Lock the camera so that it stays at the same relative position to the focus object.
Finally, we can also lock the orientation of the camera to that of the focus so that the same transformation matrix is applied to both.
Hint
Lock the orientation so that the camera also rotates with the focus.
Additionally, we can also enable the crosshair, which will mark the currently focused object.
Type visibility
Most graphical elements can be turned off and on using these toggles.
For example you can hide the stars by clicking on the
stars ![]() toggle. The object types available are the following:
toggle. The object types available are the following:
 – Stars
 – Planets
 – Moons
 – Satellites
 – Asteroids
 – Star clusters
 – Milky Way
 – Galaxies
 – Nebulae
 – Meshes
 – Equatorial grid
 – Ecliptic grid
 – Galactic grid
 – Labels
 – Titles
 – Orbits
 – Locations
 – Countries
 – Constellations
 – Constellation boundaries
 – Rulers
 – Particle effects
 – Atmospheres
 – Clouds
 – Axes
 – Velocity vectors
 – Others
Per-object visibility
This button provides access to controls to manipulate the individual visibility of objects.
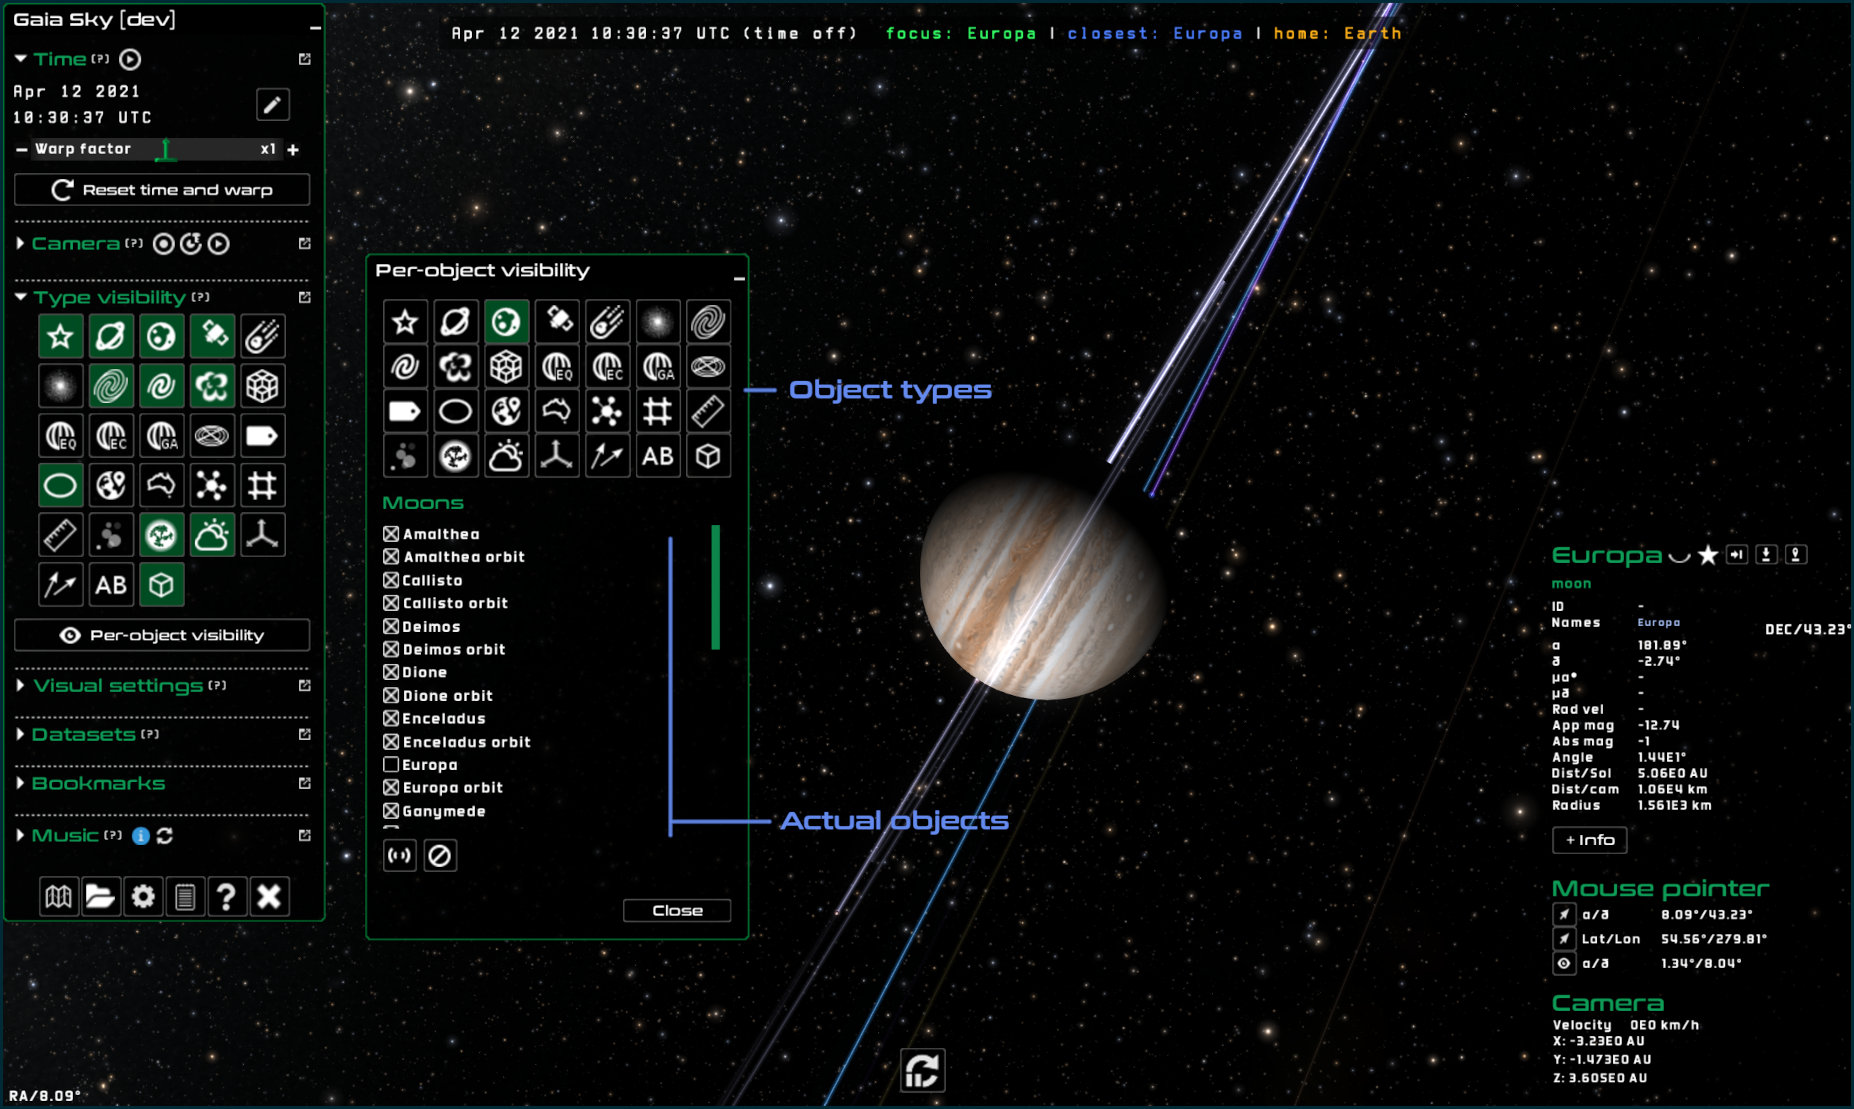
Individual object visibility button and dialog
As shown in the image above, when clicking the Per-object visibility button, a new dialog appears, from which individual objects can be toggled on and off. They are organized per object type (top of the dialog). Once the object type is selected, the list of object appears in the bottom part.
Hint
Stars do not appear in the per-object visibility panel!
Since there are so many stars, they are not in the per-object visibility panel as single objects. Instead, they show up in groups. A single standalone catalog is a single star group. In the case of LOD catalogs like the ones based on Gaia data releases, each octree node contains a star group. However, individual star visibility can still be manipulated using the eye icon in the focus information pane when the star is focused.
Velocity vectors
Enabling velocity vectors activates the representation of star velocities, if the currently loaded catalog provides them. Once velocity vectors are activated, a few extra controls become available to tweak their length and color.

Velocity vectors in Gaia Sky
Number factor – control how many velocity vectors are rendered. The stars are sorted by magnitude (ascending) so the brightest stars will get velocity vectors first.
Length factor – length factor to scale the velocity vectors.
Color mode – choose the color scheme for the velocity vectors:
Direction – color-code the vectors by their direction. The vectors \(\vec{v}\) are pre-processed (\(\vec{v}'=\frac{|\vec{v}|+1}{2}\)) and then the \(xyz\) components are mapped to the colors \(rgb\).
Speed – the speed is normalized in from \([0,100] Km/h\) to \([0,1]\) and then mapped to colors using a long rainbow colormap (see here).
Has radial velocity – stars in blue have radial velocity, stars in red have no radial velocity.
Redshift from the Sun – map the redshift (radial velocity) from the sun using a red-to-blue colormap.
Redshift from the camera – map the redshift (radial velocity) from the current camera position using a red-to-blue colormap.
Solid color – use a solid color for all arrows.
Show arrowheads – Whether to show the vectors with arrow caps or not.
Hint
Control the width of the velocity vectors with the line width slider in the visual settings pane.
Visual settings
The visual settings pane contains a few options to control the shading of stars and other elements:
Brightness power – exponent of power function that controls the brightness of stars. Makes bright stars brighter and faint stars fainter.
Star brightness – control the brightness of stars.
Star size (px) – control the size of point-like stars.
Min. star opacity – set a minimum opacity for the faintest stars.
Ambient light – control the amount of ambient light. This only affects the models such as the planets or satellites.
Line width – control the width of all lines in Gaia Sky (orbits, velocity vectors, etc.).
Label size – control the size of the labels.
Elevation multiplier – scale the height representation.
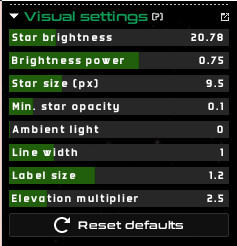
The visual settings pane
Location log
Gaia Sky keeps track of the visited locations during a session, up to 200 entries. More information on the location log can be found in the location log section.
Bookmarks
Gaia Sky offers a bookmark system to keep your favorite objects organized and at hand. This panel centralizes the operation of bookmarks. You can find more information on this in the bookmarks section.
Datasets
This tab contains all the datasets currently loaded. For each dataset, a highlight color can be defined. The dataset properties window can be used to define arbitrary filters on any of the properties of the elements of the dataset. Datasets can be highlighted by clicking on the little crosshair next to the name, below the color picker.
Please see the datasets section for more information on this.
Music
Since version 0.800b, Gaia Sky also offers a music player in its
interface. By default it ships with only a few spacey melody, but you
can add your own by dropping them in the folder $GS_DATA/music (see folders).
Hint
Drop your mp3, ogg or wav files in the folder $GS_DATA/music and these will be available during your Gaia Sky sessions to play.
In order to start playing, click on the 
Play button. To pause the track, click on the 
Pause icon. To skip to the next track,
click on the 
Forward icon. To go to the previous track, click on the 
Backward icon.
The volume can be controlled by scrolling up and down, using the mouse wheel, over the volume indicator. The default volume value is 5%.
Bottom buttons
The buttons at the bottom of the control panel are described here.
Minimap
With this button ![]() you can toggle the minimap window on an off. You can also use Tab.
you can toggle the minimap window on an off. You can also use Tab.
Load dataset
Use this button ![]() to load a new VOTable file (
to load a new VOTable file (.vot) into Gaia Sky. Refer to the Preparing datasets section for more information on the metadata needed for Gaia Sky to parse the dataset correctly.
Preferences window
You can launch the preferences window any time during the execution of
the program. To do so, click on the ![]()
Preferences button at the bottom
of the GUI window. For a detailed description of the configuration
options refer to the Configuration
Instructions.
Log
The log button ![]() brings up the log window, which displays the Gaia Sky log
for the current session. The log can be exported to a file by clicking on the
brings up the log window, which displays the Gaia Sky log
for the current session. The log can be exported to a file by clicking on the Export to
file button. The location of the exported log files is $GS_DATA (see folders).
About/help
The help button ![]() brings up the help dialog, where information on the current system,
OpenGL settings, Java memory, updates and contact can be found.
brings up the help dialog, where information on the current system,
OpenGL settings, Java memory, updates and contact can be found.
Exit
Click on the cross icon ![]() to exit Gaia Sky. You can also use Esc.
to exit Gaia Sky. You can also use Esc.