Procedural planetary surfaces
Gaia Sky is able to procedurally generate planetary surfaces, cloud layers and also atmospheres. These can be applied to planets and moons to modify their looks. The elements that can be procedurally generated are, then, the model surface, the cloud layer and the atmosphere.
Hint
The techniques and methods behind the procedural generation of planetary surfaces in Gaia Sky are described in detail in this external article.
The procedural generation module is accessible via two distinct ways:
Specifying the procedural generation parameters in descriptor files. This way allows for the textual definition of bodies and their procedural generation parameters. The files can be loaded at startup and distributed so that other Gaia Sky users can load them.
Using the runtime procedural generation window to generate and modify surfaces, clouds and atmospheres. The results are only permanent during the current session and are lost on restart.
But first, let’s learn about the process used to generate surfaces and clouds.
Surface generation process
The surface generation process starts with the generation of the elevation and humidity data. The elevation data is a 2D array containing the elevation value in \([0,1]\) at each coordinate. The humidity data is the same but it contains the humidity value, which will come in handy for the coloring. First, let’s visit our sampling process.
Seamless (tilable) noise
Usually, noise sampled directly is not tileable. The features do not repeat, and you just can’t extend the noise indefinitely because seams are visible. In the case of one dimension, usually one would sample the noise using the only dimension available, \(x\).

Sampling noise in 1D leads to seams
However, if we go one dimension higher, 2D, and sample the noise along a circumference embedded in this two-dimensional space, we get seamless, tileable noise.

Sampling noise along a circumference in 2D space is seamless
We can apply this same principle with any dimension \(d\) by sampling in \(d+1\). Since we need to create spherical 2D maps, we do not sample the noise algorithm with the \(x\) and \(y\) coordinates of the pixel in image space. That would produce higher frequencies at the poles and lower around the equator. Additionally, the noise would contain seams, as it does not tile by default. Instead, we sample the 2D surface of a sphere of radius 1 embedded in a 3D volume, so we sample 3D noise. To do so, we iterate over the spherical coordinates \(\varphi\) and \(\theta\), and transform them to cartesian coordinates to sample the noise:
The process is outlined in this code snippet. If the final map resolution is \(N \times M\), we use N \(\theta\) steps and M \(\varphi\) steps.
for (phi = -PI / 2; phi < PI / 2; phi += PI / M){
    for (theta = 0; theta < 2 * PI; theta += 2 * PI / N) {
        n = noise.sample(cos(phi) * cos(theta), // x
                         cos(phi) * sin(theta), // y
                         sin(phi));             // z
        theta += 2 * PI / N;
    }
}
Noise parametrization
The generation is carried out by sampling configurable noise algorithms at different levels of detail, or octaves. To do that, we have some important noise parameters to adjust:
seed—a number which is used as a seed for the noise RNG.
type—the base noise type. Can be gradient (Perlin) noise 1, gradval noise 2, simplex 3, value 4 or white 5. Find more information here.
fractal type—the algorithm used to modify the noise in each octave. It determines the persistence (how the amplitude is modified) as well as the gain and the offset. Can be billow, deCarpenterSwiss, FBM, hybrid multi, multi or ridge multi. Find more information here.
scale—determines the scale of the sampling volume. The noise is sampled on the 2D surface of a sphere embedded in a 3D volume to make it seamless. The scale stretches each of the dimensions of this sampling volume.
octaves—the number of levels of detail. Each octave reduces the amplitude and increases the frequency of the noise by using the lacunarity parameter.
frequency—the initial frequency of the first octave. Determines how much detail the noise has.
lacunarity—determines how much detail is added or removed at each octave by modifying the frequency.
range—the output of the noise generation stage is in \([0,1]\) and gets map to the range specified in this parameter. Water gets mapped to negative values, so adding a range of \([-1,1]\) will get roughly half of the surface submerged in water.
power—power function exponent to apply to the output of the range stage.

The different types of noise, sampled raw with no fractals
The final stage of the procedural noise generation clamps the output to \([0,1]\) again, so that all negative values are mapped to 0, and all values greater than 1 are clamped to 1.
Both elevation and humidity data use the same set of parameters right now. The elevation is used directly as the height texture. The humidity is used, together with the elevation, to determine the color using a look-up table. The humidity value is mapped to the X coordinate, while the elevation value is mapped to Y. Both coordinates are normalized to \([0,1]\).

The look-up table mapping dimensions are elevation and humidity
The look-up can also be hue-shifted by an extra hue shift parameter, in \([0^{\circ}, 360^{\circ}]\). The shift happens in the HSL color space. Once the shift is established, we generate the diffuse texture by sampling the look-up table and shifting the hue. The specular texture is generated by assigning all heights equal to zero to a full specular value. Remember that all negative values were clamped to zero, so zero essentially equals water in the final height map.
Finally, the normal map is generated from the height map by determining elevation gradients in both X and Y. We use the normal map only when tessellation is unavailable or disabled. Otherwise it is not generated at all.
Footnotes
Cloud generation process
The clouds are generated with the same algorithm and the same parameters as the surface elevation. Then, an additional color parameter is used to color them. For the clouds to look better one can set a larger Z scale value compared to X and Y, so that the clouds are stretched in the directions perpendicular to the rotation axis of the planet.

Left to right and top to bottom, clouds map, diffuse texture, elevation map, normal map and specular map procedurally generated with Gaia Sky.
Descriptor files
This section describes how to set up the procedural generation using JSON descriptor files and how to express the parameters seen in the previous section in these descriptor files. The format is thoroughly documented in this section.
The procedural generation parameters for surfaces and clouds are described in the material and cloud elements. The material element lives inside the model element. By contrast, there are no procedural generation parameters that can be set in the atmosphere element itself. It just holds the atmospheric scattering parameters. However, the atmosphere element as a whole can be randomized. Let’s see how to randomize these elements in the next section.
Randomize all
The easiest way to add procedural generation to an object is by using the randomize element. It is an array which can contain the strings "model", "cloud" and "atmosphere". It can optionally be accompanied by a seed element, specifying the seeds for each of the elements to randomized. A seed is a 64-bit number used to initialize the RNG (random number generator) so that it always produces the same random number sequence. If you omit the seeds the system will randomly generate them. Otherwise, they are matched to elements by their order of appearance in the arrays. If the seeds array is not long enough, the first seed is used. Let’s see an example:
{
    "name" : "Exonia f",

    "randomize" : [ "model", "cloud", "atmosphere" ],
    "seed" : [111, 222, 333]
}
In the snippet above we have omitted all the usual elements (color, size, ct, etc.) except the name. The last two elements specify the components to randomize and their seeds. In this case, the model would take the seed 111, the cloud would take the seed 222 and the atmosphere would take the seed 333.
If any of the elements were not present in the randomize array, it would not be generated. If the element object is present, it will be picked up though, but only if the randomize array does not contain it. The randomize array has precedence.
Surface description
Some of the textures in the material element, making up the surface of the body, can be procedurally generated. The procedural generation parameters are specified in the material element inside the model element. Let’s see an example:
"model"                 : {
    "args" : [true],
    "type" : "sphere",
    "params" : {
        "quality" : 400,
        "diameter" : 1.0,
        "flip" : false
    },
    "material" : {
        "height" : "generate",
        "diffuse" : "generate",
        "normal" : "generate",
        "specular" : "generate",
        "biomelut" : "data/tex/base/biome-smooth-lut.png",
        "biomehueshift" : -15.0,
        "heightScale" : 14.0,
        "noise" : {
            "seed" : 993390,
            "scale" : 0.1,
            "type" : "simplex",
            "fractaltype" : "ridgemulti",
            "frequency" : 5.34,
            "lacunarity" : 2.0,
            "octaves" : 10,
            "range" : [-1.4, 1.0],
            "power" : 7.5
        },
    }
}
Usually, the diffuse, height, normal and specular elements contain texture image file locations. However, if they are set with the special token "genearte", they will be procedurally generated by the system using the process described above.
Color look-up table
The color look-up table is specified in the biomelut element as a pointer to a data file. The hue shift is specified in biomehueshift, and contains the shift value in degrees.
Noise parameters
The noise parameters described in this section above can be specified in the noise attribute. The parameters translate 1-to-1 to what is described above, so they are pretty much already covered. If the noise parameters are not there, they are randomly initialized. These noise parameters are used to produce the elevation data and the humidity data.
Cloud description
The clouds description goes in the cloud attribute. It contains the size of the clouds sphere (in km) and the parameters for the model.
Then, in cloud we can either specify a texture image file, or we can use the reserved token "generate". If this is there, we can specify the noise parameters just like in the material. If the noise parameters are not there, they are randomized automatically.
"cloud" : {
    "size" : 2430.0,
    "cloud" : "generate",
    "params" : {
        "quality" : 200,
        "diameter" : 2.0,
        "flip" : false
    }
    "noise" : {
        "seed" : 1234,
        "scale" : [1.0, 1.0, 0.4],
        "type" : "simplex",
        "fractaltype" : "ridgemulti",
        "frequency" : 4.34,
        "octaves" : 6,
        "range" : [-1.5, 0.4],
        "power" : 10.0
    }
}
Atmospheric parameters description
The format for the atmospheric scattering parameters is documented in this section. If the value atmosphere is in the array of randomize, the atmospheric scattering parameters will be randomized automatically.
Procedural generation at runtime
This section describes how to modify procedural generation parameters at runtime in real time.
You can bring up the procedural generation dialog by right clicking on any planet and/or moon, and then clicking on Procedural generation…. This brings up the following dialog.
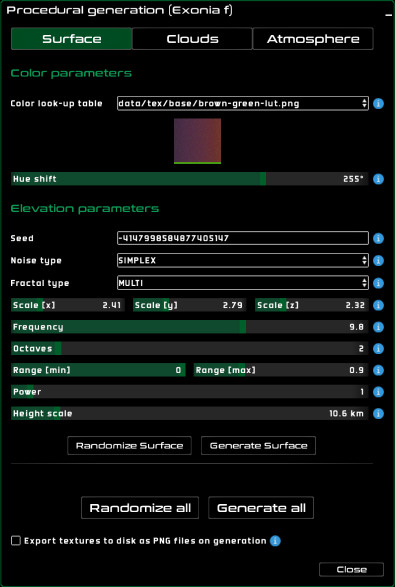
The procedural generation dialog in Gaia Sky
In it, there are three tabs for surface, clouds and atmosphere. Use the controls in each tab to modify each of the procedural generation and atmospheric scattering parameters. Apply them in real time with the generate buttons. Use the randomize buttons to randomize all the parameters.
At the bottom, there is a check box to export all the generated textures to image files and save them to disk. The save location is the directory tex/procedural within your data directory.

A few planets created using the randomize all button.