Gaia Sky tutorial (DPAC 2021)
This page contains the workshop on the general usage of Gaia Sky given at the online DPAC plenary meeting on March 17-18, 2021.
The main aim of this workshop is to provide a comprehensive introduction on the usage of the most common features of Gaia Sky. By the end of the workshop you will be able to:
Use the basic controls to navigate the scene
Find your way around the Gaia Sky user interface
Locate basic information like the current focus, the nearest object to the camera, etc.
Display and understand the debug information panel
Activate/deactivate time and change the time warp factor
Change camera modes and camera settings
Use the special render modes (3D, planetarium, 360)
Enable/disable components’ visibility
Show and modify the properties of proper motion vectors
Control star appearance using the visual settings panel
Load additional datasets in
.vot,.csvor.fitsHide/show and highlight datasets, and map attributes to color
Apply basic filters to datasets
Use the archive view and the extra information panel
Record and play back a camera file
Use keyframes to define a camera path
Write and run very basic Python scripts using the Gaia Sky API
This workshop does not deal with the following items:
Installation in different operating systems
Performance tuning and optimisation (memory, GPU, etc.)
Data descriptors and formats
Internal workings of Gaia Sky
Internal reference system
Level-of-detail catalogs
VR mode setup and configuration
System folders (location, content, etc.)
Running Gaia Sky from source, CLI arguments, etc.
In-depth video production
Bookmarking system
Connecting Gaia Sky instances in master-slave configuration
Multi-display setups, dome, MPCDI, etc.
External view mode
Estimated duration: 1.5 hours
Before starting…
In order to follow the course it is recommended, albeit not required, to have a local installation of Gaia Sky so that you can explore and try out the teachings for yourself. In order to install Gaia Sky, follow the instructions for your operating system in the installation section of the Gaia Sky documentation.
When you start Gaia Sky for the first time, you will be greeted with the welcome screen pictured below. Initially the Start Gaia Sky button will be grayed out, as you need to download the data packages before Gaia Sky can start. To do so, click on the Dataset manager button.
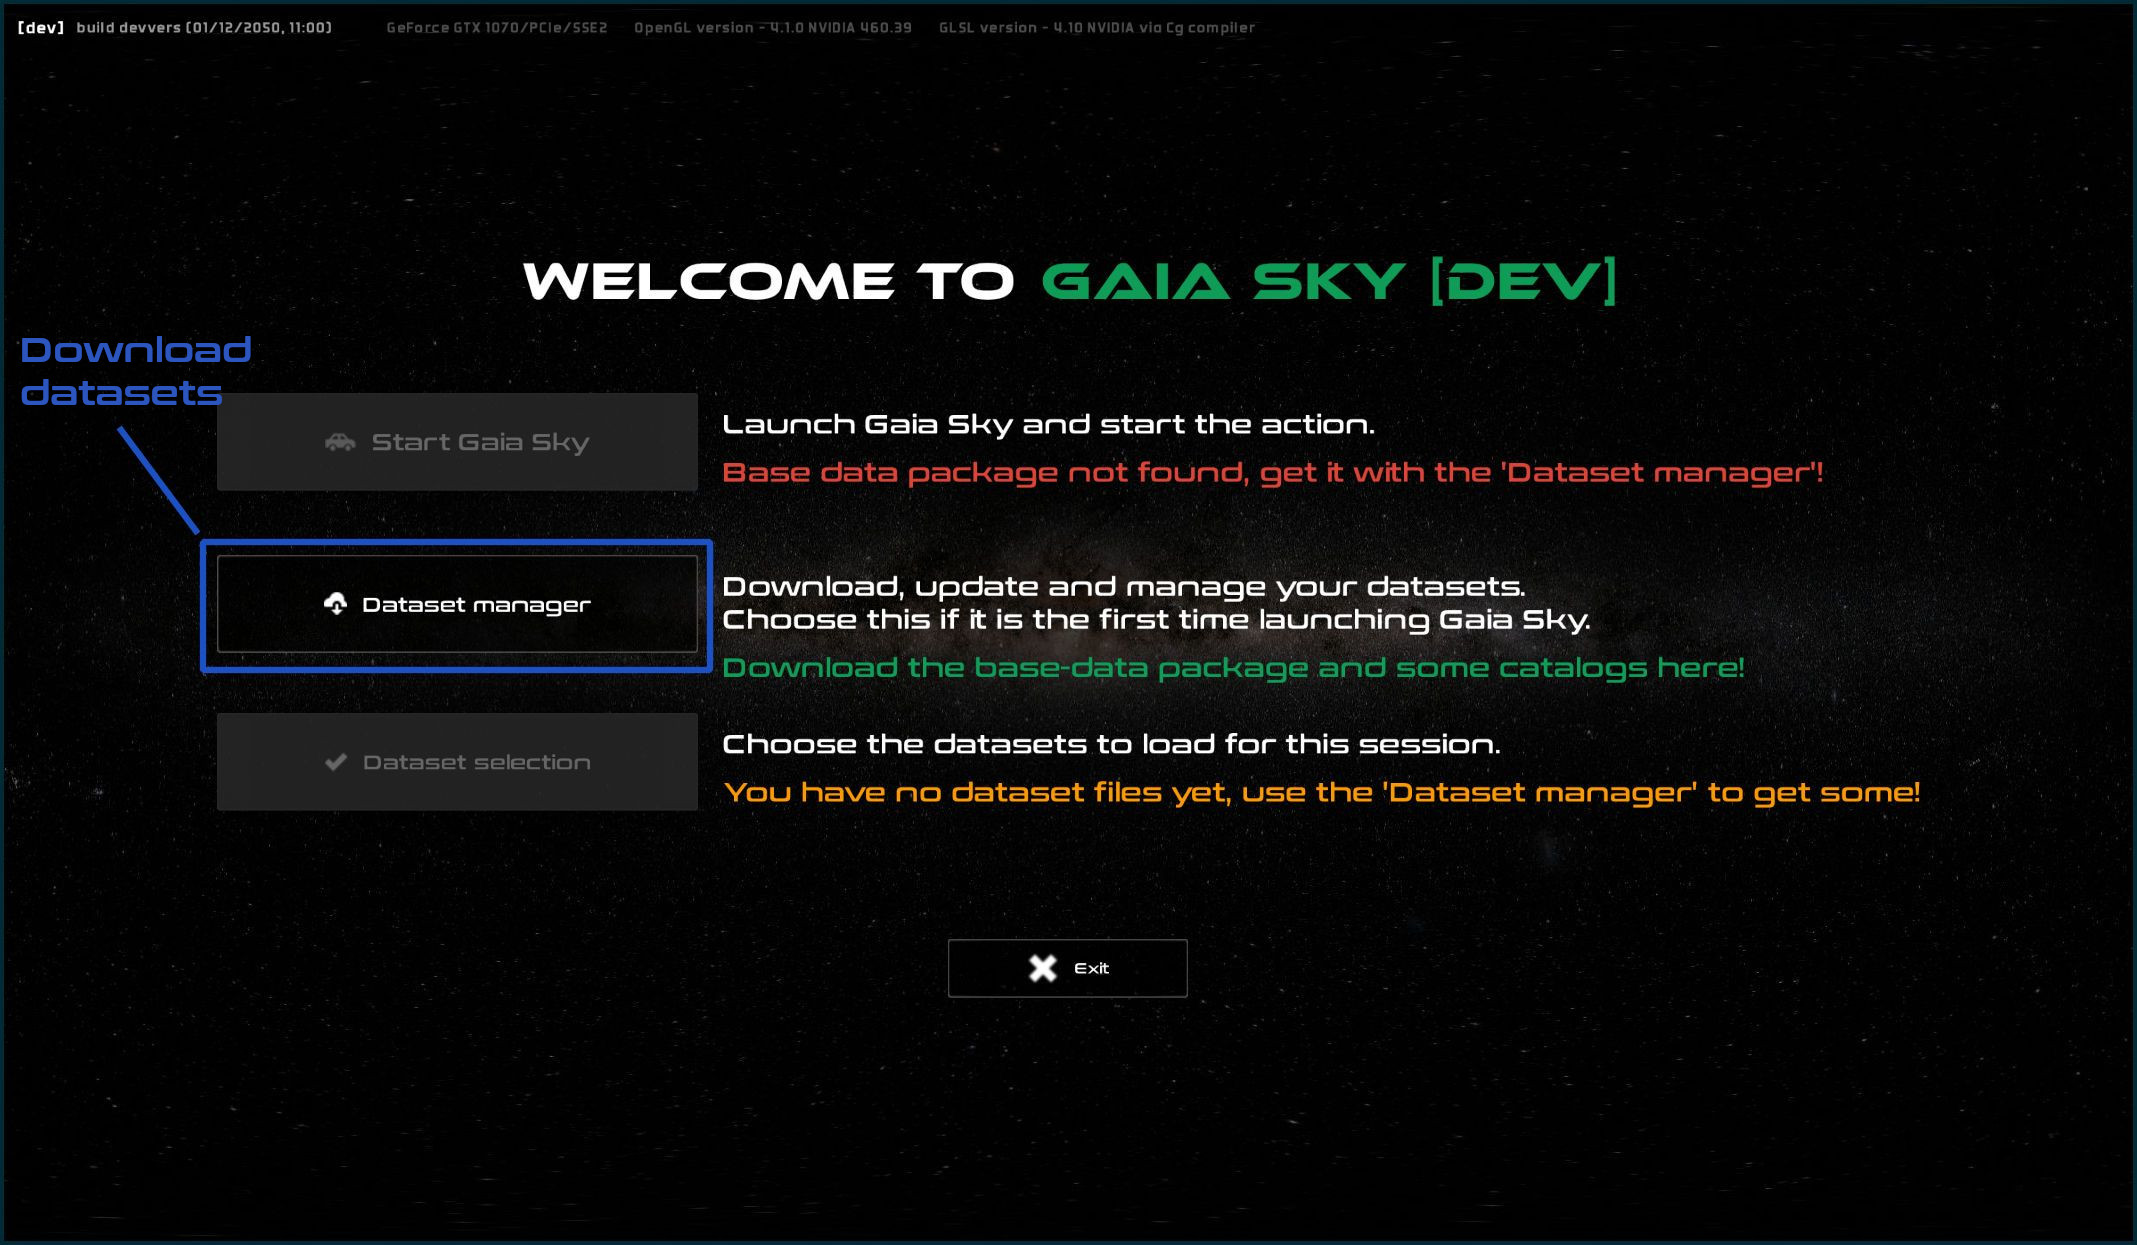
Welcome window at the first start of Gaia Sky
Then select at least the following data packages:
Base data pack– Should be selected by default, contains the Solar System and some other basic dataGaia eDR3 small,Hipparcosor another star catalog – The star catalog. Note that usually only one star catalog should be loaded at once. The Gaia eDR3 catalogs for Gaia Sky already contain Hipparcos!NBG catalog– Nearby Galaxies CatalogSDSS DR12(small) orSDSS DR14(large) – Sloan Digital Sky Survey catalog, distant galaxiesOpen Clusters DR2– Open clusters catalog based on DR2 dataNebulae– Some nebulae textures
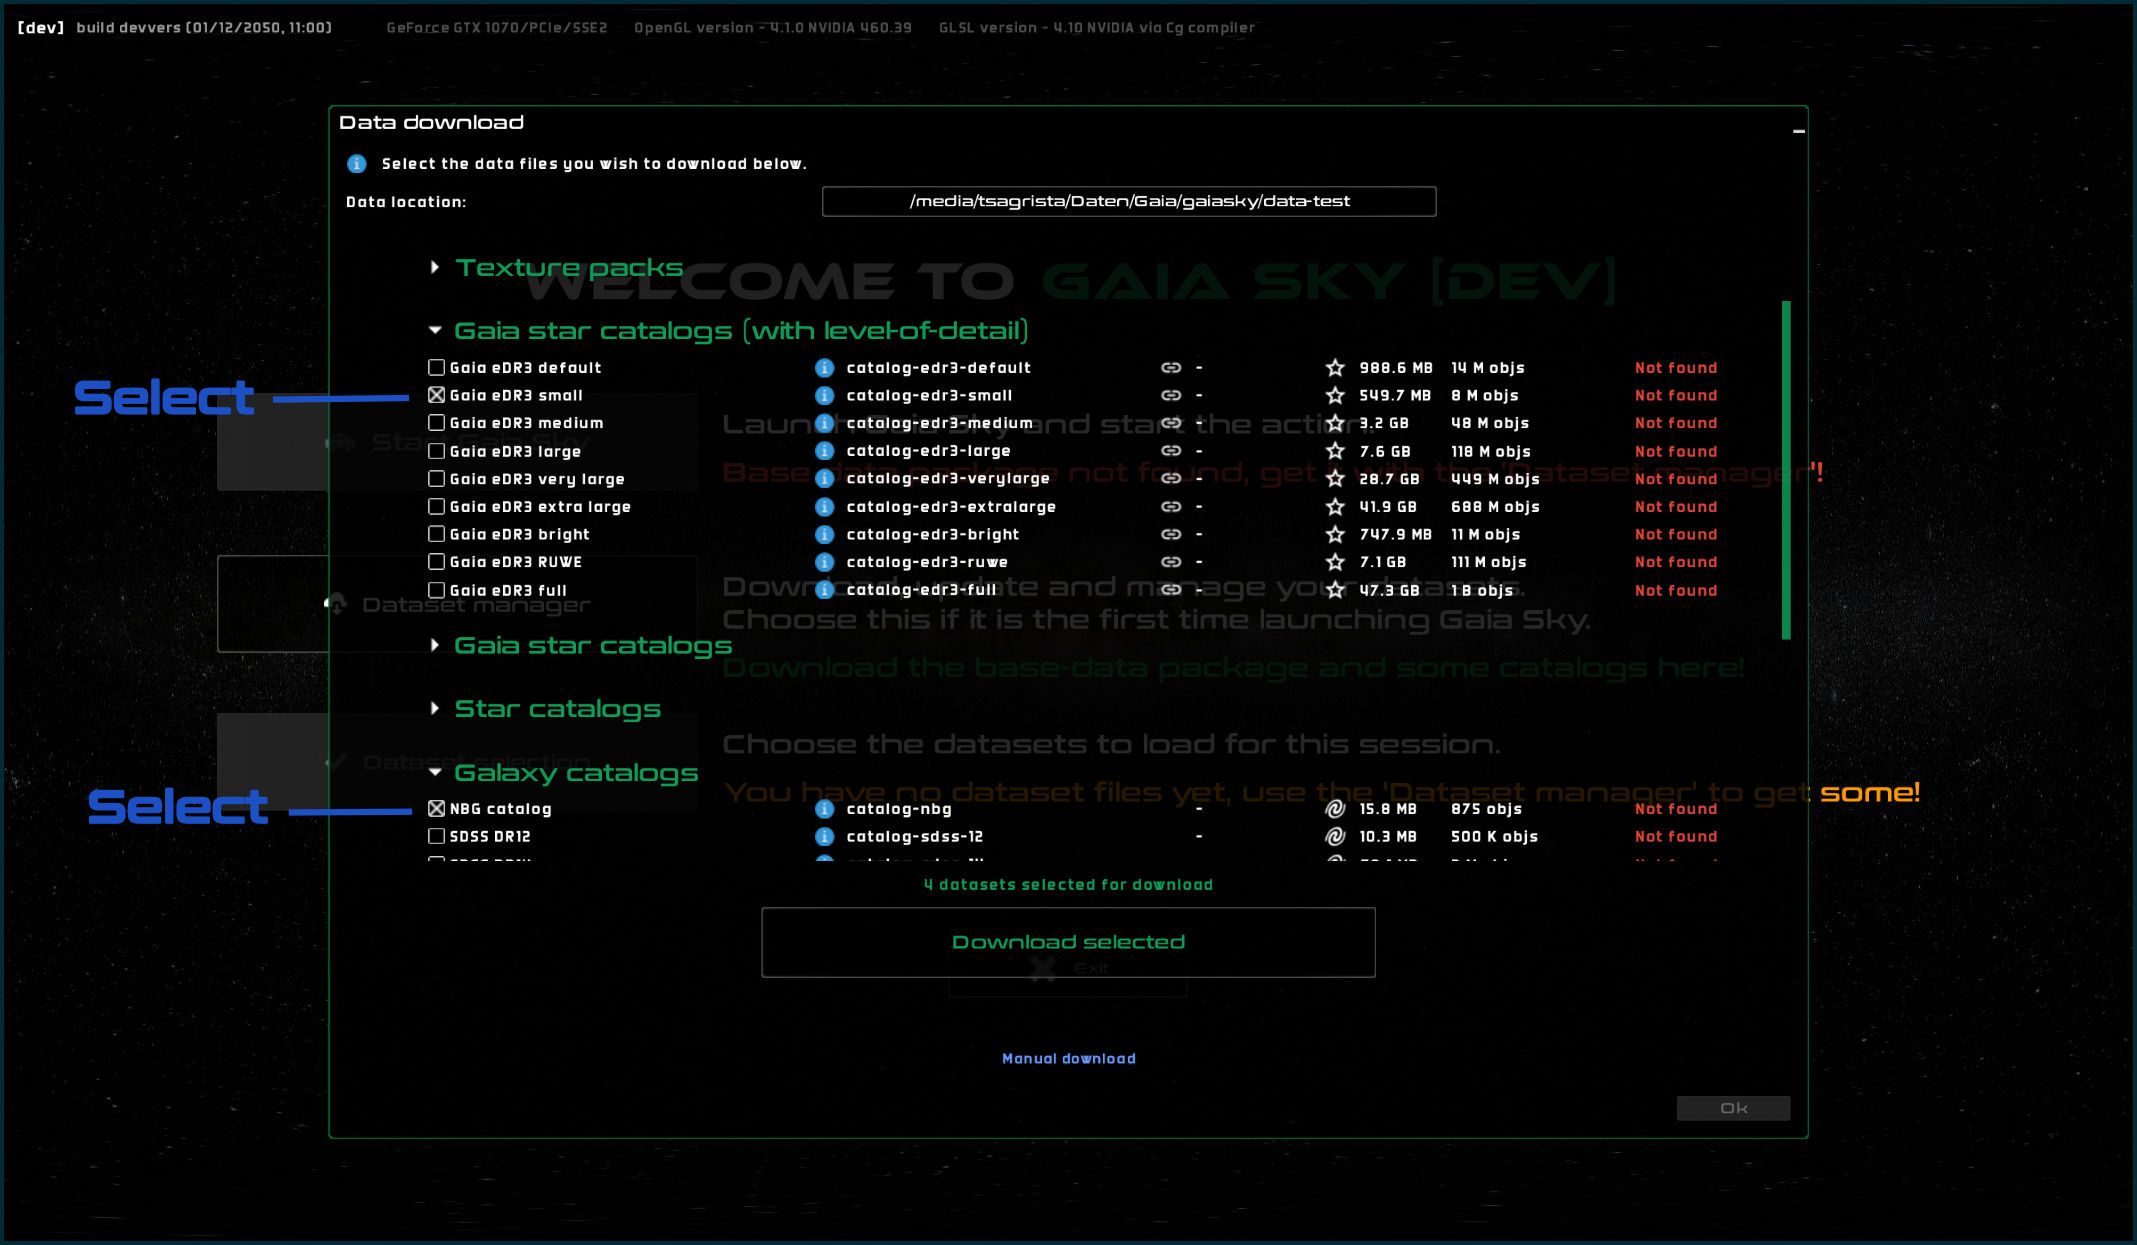
The download manager of Gaia Sky
Then click on Download selected and wait for Gaia Sky to download and extract your catalogs. Once the downloads have finished, close the window with Ok. Then you can go ahead and start Gaia Sky by clicking on Start Gaia Sky.
Hint
By default Gaia Sky automatically selects all downloaded packages for you. However, you can override this by selecting/unselecting packages each session using the Dataset selection button in the welcome screen.
Basic controls
When Gaia Sky is ready to go, you will be presented with this screen:
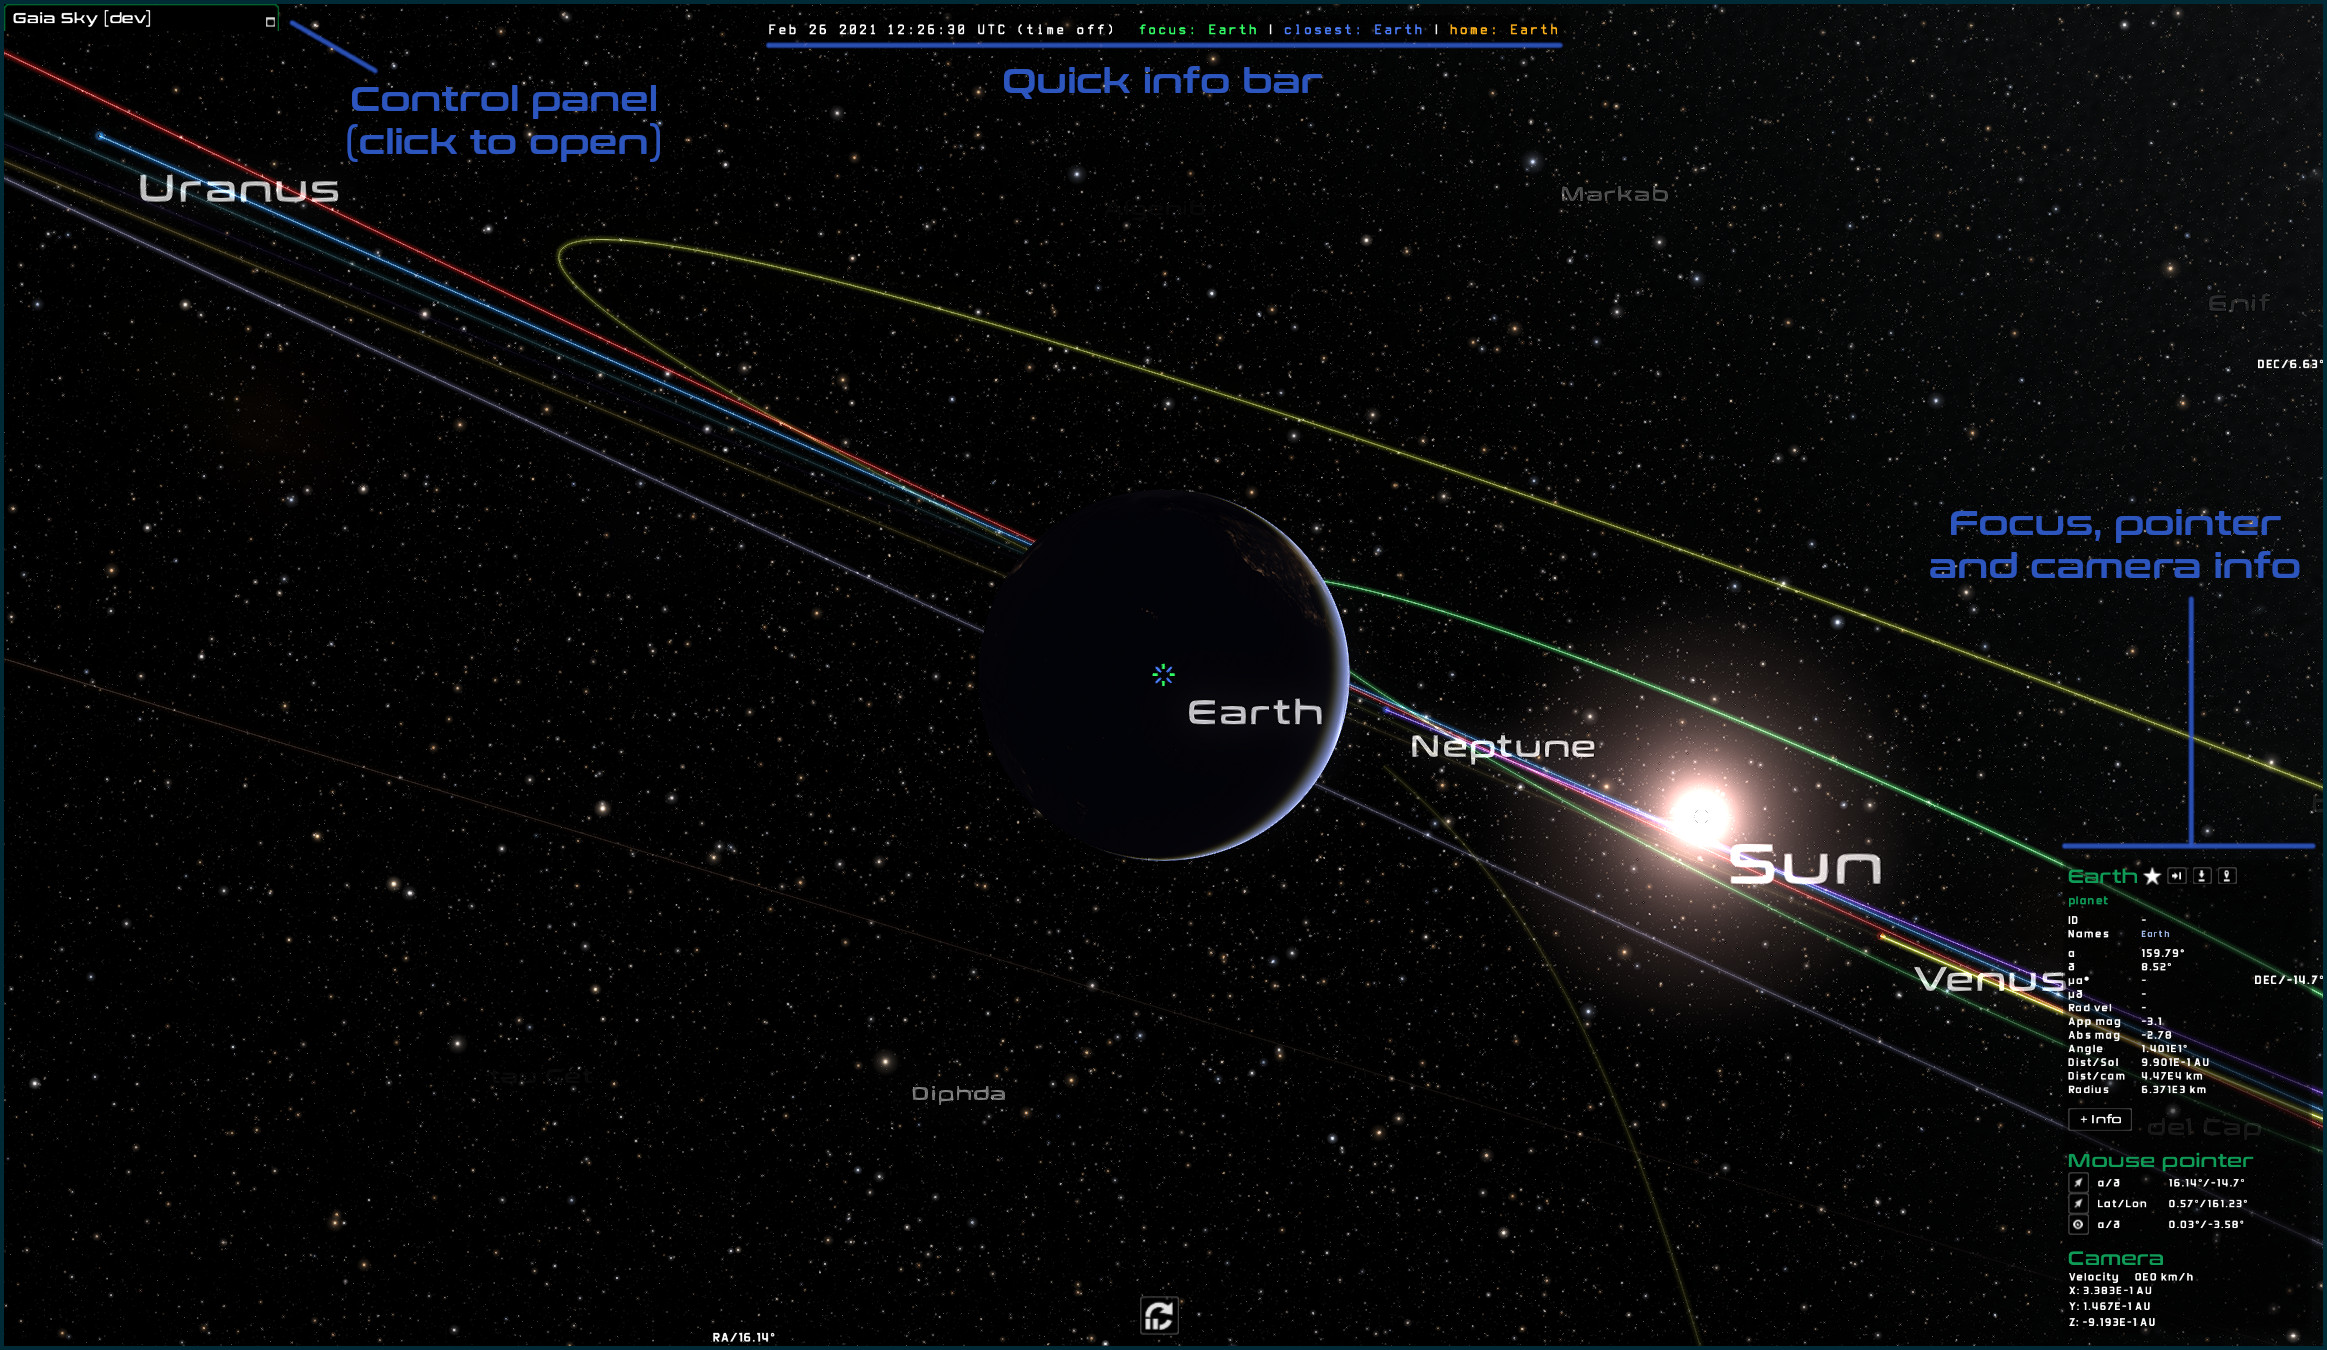
Gaia Sky default scene
In it you can see a few things already. To the bottom right the focus panel tells you that you are in focus mode, meaning that all our movement is relative to the focus object. The default focus of Gaia Sky is the Earth. You can also see in the quick info bar at the top that our focus is the Earth, and that the closest object to our location is also the Earth. Additionally you see that your home object is again the Earth. Finally the control panel is collapsed at the top left. If you click on it, the panel opens. We will use it later.
Movement
But right now let’s try some movement. In focus mode the camera will by default orbit around the focus object. Try clicking and dragging with your left mouse button. The camera should orbit around the Earth showing parts of the surface which were previously hidden. You will notice that the whole scene rotates. Now try scrolling with your mouse wheel. The camera will move either farther away from (scroll down) or closer up to (scroll up) the Earth. Now, if you click and drag with your right mouse button, you can offset the focus object from the center, but your movement will still be relative to it.
You can also use your keyboard arrows ← ↑ → ↓ to orbit left or right around the focus object, or move closer to or away from it.
You can use shift with a mouse drag in order to roll the camera.
More information on the controls is available in the controls section of the Gaia Sky user manual.
Selection
You can change the focus by simply double clicking on any object on the scene. You can also press f to bring up the search dialog where you can look up objects by name. Try it now. Press f and type in “mars”, without the quotes, and hit esc. You should see that the camera now points in the direction of Mars. To actually go to Mars simply scroll up until you reach it, or click on the  icon next to the name in the focus info panel. If you do so, Gaia Sky takes control of the camera and brings you to Mars.
If you want to move instantly to your current focus object, hit ctrl + g.
At any time you can use the home key in your keyboard to return back to Earth or whatever home object you have defined in the configuration file.
The User Interface
The user interface of Gaia Sky consists of basically two components: keyboard shortcuts and a graphical user interface in the form of the control panel.

Gaia Sky user interface with the most useful functions
Control panel
Hint
The control panel is described in detail in its own section of the Gaia Sky user manual.
The control panel is made up of different panes: Time, Camera, Type visibility, Visual settings, Datasets, Bookmarks and Music. In this tutorial we will only explore the first six. Each pane can be expanded (with ![]() ), collapsed (with
), collapsed (with ![]() ) and detached (with
) and detached (with ![]() ).
).
To the bottom of the control panel we can find a few buttons to perform special actions like:
 Toggle the minimap
 Load a dataset
 Open the preferences window
 Show the session log
 Show the help dialog
 Exit Gaia Sky
Quick info bar
To the top of the screen you can see the quick info bar which provides information on the current time, the current focus object (if any), the current closest object to our location and the current home object. The colors of these objects (green, blue, orange) correspond to the colors of the crosshairs. The crosshairs can be enabled or disabled from the interface tab in the preferences window (use p to bring it up).
Debug panel
Gaia Sky has a built-in debug information panel that provides system information and is hidden by default. You can bring it up with ctrl + d, or by ticking the “Show debug info” check box in the system tab of the preferences window. By default, the debug panel is collapsed.

Collapsed debug panel
You can expand it with the + symbol to get additional information.

Expanded debug panel
As you can see, the debug panel shows information on the current graphics device, system and graphics memory, the amount of objects loaded and on display, the octree (if a LOD dataset is in use) or the SAMP status.
Additional debug information can be obtained in the system tab of the help dialog (? or h).
Time controls
Gaia Sky can simulate time. Play and pause the simulation using the ![]() /
/![]()
Play/Pause buttons in the time pane, or toggle using Space. You can also change the time warp, which is expressed as a scaling factor, using the provided Warp factor slider. Use , or ![]() and . or
and . or ![]() to divide by 2 and double the value of the time warp, respectively.
to divide by 2 and double the value of the time warp, respectively.

Warp factor slider
Now, go ahead and press home. This will bring us back to Earth. Now, start the time with ![]() or space and drag the slider slightly to the right to increase its speed. You will see that the Earth rotates faster and faster as you move the slider to the right. Now, drag it to the left until time is reversed and the Earth starts rotating in the opposite direction. Now time is going backwards!
or space and drag the slider slightly to the right to increase its speed. You will see that the Earth rotates faster and faster as you move the slider to the right. Now, drag it to the left until time is reversed and the Earth starts rotating in the opposite direction. Now time is going backwards!
If you set the time warp high enough you will notice that as the bodies in the Solar System start going crazy, the stars start to slightly move. That’s right: Gaia Sky also simulates proper motions.
Camera modes
We have already talked about the focus camera mode, but Gaia Sky provides many more Camera modes:
0 - Free mode: the camera is not locked to a focus object and can roam freely. The movement is achieved with the scroll wheel of your mouse, and the view is controlled by clicking and draggin the left and right mouse buttons
1 - Focus mode: the camera is locked to a focus object and its movement depends on it
2 - Game mode: similar to free mode but the camera is moved with wasd and the view (pitch and yaw) is controlled with the mouse. This control system is commonly found in FPS (First-Person Shooter) games on PC
3 - Gaia mode: the camera can’t be controlled, as it follows Gaia only
4 - Spacecraft mode: take control of a spacecraft (outside the scope of this tutorial)
5, 6, 7 - Fov modes: project the fields of view of Gaia on the screen
The most interesting mode is free mode which lets us roam freely. Go ahead and press 0 to try it out. The controls are a little different from those of focus mode, but they should not be to hard to get used too. Basically, use your left mouse button to yaw and pitch the view, use shift to roll, and use the right mouse button to pan.
Special render modes
There are three special render modes: 3D mode, planetarium mode and panorama mode. You can access these modes using the buttons at the bottom of the camera pane or the following shortcuts:
 or ctrl + s - 3D mode
 or ctrl + p - Planetarium mode
 or ctrl + k - Panorama mode
Toggle visibility of components
The visibility of most graphical elements can be switched off and on using the buttons in the type visibility pane in the control panel.
For example you can hide the stars by clicking on the
stars ![]() button. The object types available are the following:
button. The object types available are the following:
 – Stars
 – Planets
 – Moons
 – Satellites
 – Asteroids
 – Star clusters
 – Milky Way
 – Galaxies
 – Nebulae
 – Meshes
 – Equatorial grid
 – Ecliptic grid
 – Galactic grid
 – Labels
 – Titles
 – Orbits
 – Locations
 – Countries
 – Constellations
 – Constellation boundaries
 – Rulers
 – Particle effects
 – Atmospheres
 – Clouds
 – Axes
 – Velocity vectors
 – Others
Velocity vectors
One of the elements, the velocity vectors, enable a few properties when selected. See the velocity vectors section in the Gaia Sky user manual for more information on that.
Number factor – control how many velocity vectors are rendered. The stars are sorted by magnitude (ascending) so the brightest stars will get velocity vectors first
Length factor – length factor to scale the velocity vectors
Color mode – choose the color scheme for the velocity vectors
Show arrowheads – Whether to show the vectors with arrow caps or not
Hint
Control the width of the velocity vectors with the line width slider in the visual settings pane.
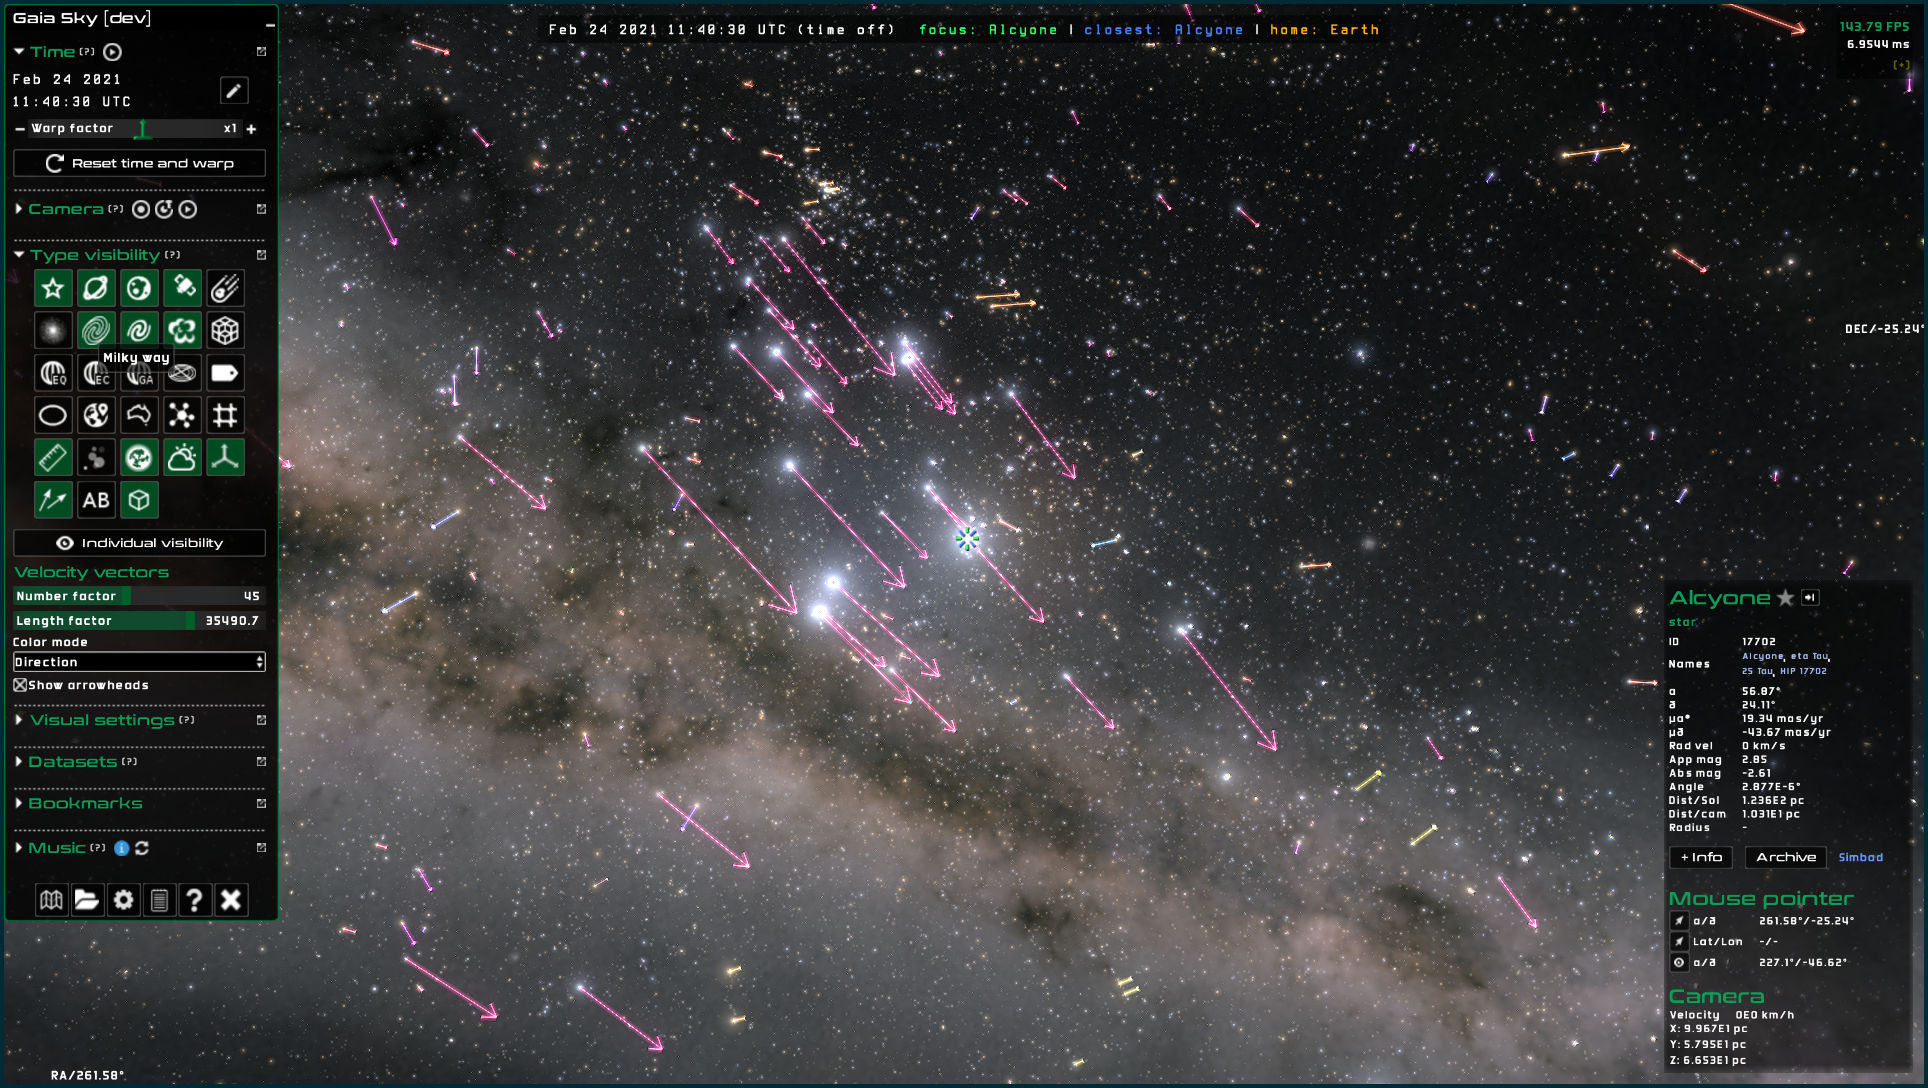
Velocity vectors in Gaia Sky
Visual settings
The visual settings pane contains a few options to control the shading of stars and other elements:
Brightness power – exponent of power function that controls the brightness of stars. Makes bright stars brighter and faint stars fainter
Star brightness – control the brightness of stars
Star size (px) – control the size of point-like stars
Min. star opacity – set a minimum opacity for the faintest stars
Ambient light – control the amount of ambient light. This only affects the models such as the planets or satellites
Line width – control the width of all lines in Gaia Sky (orbits, velocity vectors, etc.)
Label size – control the size of the labels
Elevation multiplier – scale the height representation for planets with elevation maps

The visual settings pane
Loading external datasets
Gaia Sky supports the loading of external datasets at runtime. Right now, VOTable, csv and FITS formats are supported. Gaia Sky needs some metadata in the form of UCDs or column names in order to parse the dataset columns correctly. Refer to the STIL data provider section of the Gaia Sky user manual for more information on how to prepare your dataset for Gaia Sky.
The datasets loaded in Gaia Sky at a certain moment can be found in the Datasets pane of the control panel.
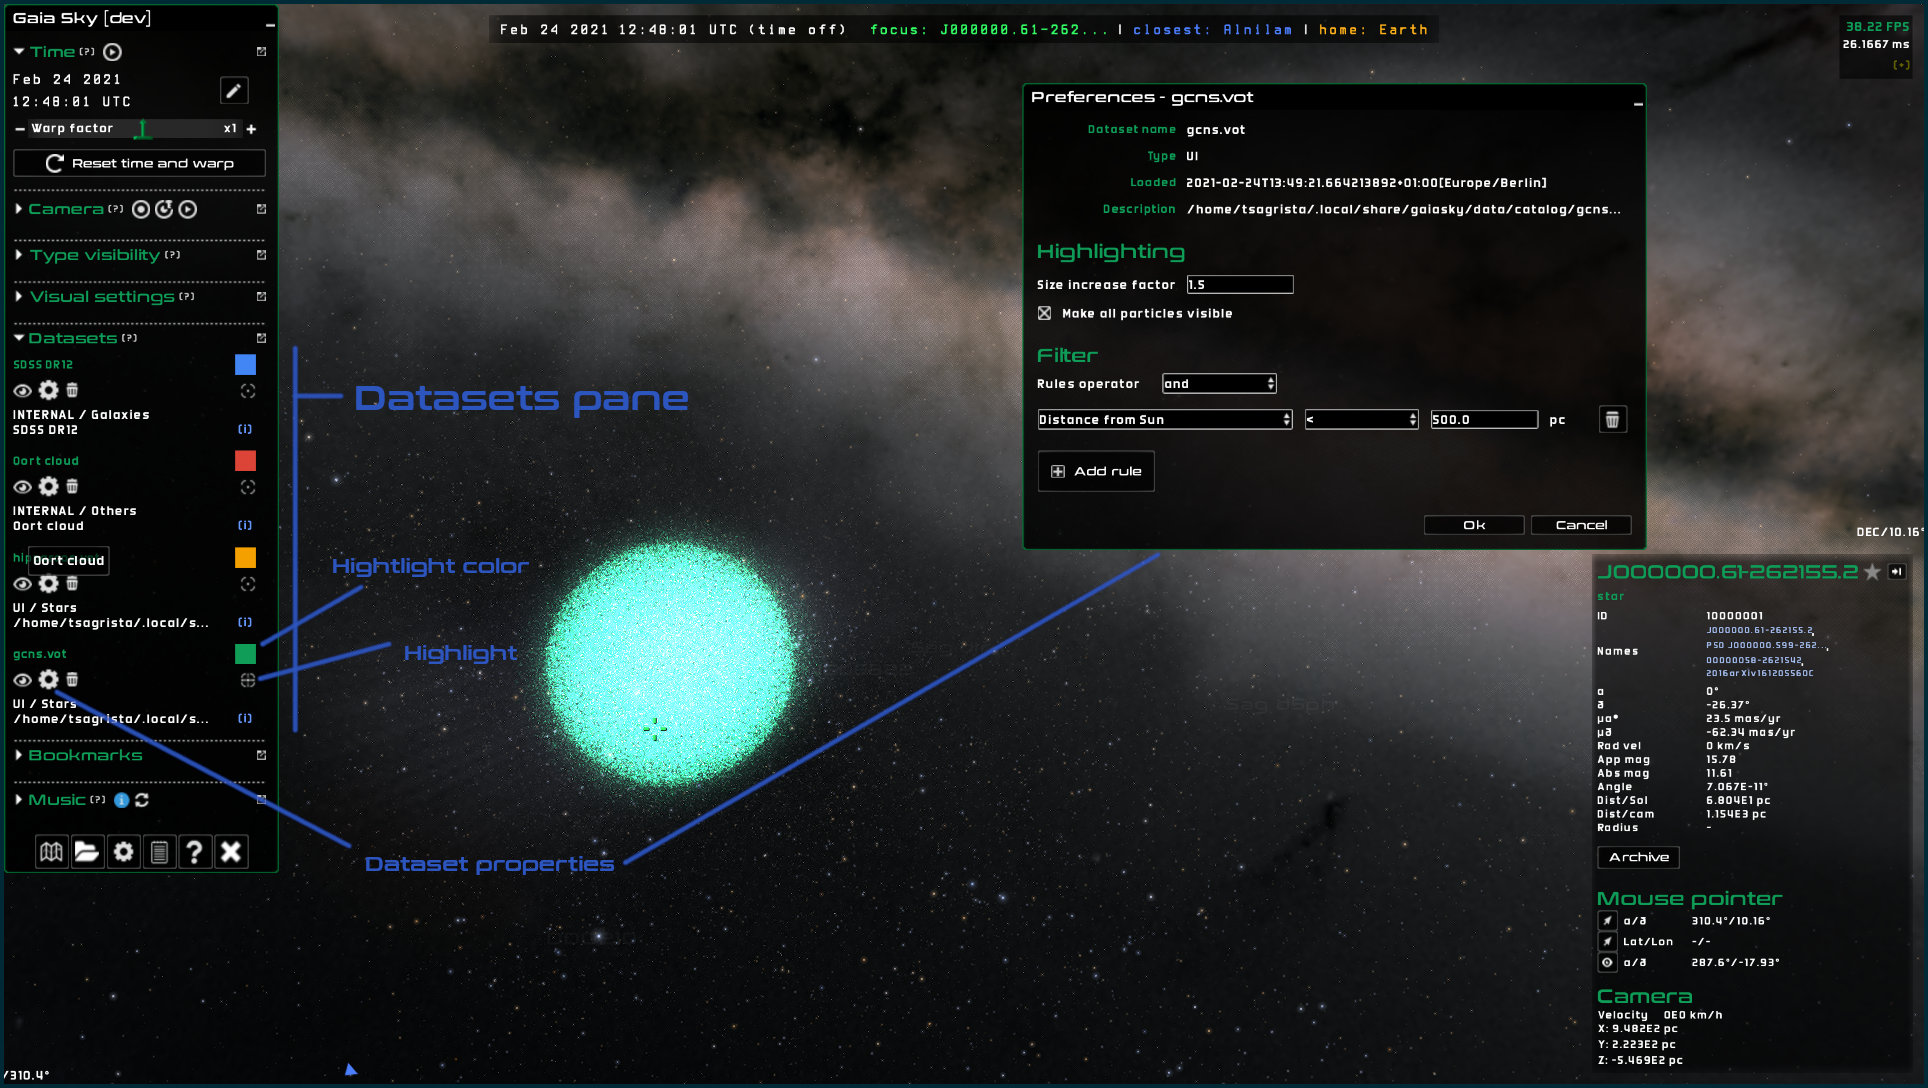
Datasets pane of Gaia Sky
There are three main ways to load new datasets into Gaia Sky:
Directly from the UI, using the
button or pressing ctrl + oThrough SAMP, via a connection to another astronomy software package such as Topcat or Aladin
Via a script (addressed later on in the workshop if time allows)
Loading a dataset from the UI – Go ahead and remove the current star catalog (either eDR3 or hipparcos) by clicking on the ![]() icon in the datasets pane. Now, download a raw Hipparcos dataset VOTable, click on the
icon in the datasets pane. Now, download a raw Hipparcos dataset VOTable, click on the ![]() icon (or press ctrl + o) and select the file. In the next dialog just click Ok to start loading the catalog. In a few moments the Hipparcos new reduction dataset should be loaded into Gaia Sky.
icon (or press ctrl + o) and select the file. In the next dialog just click Ok to start loading the catalog. In a few moments the Hipparcos new reduction dataset should be loaded into Gaia Sky.
Loading a dataset via SAMP – This section presupposes that Topcat is installed on the machine and that the user knows how to use it to connect to the VO to get some data. The following video demonstrates how to do this (mirror):
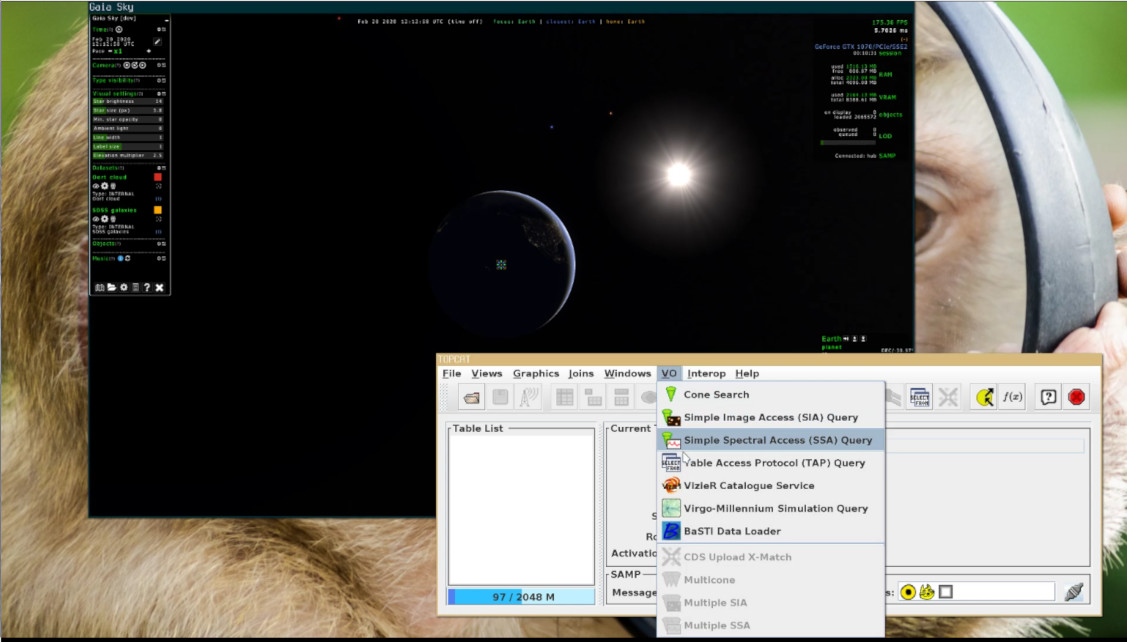
Loading a dataset from Topcat through SAMP (click for video)
Loading a dataset via scripting – Wait for the scripting section of this course.
Working with datasets
All datasets loaded are displayed in the datasets pane in the control panel. A few useful tips for working with datasets:
The visibility of individual datasets can be switched on and off by clicking on the
 button
Remove datasets with the
 button
You can highlight a dataset by clicking on the
 button. The highlight color is defined by the color selector right on top of it. Additionally, we can map an attribute to the highlight color using a color map. Let’s try it out:
Click on the color box in the Hipparcos dataset we have just loaded from Topcat via SAMP
Select the radio button “Color map”
Select the rainbow color map
Choose your attriubte. In this case, we will use the number of transits, ntr
Click Ok
Click on the highlight dataset
icon to apply the color map
You can define basic filters on the objects of the dataset using their attributes from the dataset preferences window
 . For example, we can filter out all stars with \(\delta > 50^{\circ}\):
Click on the dataset preferences button
Click on Add filter
Select your attribute (declination \(\delta\))
Select your comparator (\(<\))
Enter your value, in this case 50
Click Ok
The stars with a declination greater than 50 degrees should be filtered out
Multiple filters can be combined with the AND and OR operators
External information
Gaia Sky offers three ways to display external information on the current focus object: Wikipedia, Gaia archive and Simbad.
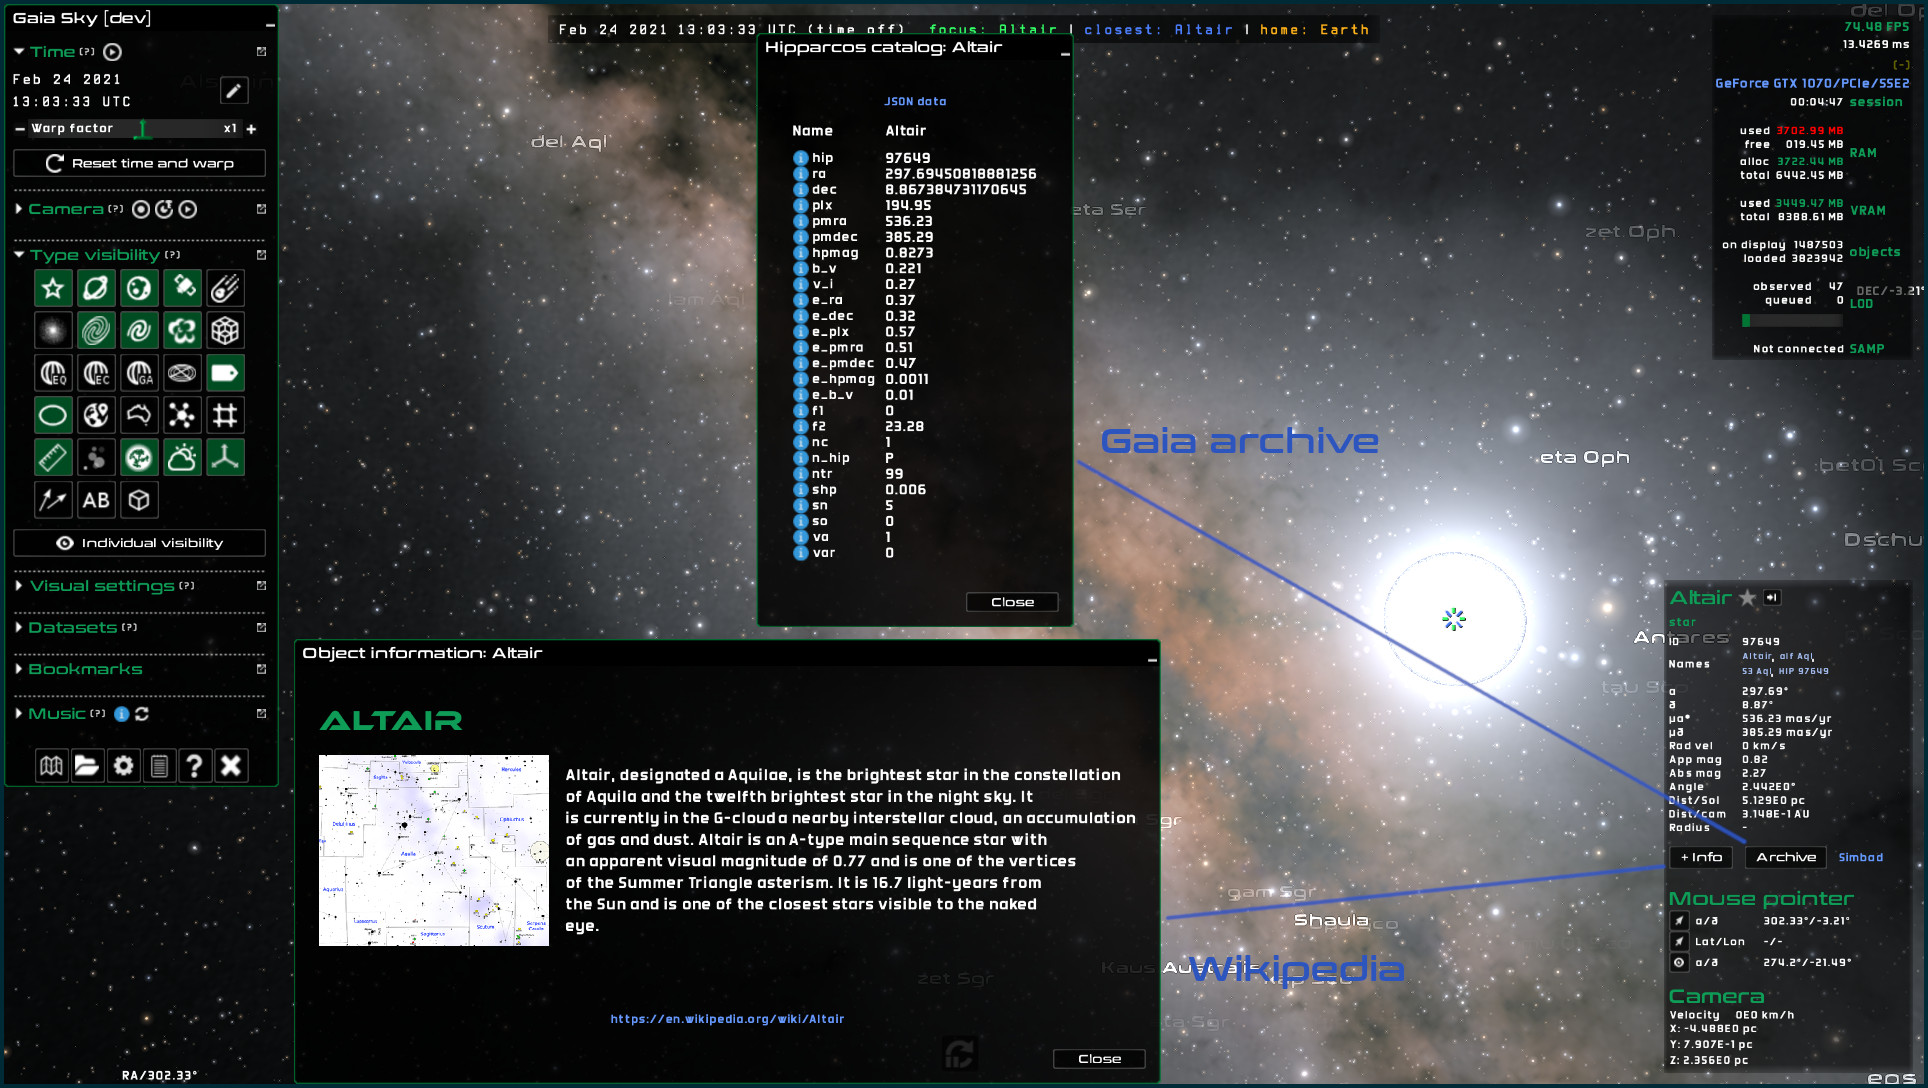
Wikipedia, Gaia archive and Simbad connections
When the +Info button appears in the focus info pane, it means that there is a Wikipedia article on this object ready to be pulled and displayed in Gaia Sky
When the Archive button appears in the focus info pane, it means that the full table information of selected star can be pulled from the Gaia archive
When the
Simbadlink appears in the focus info pane, it means that the objects has been found on Simbad, and you can click the link to open it in your web browser
Camera paths
Gaia Sky includes a feature to record and play back camera paths. This comes in handy if you want to showcase a certain itinerary through a dataset, for example.
Recording a camera path – The system will capture the camera state at every frame and save it into a .gsc (for Gaia Sky camera) file. You can start a recording by clicking on the ![]() icon in the camera pane of the control panel. Once the recording mode is active, the icon will turn red
icon in the camera pane of the control panel. Once the recording mode is active, the icon will turn red ![]() . Click on it again in order to stop recording and save the camera file to disk with an auto-generated file name (default location is
. Click on it again in order to stop recording and save the camera file to disk with an auto-generated file name (default location is $GS_DATA/camera (see the folders section in the Gaia Sky documentation).
Playing a camera path – In order to playback a previously recorded .gsc camera file, click on the ![]() icon and select the desired camera path. The recording will start immediately.
icon and select the desired camera path. The recording will start immediately.
Hint
Mind the FPS! The camera recording system stores the position of the camera for every frame! It is important that recording and playback are done with the same (stable) frame rate. To set the target recording frame rate, edit the “Target FPS” field in the camcorder settings of the preferences window. That will make sure the camera path is using the right frame rate. In order to play back the camera file at the right frame rate, you can edit the “Maximum frame rate” input in the graphics settings of the preferences window.
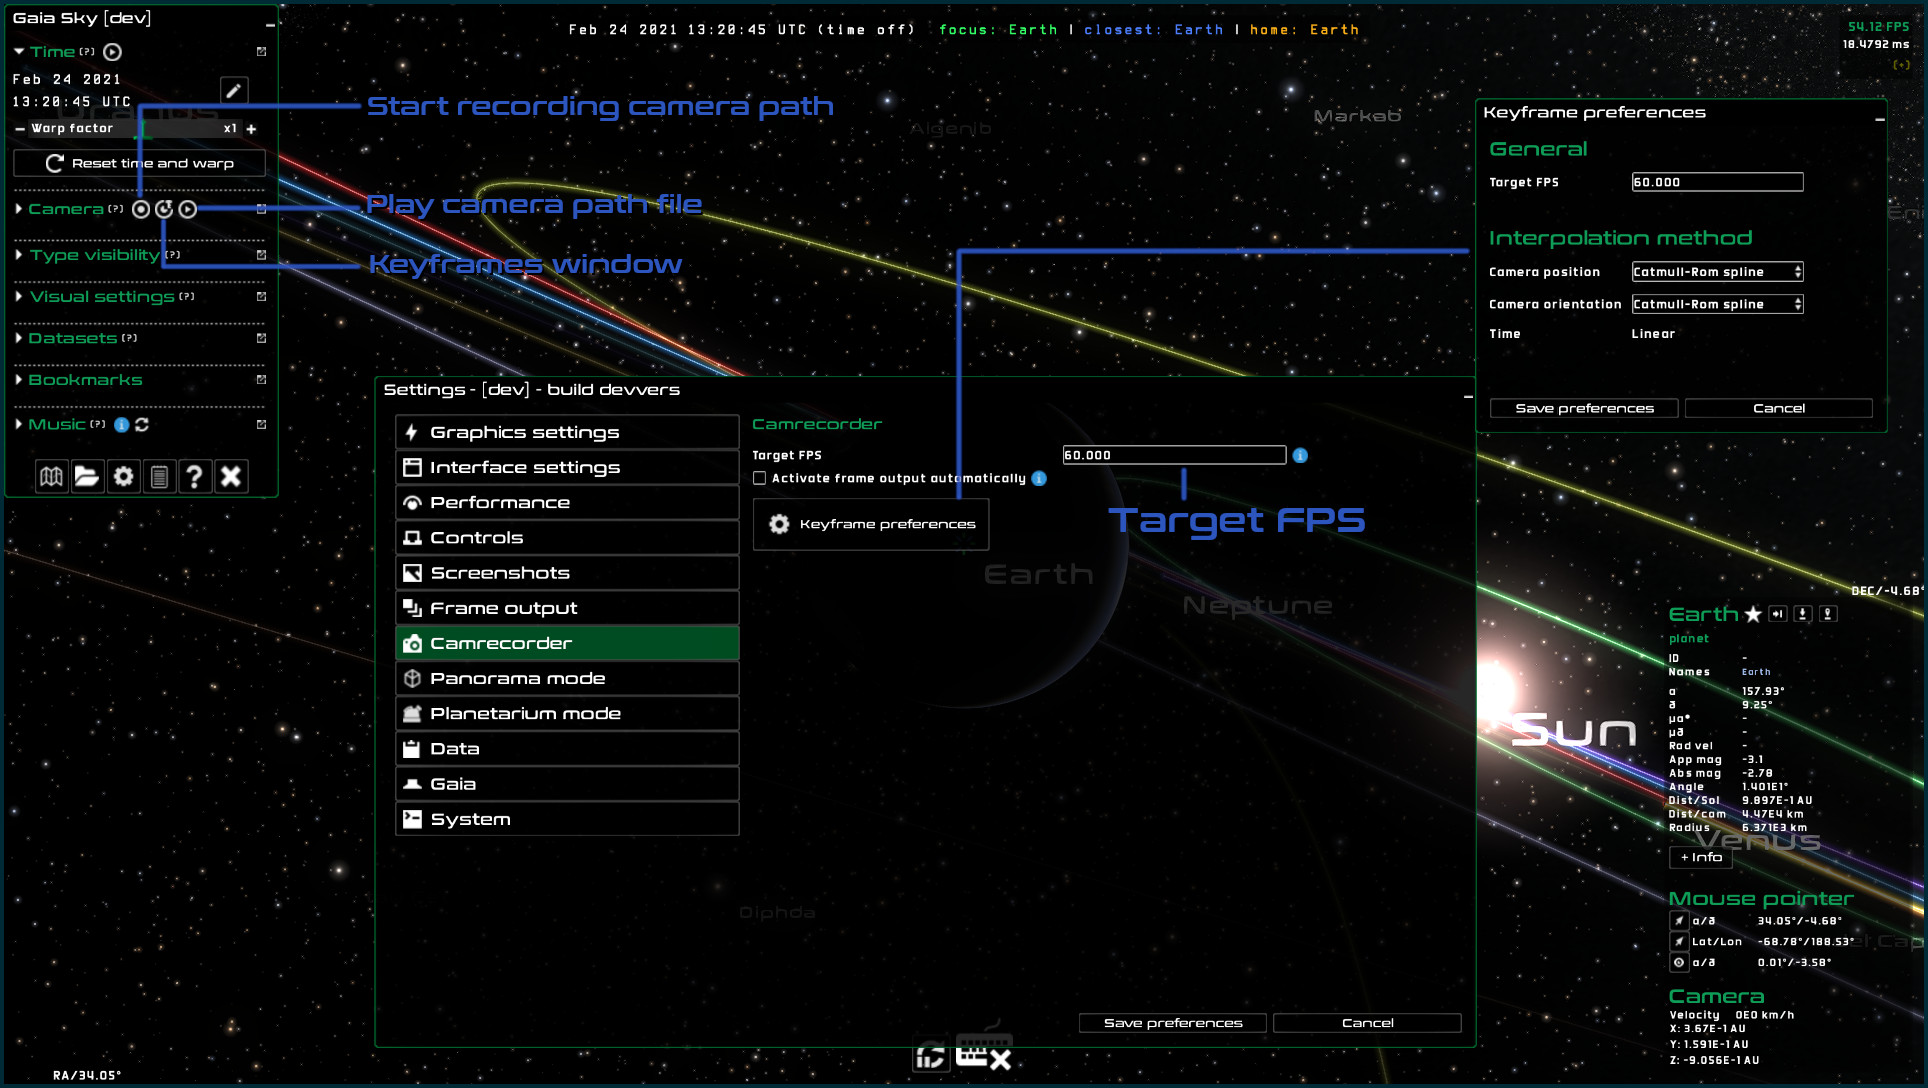
Location of the controls of the camcorder in Gaia Sky
More information on camera paths in Gaia Sky can be found in the camera paths section of the Gaia Sky user manual.
Keyframe system
The camera path system offers an additional way to define camera paths based on keyframes. Essentially, the user defines the position and orientation of the camera at certain times and the system generates the camera path from these definitions. Gaia Sky incorporates a whole keyframe definition system which is outside the scope of this tutorial.
As a very short preview, in order to bring up the keyframes window to start defining a camera path, click on the icon ![]() .
.
More information on the keyframe system can be found in the keyframe system subsection of the Gaia Sky user manual.
Frame output system
In order to create high-quality videos, Gaia Sky offers the possibility to export every single still frame to an image file. The resolution of these still frames can be set independently of the current screen resolution.
You can start the frame output system by pressing F6. Once active, the frame rate will go down (each frame is being saved to disk). The save location of the still frame images is, by default, $GS_DATA/frames/[prefix]_[num].jpg, where [prefix] is an arbitrary string that can be defined in the preferences. The save location, mode (simple or advanced), and the resolution can also be defined in the preferences.
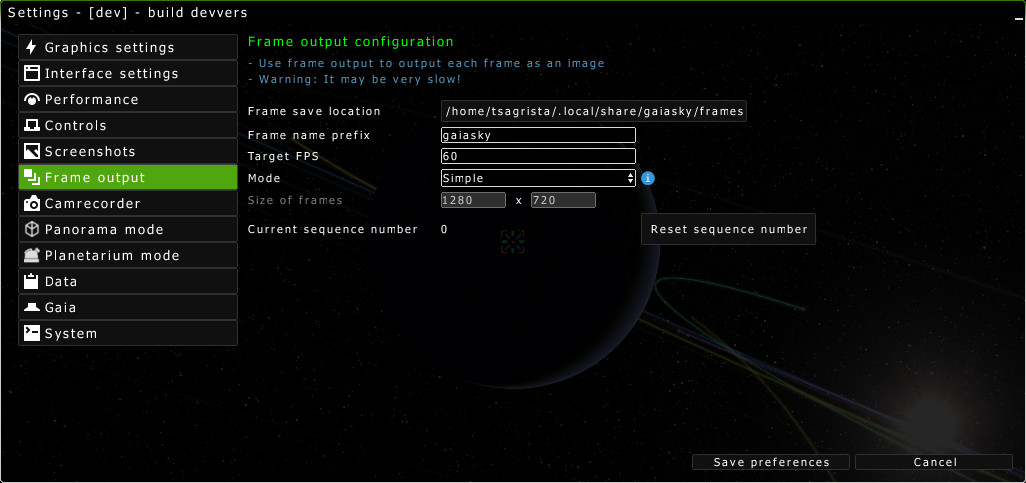
The configuration screen for the frame output system
Once we have the still frame images, we can convert them to a video using ffmpeg or any other encoding software. Additional information on how to convert the still frames to a video can be found in the capturing videos section of the Gaia Sky user manual.
Scripting
This section includes a hands-on session inspecting pre-existing scripts and writing new ones to later run them on Gaia Sky.
More information on the scripting system can be found in the scripting section of the Gaia Sky user manual.
Conclusion
In this tutorial we have walked through the basic usage and options of Gaia Sky. We have learned about the controls, the camera modes, the user interface, the time operation, the different render modes, the visibility of components, external datasets and filters, camera paths and keyframes, and the scripting subsystem.
There is much much more to Gaia Sky, so if you are interested to continue learning, I’d suggest to have a look at these additional resources: