Settings and configuration
Gaia Sky can be configured using the on-screen control panel and preferences window.
Bring up the preferences window by clicking on the preferences icon ![]() in
the Controls pane.
However, very few features are not represented in the GUI, so you may need
to dive deep into the configuration file.
in
the Controls pane.
However, very few features are not represented in the GUI, so you may need
to dive deep into the configuration file.
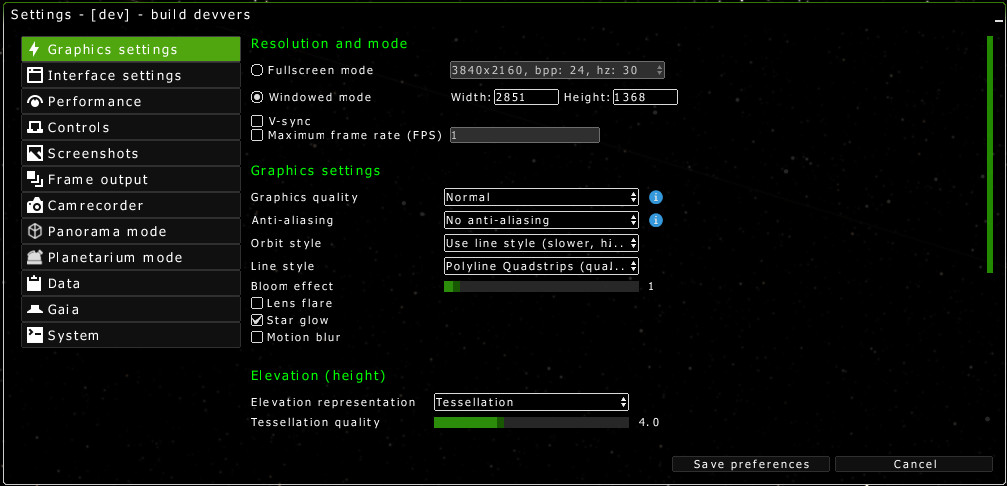
The graphics settings in Gaia Sky
Graphics settings
Please refer to the Graphics configuration chapter.
Interface settings
The Interface settings section allows the user to set the language and the
theme of the user interface.
Language – choose the language of the interface. Changes are applied immediately after clicking on
Save preferences.Interface theme – select the UI skin or theme. The available themes are:
dark-green, black and green theme.dark-blue, black and blue theme.dark-orange, orange and blue theme.bright-green, a bright theme with greenish tones.night-red, a red theme for low-light environments.
UI scale factor – if you have a high pixel density display (HiDPI) you may want to scale the user interface up. This slider applies a fractional scaling factor to all of the user interface. Set it to larger than one in order to increase the interface size, and lower than one to reduce it size. The scaling is applied on the fly when you click on the
Save preferencesbutton. You can also apply the scaling immediately by clicking on theApplybutton next to the slider.Minimap size – adjust the base size of the minimap frame buffers. You can bring up the minimap by clicking on the minimap icon
 or by pressing Tab.
Preferred distance units – choose between parsecs and light years to use as default top units. These apply to the focus info pane (bottom-right), as well as in the projection lines of the recursive grid.
Display mode change information pop-up – enable or disable the appearance of the information pop-up dialog when one of the special modes (panorama, planetarium, stereoscopic, game) is activated.
Crosshair – adjust the visibility of the different crosshairs and markers.
Focus marker – mark the location of the current focus object.
Closest object marker – mark the location of the closest object to the camera.
Home object marker – mark the location of the home object, defined in the configuration file.
Pointer guides – vertical and horizontal guides spanning the full window marking the position of the pointer.
Display pointer guides – enable or disable the pointer guides.
Display pointer coordinates – display the coordinates of the pointer, either sky coordinates (equatorial), or latitude and longitude on a planet. The coordinates are shown at the bottom and right edges of the screen, aligned with the pointer.
Color – choose the color of the pointer guides.
Width – choose the width of the pointer guide lines.
Recursive grid – lets you choose the settings concerning the recursive grid object.
Origin – choose the origin of the recursive grid, either the reference system origin or the focus object.
Origin projection lines – if the origin is set to the reference system origin, this check box controls whether projection lines on the fundamental plane and to the object are drawn.
Performance
Enable multithreading – enable using multiple threads.
Number of threads – adjust the maximum number of threads to use.
Smooth transitions between levels of detail – fade the contents of octree nodes as they approach the visibility threshold. Improves graphical fidelity and removes pop-ins.
Draw distance – adjust the solid angle threshold for when octree nodes become visible. See the draw distance section for more information.
More detailed info on performance can be found in the performance section.
Controls
You can see the key-action bindings in the Controls tab. Controls are
only editable by modifying the keyboard.mappings file inside the mappings
folder of your installation. Check out the Controls documentation
to know more.
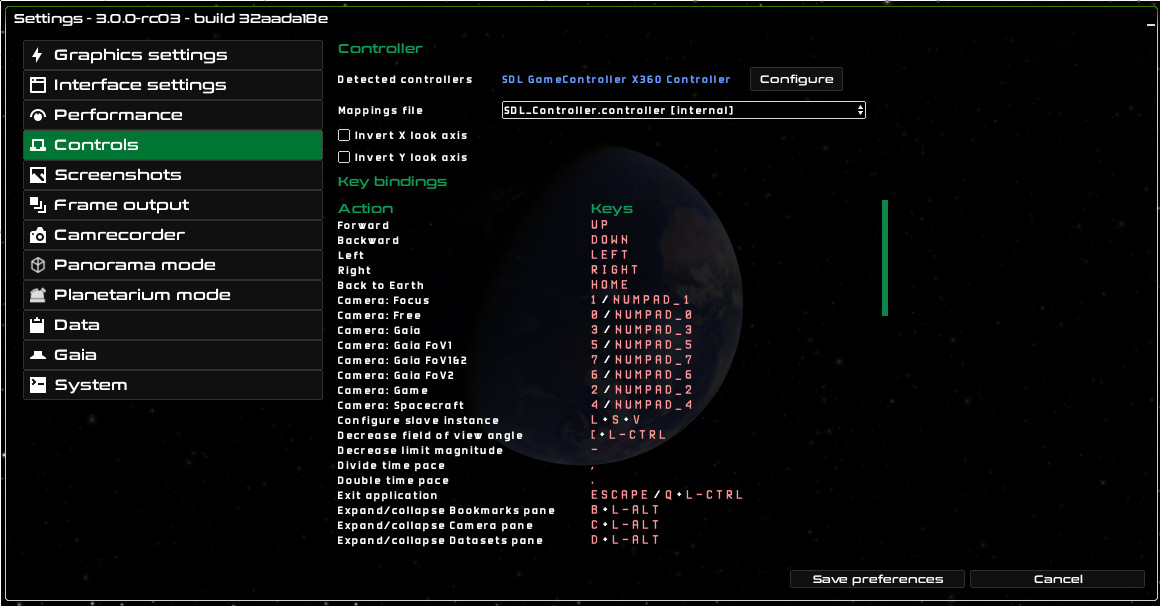
The controls settings in Gaia Sky
Screenshots
You can take screenshots anytime when the application is running by
pressing F5. There are two screenshot modes available: *
Simple, the classic screenshot of what is currently on screen, with
the same resolution. * Advanced, where you can define the
resolution of the screenshots.
Additionally, the output format (either JPG or PNG) and the quality (in
case of JPG format) can also be set in the configuration file, usually
located in $GS_CONFIG/config.yaml (see folders). The keys to modify are:
screenshot::formatscreenshot::quality
Screenshots save location – choose the location on disk where the screenshots are to be saved.
Mode – choose the screenshot mode, either
SimpleorAdvanced(see above).Screenshots size – adjust the resolution for the
Advancedscreenshots mode.
Frame output
There is a feature in Gaia Sky that enables the output of every
frame as a JPG or PNG image. This is useful to produce videos. In order to
configure the frame output system, use the Frame output tab. There
you can select the output folder, the image prefix name, the output
image resolution (in case of Advanced mode) and the target frame rate.
Additionally, the output format (either JPG or PNG) and the quality (in
case of JPG format) can also be set in the configuration file, usually
located in $GS_CONFIG/config.yaml (see folders). The keys to modify are:
frame::formatframe::quality
Note
Use F6 to activate the frame output mode and start saving each frame as an image. Use F6 again to deactivate it.
When the program is in frame output mode, it does not run in real time but it adjusts the internal clock to produce as many frames per second as specified here. You have to take it into account when you later use your favourite video encoder (ffmpeg) to convert the frame images into a video.
Frame save location – choose the location on disk where the still frames are to be saved.
Frame name prefix – choose the prefix to prepend to the still frame files.
Target FPS – target framerate of the frame output system.
Mode – choose the frame mode, either
SimpleorAdvanced(see above).Size of frames – adjust the resolution for the
Advancedmode.Reset sequence number – resets the frame sequence number of the current session to 0. Useful if you need to re-capture frames.
Camrecorder
Target FPS – set the desired frames per second to capture the camera paths. If your device is not fast enough in producing the specified frame rate, the application will slow down while recording so that enough frames are captured. Same behaviour will be uploading during camera playback.
Activate frame output automatically – enable automatic frame recording during playback. This will automatically activate the frame output system (see Frame output) during a camera file playback.
Keyframe preferences – bring up a new dialog to adjust some preferences of the camera keyframe system. See this section for more information.
Panorama mode
Cubemap side resolution – define the cube map side resolution for the 360 mode. With this mode a cube map will be rendered (six individual scenes in directions \(+X\), \(-X\), \(+Y\), \(-Y\), \(+Z\), \(-Z\)) and then it will be transformed into a flat image using an equirectangular projection. This allows for the creation of 360 (VR) videos.
Planetarium mode
Aperture angle – adjust the aperture angle to suit your dome setup.
Cubemap side resolution – the planetarium mode also works with the cube map system used in Panorama mode, so here you can also adjust the cubemap side resolution.
Data
You can use the Data tab to bring up the dataset manager window and download new datasets, and enable and disable the ones that you have available locally. To bring it up, click on the Dataset manager button.
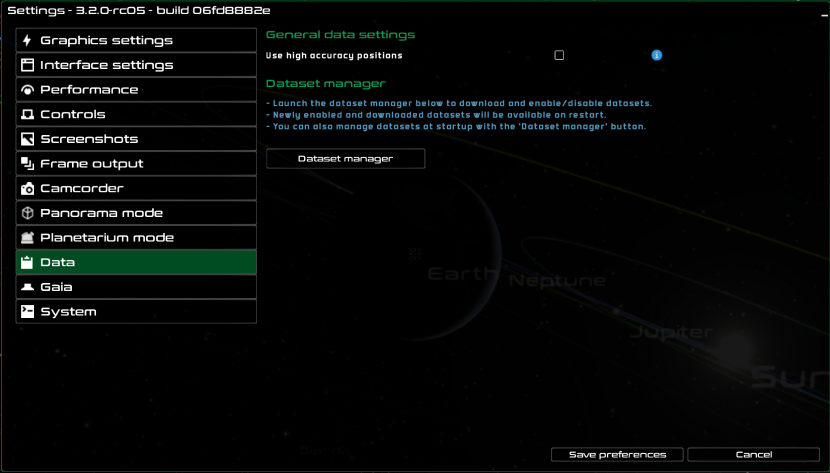
The data settings in Gaia Sky
There is a setting available in the data tab:
Use high accuracy positions – enable high accuracy positions, which uses all terms in the VSOPxx and other ephemerides algorithms.
Gaia
Gaia attitude – you have two options here:
Real satellite attitude– takes a while to load but it uses the correct phase angles and parameters. In this case, the planned attitude of Gaia is used. This may still diverge from the actual attitude of the satellite.NSL– analytical implementation of the nominal attitude of the satellite. It behaves the same as the real thing, but the direction to which the satellite is pointing is off.
System
Show debug info – enable and disable the debug info using the
Show debug infocheckbox. When the debug info is enabled, the program prints the frames per second and other useful information at the top-right of the screen.Exit confirmation – whether to ask for confirmation on exit.
Reset default settings – revert to the default settings. You will lose your current settings file and Gaia Sky will need to be relaunched for the changes to take effect.