

Settings and configuration#
Gaia Sky can be configured using the on-screen UI and the preferences window.
Bring up the preferences window by clicking on the preferences icon ![]() in
the Controls pane or by pressing p.
in
the Controls pane or by pressing p.
Some features are not exposed in the preferences window or UI, so you may need to dive deep into the configuration file section to modify them.
Graphics settings#
The  Graphics tab in the preferences window contains most of the graphics settings in Gaia Sky.
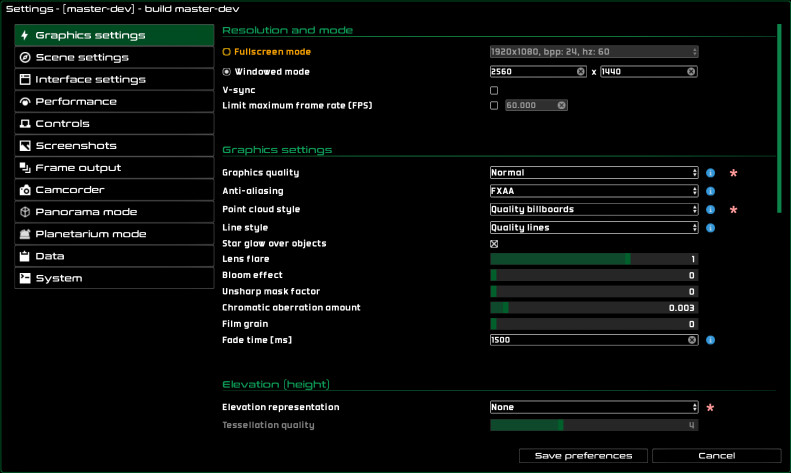
The graphics settings.#
Graphics presets#
Graphics presets are sets of preferences that are applied all at once. Gaia Sky offers three presets:
Low
For low-spec computers or very old systems. This is what it does:
Set graphics quality to low. More information here.
Disable anti-aliasing and fall back to quality 0 (see here).
Set line renderer to legacy (
GL_LINES).Disable lens flare. Revert to simple lens flare type.
Disable bloom.
Disable unsharp mask.
Disable chromatic aberration.
Disable film grain.
Disable elevation representation.
Disable shadow mapping.
Disable motion blur.
Disable HDR tone mapping.
Medium
For everyday laptops and desktops which are not particularly powerful. Here’s the settings it changes:
Set graphics quality to medium. More information here.
Enable anti-aliasing, set it to FXAA, and set quality to 1 (see here).
Set line renderer to quality lines.
Enable lens flare, set it to simple type.
Enable elevation representation, set it to ‘regular vertex displacement’.
Enable shadow mapping and set a maximum of 4 shadows.
Set a shadow map resolution of 1024.
High
For resonably powerful systems with good discrete graphics cards, or powerful integrated GPUs. CPU performance should also be good. Here’s exactly the settings this affects:
Set graphics quality to high. More information here.
Enable anti-aliasing, set it to FXAA, and set quality to 2 (see here).
Set line renderer to quality lines.
Enable lens flare, set it to complex type.
Enable elevation representation, and use tessellation.
Enable shadow mapping and set a maximum of 5 shadows.
Set a shadow map resolution of 2048.
Resolution and mode#
You can find the Resolution and mode configuration under the
Graphics tab.
Display mode – select between fullscreen mode and windowed mode. In the case of full screen, you can choose the resolution from a list of supported resolutions in a drop down menu. If you choose windowed mode, you can enter the resolution you want. You can also choose whether the window should be resizable or not. In order to switch from full screen mode to windowed mode during the execution, use the key F11.
V-sync – enable v-sync to limit the frame rate to the refresh rate of your monitor. In some cases this may help reducing tearing.
Maximum frame rate – it is possible to set a maximum frame rate by ticking this checkbox and entering a positive integer value. The frame rate will be capped to that value.
External view settings#
When the external view is active, this section appears in the settings window. In it, you can adjust the size of the external view window manually.
Window size – adjust the width and height of the external view window. Note that this only adjusts the size of the window, not the resolution of the buffer. The size of the external window is not persisted.
Resolution – the actual resolution of the buffer. This field is not editable, and is calculated by multiplying the actual resolution of the main window, times the back-buffer scale.
Graphics settings#
Below is an itemized list of the graphics settings:
Graphics quality
This setting governs the size of the textures, the complexity of the models and also the quality of some graphical effects like the star glow or the lens flare. Here are the differences:
Low (1K) – very low resolution textures, mostly 1K (1024x512), and fewer sample counts for the visual effects than in higher quality settings. Low-fidelity Milky Way model. - Low resolution textures (1K). - Use a 1K texture for the star glow effect. - Use a maximum of 4 stars with star glow effect. - Use low resolution textures (512x512) as star billboards. - Reduce the number of particles in the Milky Way object considerably. - Reduce the maximum particle size in the Milky Way object considerably.
Medium (2K) – moderately low resolution textures (2K when available). The graphical effects use a reasonable amount of quality for nice visuals without compromising the performance too much. Medium-fidelity Milky Way model. - Medium resolution textures (2K). - Use an HD texture (1280x720) for the star glow effect. - Use a maximum of 5 stars with star glow effect. - Use medium resolution (1024x1024) textures as star billboards. - Use a moderate number of particles for the Milky Way object. - Use a moderate maximum particle size for the Milky Way object.
High (4K) – high-resolution 4K (3840x2160) textures. Graphical effects use a large number of samples. High-fidelity Milky Way model. This may be taxing even on good graphics cards. - 4K textures. - Use a high resolution (1500x843) texture for the star glow effect. - Use a maximum of 6 stars with star glow effect. - Use medium resolution (1024x1024) textures as star billboards. - Use a high number of particles for the Milky Way object. - Use a high maximum particle size for the Milky Way object.
Ultra (8K) – very high resolution textures (8K, 16K, etc.). Ultra-high-fidelity Milky Way model. - Ultra-high resolution textures (8K). - Use a full HD texture (1920x1080) for the star glow effect. - Use a maximum of 8 stars with star glow effect. - Use medium resolution (1024x1024) textures as star billboards. - Use a very high number of particles for the Milky Way object. - Use a very high maximum particle size for the Milky Way object.
Antialiasing
In the Graphics tab you can also find the antialiasing configuration. Applying antialiasing removes the jagged edges of the scene and makes it look better. However, it does not come free of cost, and usually has a penalty on the frames per second (FPS). There are four main options, described below. Find more information on antialiasing in the Antialiasing section.
No Antialiasing – if you choose this no antialiasing will be applied, and therefore you will probably see jagged edges around models. This has no penalty on either the CPU or the GPU. If want you enable antialiasing with
override application settingsin your graphics card driver configuration program, you can leave the application antialiasing setting to off.FXAA – Fast Approximate Antialiasing – This is a post-processing antialiasing filter which is very fast and produces very good results. The performance hit depends on how fast your graphics card is, but it is generally low. Since it is a post-processing effect, this will work also when you take screenshots or output the frames. As of Gaia Sky
2.2.5, FXAA is activated by default. Here is more info on FXAA.NFAA – Normal Field Antialiasing – This is yet another post-processing antialiasing technique. It is based on generating a normal map to detect the edges for later smoothing. It may look better on some devices and the penalty in FPS is small. It will also work for the screenshots and frame outputs.
Line style
Select the line rendering back-end.
Quality lines – use geometry shaders to generate polyline quad-strips, resulting in much better-looking and more consistent lines. Trajectories and orbits are also sent to the GPU once, and updated periodically. The use of geometry shaders may have a slight impact on performance with some graphics cards, but it is typically unnoticeable.
Legacy (line primitives) – use the line primitives offered by the graphics driver. Since the lines are shaded by the driver implementation, they may differ depending on the graphics card. Trajectories and orbits are sent to the GPU in a buffer only once, the rest of the custom lines are computed on the CPU and sent over each frame.
Lens flare
Set the strength of the lens flare effect. Set to 0 to disable the lens flare. There are currently three different lens flare options, but they need to be chosen directly in the configuration file. See this section for more information.
Bloom effect
This slider controls the amount of bloom (light bleeding from bright to dark areas) to apply to the scene. Bring it all the way down to zero to disable bloom altogether.
Unsharp mask factor
This slider controls the amount of sharpening to apply to the scene with the unsharp mask effect. Increasing the unsharp mask factor makes the visuals sharper but possibly introduces aliasing and visual artifacts. Bring it all the way down to zero to disable the unsharp mask effect.
Chromatic aberration amount
The amount of chromatic aberration to apply to the image. Set to 0 to disable the chromatic aberration effect.
Film grain
The amount of film grain to apply to the image. Set to 0 to disable the film grain effect.
Fade time [ms]
Set the time it takes for objects to fade in and out when their visibility is modified, either via the “Object visibility” pane or using the individual visibility toggle. This value is in milliseconds.
Elevation (height)#
Settings related to the representation of elevation in planets and moons.
Elevation representation
Choose the way elevation (also referred to as terrain height) is represented in Gaia Sky. This only works when the objects has a height map (texture, cubemap or SVT) attached, and also a height scale. If the object has a normal map, normals are computed from this map. Otherwise, the height texture is used to compute the normals.
Regular vertex displacement – displace the object’s vertices along the normal vector to represent height. Note that a
heightScalevalue, indicating the extent of the displacement with an elevation multiplier of 1, is needed for this to work correctly.Terrain tessellation – use geometry subdivision by tessellation for large bodies (planets and moons). For bodies with a rough size greater than about 500 Km, tessellation subdivision is used before displacing the vertices. This may be taxing on integrated or old graphics cards. Disable if frame rate is low. Note that a
heightScalevalue, indicating the extent of the displacement with an elevation multiplier of 1, is needed for this to work correctly.None – do not represent elevation.
Shadows#
Enable or disable shadows, and choose their properties.
Shadow map resolution – choose the resolution of the shadow map textures to use.
# shadows – control the number of objects with self-shadows at any given time in the scene.
Image levels#
Controls related to image levels.
Brightness – overall brightness of the image.
Contrast – overall contrast of the image.
Hue – hue value of the image.
Saturation – saturation value of the image.
Gamma correction – gamma correction value of the image. This should be calibrated with your monitor.
HDR tone mapping type – tone mapping algorithm to use. Choose
Automaticto use a real-time adjusting mode based on the overall lightness of the image. All the others are static algorithms.
Virtual textures#
Settings related to the sparse virtual texturing system.
Cache size – use this slider to determine the cache size, in tiles. The size of each tile depends on the first virtual texture dataset loaded. Gaia Sky supports only multiple virtual textures in the same scene when all have the same tile size. You can adjust this slider to modify the size of the texture used as cache. The changes apply only the next time you start Gaia Sky.
Experimental#
This section contains experimental graphics options:
Post-processing re-projection
Use a post-processing shader to re-project the final image, with a varied choice of projection algorithms:
Disabled – no re-projection.
Default (simple fisheye) – a simple fisheye projection algorithm.
Accurate (no full coverage) – a more accurate projection, but has a coverage of \(180^\circ\), which is not available with the perspective camera.
Stereographic (screen fit) - stereographic projection with a screen fit.
Stereographic (long edge fit) - stereographic projection with a long axis fit.
Stereographic (short edge fit) - stereographic projection with a short axis fit.
Stereographic (180 fit) - stereographic projection with a fit to a filed of view of \(180^\circ\).
Lambert (screen fit) - Lambert projection with a screen fit.
Lambert (long edge fit) - Lambert projection with a long axis fit.
Lambert (short edge fit) - Lambert projection with a short axis fit.
Lambert (180 fit) - Lambert projection with a fit to a filed of view of \(180^\circ\).
Orthographic (screen fit) - orthographic projection with a screen fit.
Orthographic (long edge fit) - orthographic projection with a long axis fit.
Orthographic (short edge fit) - orthographic projection with a short axis fit.
Orthographic (180 fit) - orthographic projection with a fit to a filed of view of \(180^\circ\).
Other experimental settings
Dynamic resolution – in this mode, the resolution of the back-buffer is adapted depending on the frame rate to avoid too drastic slow-downs. The dynamic resolution is adjusted according to some predefined back-buffer scale factors: 1, 0.85 and 0.75. The resolution of the back-buffer is scaled by the next value if the frame rate is below 30, and to the previous level if it is over 60. This should provide smoother frame-rates on older hardware, and in some GPU demanding situations.
Back-buffer scale – resolution scale factor to apply to the render frame buffer, effectively rendering the scene at a lower or higher resolution in the background, trading off performance and visual fidelity. This setting is disabled when dynamic resolution is enabled. Note that the scale applies to the width and height of the current frame buffer, not the pixel count. The pixel count roughly follows a square law. - Set the back-buffer scale to less than one to render the image with a lower resolution, increasing performance and lowering visual fidelity, and upscale it to the window size. - Set the back-buffer scale to a value greater than one to render the image with a resolution higher than that of the current window, decreasing performance and increasing visual fidelity by down-sampling it to the window size.
Index of refraction – set the index of refraction of the sphere in orthosphere view mode. The orthosphere is filled up with a material with the given refraction index, with light rays bending and scattering according to their angles of incidence.
Screen space reflections – activate SSR (screen space reflections). In this method, a post-process step traces the reflections for each reflective surface in the image. This has an impact on performance but produces nice-looking reflections on metallic surfaces. If this is off, it falls back to cubemap reflections with a default sky box of the milky way. The default location of the sky box is
$GS_DATA/tex/skybox/gaiasky.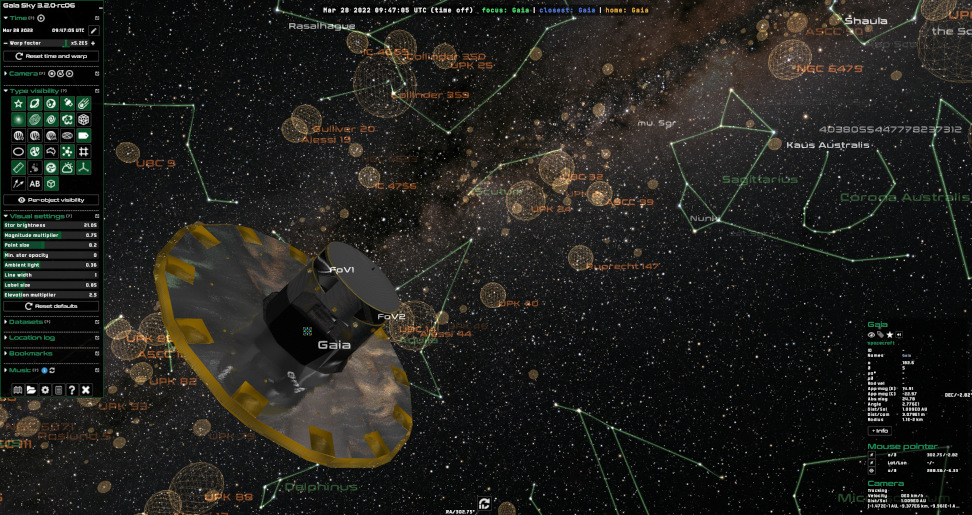
A rendering of the Gaia satellite with screen-space reflections.#
Motion blur – choose the amount of camera motion blur to apply to the scene. Set to 0 to disable motion blur. Gaia Sky implements what is know as camera motion blur, where the scene is blurred only depending on the camera motion. Object motion blur is not implemented at the moment.
Scene settings#
The  Scene tab in the preferences window contains settings concerned with the scene configuration as a whole and its objects.

The scene settings.#
Stars#
Settings related to star rendering and appearance.
Star glow over objects – enable the post-processing effect to render the star light effect that spills over occluding objects.
Motion trails (elongation in the direction of motion) – enable and disable motion trails for stars. These manifest as stretching the objects in the direction of the camera motion when their on-screen motion is high enough.
Star image (index) – select the index of the texture for stars. The available textures are in
$data/default-data/tex/base/star-tex-*.jpg.Render star spheres – enable the rendering of stars as spheres.
Use distances to compute camera speed scaling – when the camera moves through the star field, use the distance to the closest star to scale the velocity of the camera. If this is not selected, the distance to the closest regular object (i.e. non-star) is used.
Recursive grid#
Settings to tweak the behavior and appearance of the recursive grid.
Origin – choose the origin of the recursive grid, either the reference system origin or the focus object.
Style – choose the style of the recursive grid. It can be either Circular (concentric rings) or Square grid.
Origin projection lines – if the origin is set to the reference system origin, this check box controls whether projection lines on the fundamental plane and to the object are drawn.
Eclipses#
Enable and configure the real-time eclipse representation. For more information, visit the eclipse representation section.
Enable eclipse representation – enable or disable the real time in-scene eclipse representation.
Enable outlines for umbra (red) and penumbra (yellow) – enable or disable outlines for the umbra regions (red) and the penumbra region (yellow) during eclipses.
Procedural generation#
Settings related to the procedural generation of planetary surfaces.
Generated texture resolution – the resolution of the textures produced by the procedural generation module.
Export textures to disk as JPEG files after generation – enable saving the generated textures to disk as JPEG image files. For more information, see the procedural generation section.
Interface settings#
The  Interface tab in the preferences window contains some configuration options related to the user-facing interface, like the language, scale factor, object cross-hairs and pointer guides.

The interface settings.#
Interface settings#
Adjust general settings related to the user interface.
Language – choose the language of the interface. Changes are applied immediately after clicking on
Save preferences.Accent color – choose the accent color for the UI using the provided color picker. Any color is allowed.
UI scale factor – scale the user interface up or down. This slider applies a fractional scaling factor to all user interface elements (not only the fonts!). The scaling is takes effect on the fly when you click on the Save preferences button. You can also apply the scaling immediately, without closing the preferences dialog, by clicking on the Apply button next to the slider.
Minimap size – adjust the base size of the minimap frame buffers. You can bring up the minimap by clicking on the minimap icon
 or by pressing Tab.
Preferred distance units – choose between parsecs and light years to use as default top units. These apply to the focus info pane (bottom-right), as well as in the projection lines of the recursive grid.
Display time in no-GUI mode – display the current time in a label when using the no-GUI mode (Ctrl + U).
Display mode change information pop-up – enable or disable the appearance of the information pop-up dialog when one of the special modes (panorama, planetarium, stereoscopic, game) is activated.
Use new UI – select between the new UI and the old UI. The new UI contains buttons anchored to the left that expand the different control panes. The old UI is based on a collapsible window. Find more info in Control panes.
Crosshair/markers#
Adjust the visibility of the different crosshairs and markers.
Focus marker – mark the location of the current focus object.
Closest object marker – mark the location of the closest object to the camera.
Home object marker – mark the location of the home object, defined in the configuration file.
Pointer guides#
Vertical and horizontal guides spanning the full window marking the position of the pointer.
Display pointer guides – enable or disable the pointer guides.
Display pointer coordinates – display the coordinates of the pointer, either sky coordinates (equatorial), or latitude and longitude on a planet. The coordinates are shown at the bottom and right edges of the screen, aligned with the pointer.
Color – choose the color of the pointer guides.
Width – choose the width of the pointer guide lines.
Performance#
The  Performance settings tab in the preferences window contains a few settings that impact the performance of the application.
Enable multithreading – enable using multiple threads.
Number of threads – adjust the maximum number of threads to use.
Smooth transitions between levels of detail – fade the contents of octree nodes as they approach the visibility threshold. Improves graphical fidelity and removes pop-ins.
Draw distance – adjust the solid angle threshold for when octree nodes become visible. See the draw distance section for more information.
More detailed info on performance can be found in the performance section.
Controls#
The  Controls tab in the preferences window contains information about the keyboard, mouse and gamepad controls, and some tools to edit the gamepad mappings.
You can see the key-action bindings in the controls tab. Controls are only editable by modifying the keyboard.mappings file inside the mappings folder of your installation. Check out the Controls documentation to know more.

The controls settings.#
Screenshots#
The  Screenshots tab in the preferences window contains settings on the screenshots subsystem.
Hint
Take screenshots any time by pressing F5.
There are two screenshot modes available:
Simple – the classic screenshot of what is currently on screen, with the same resolution.
Advanced – where you can define the output resolution of the screenshots. Note that advanced mode requires the scene to be re-rendered at the target resolution, so it is slower.
You can also select the output format (either JPG or PNG) and the quality (in case of JPG format) by using the Image format select box and the Quality slider.
These are the controls in this tab:
Screenshots save location – choose the location on disk where the screenshots are to be saved.
Mode – choose the screenshot mode, either
SimpleorAdvanced(see above).Screenshots size – adjust the resolution for the
Advancedscreenshots mode.Image format – choose the save format, either
JPGorPNG.Quality – when
JPGis selected as an image format, use this slider to control its quality setting.
Frame output#
The  Frame output tab in the preferences window contains settings related to the frame output system.

The frame output settings.#
This feature enables the exporting and saving of every frame as a JPG or PNG image directly to disk. This is useful to produce videos. In the frame output tab you can select the frame save location, the image prefix name, the target frame rate, the mode and the output image resolution (in case of Advanced mode). You can also select the output format (either JPG or PNG) and the quality (in case of JPG format) by using the Image format select box and the Quality slider. Finally, there is a button to reset the integer sequence number.
Note
Use F6 to activate the frame output mode and start saving each frame as an image. Use F6 again to deactivate it.
When Gaia Sky is in frame output mode, it does not run in real time but it adjusts the internal clock to meet the configured target FPS (frames per second, or frame rate). Take this frame rate into account when you later use your favourite video encoder (ffmpeg) to convert the frame images into a video.
Here is a list of the available controls:
Frame save location – choose the location on disk where the still frames are to be saved.
Frame name prefix – choose the prefix to prepend to the still frame files.
Target FPS – target framerate of the frame output system.
Mode – choose the frame mode, either
SimpleorAdvanced(see above).Size of frames – adjust the resolution for the
Advancedmode.Reset sequence number – resets the integer frame sequence number of the current session to 0. After clicking this, the frame sequence will start over from 0, overwriting any previously existing frames with the same name! This control is useful if you need to re-capture frames.
Camcorder#
The  Camcorder tab in the preferences window contains settings related to the camera path recording system.
The following settings are available:
Target FPS – set the desired frames per second to capture the camera paths. If your device is not fast enough in producing the specified frame rate, the application will slow down while recording so that enough frames are captured. Same behaviour will be uploading during camera playback.
Activate frame output automatically – enable automatic frame recording during playback. This will automatically activate the frame output system (see Frame output) during a camera file playback.
Hide UI automatically – automatically hide the user interface during playback. The UI state is restored after playback is finished.
Keyframe preferences – bring up a new dialog to adjust some preferences of the camera keyframe system. See this section for more information.
Stereoscopic mode#
The ![]() Stereoscopic mode tab in the preferences window contains settings related to the Stereoscopic (3D) mode.
Stereoscopic mode tab in the preferences window contains settings related to the Stereoscopic (3D) mode.
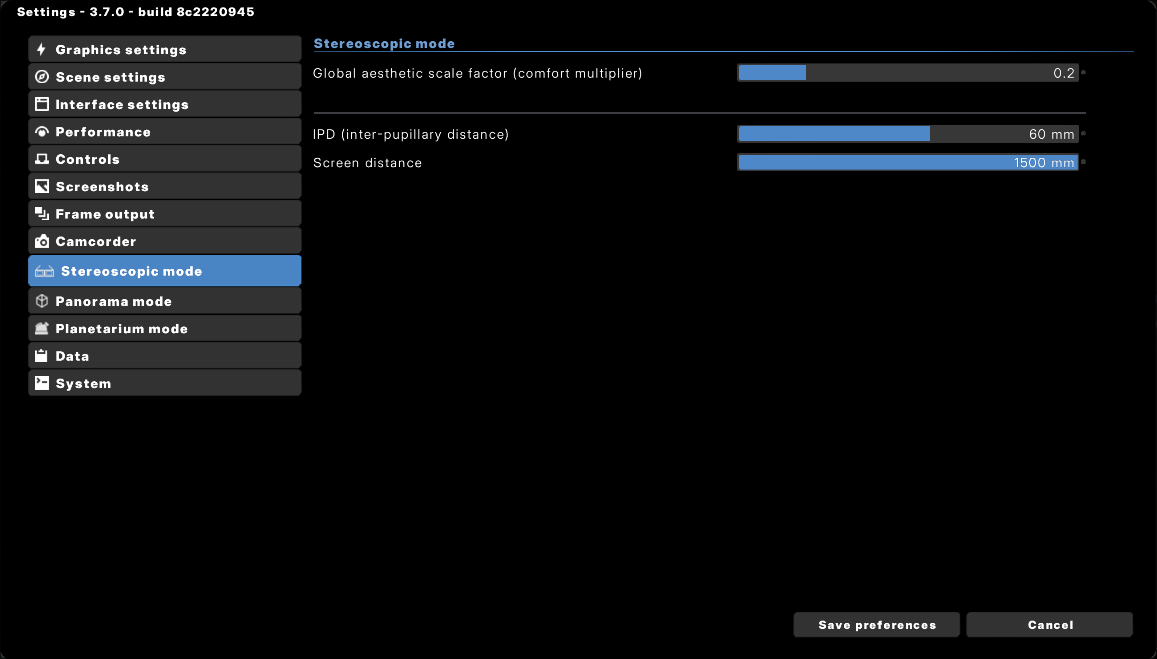
The stereoscopic mode settings.#
The following settings are available:
Global aesthetic scale factor (comfort multiplier) – set the coefficient that scales the entire calculated eye separation, compensating for the mismatch between the theoretical geometric model (based on human-scale IPD and screen distance) and the visually comfortable hyper-stereoscopy required for astronomical scales. Setting it to \(< 1\) pulls the perceived 3D effect deeper behind the screen for user comfort and reduced eye strain.
IPD (inter-pupillary distance) – the interpupillary distance, in millimeters.
Screen distance – the distance from the user to the display, in millimeters.
Anaglyph custom colors – choose your own custom colors for the anaglyph mode. These are used in the custom anaglyph profile.
Panorama mode#
The  Panorama mode tab in the preferences window contains settings related to the panorama mode.
The following settings are available:
Cubemap side resolution – define the cube map side resolution for the 360 mode. With this mode a cube map will be rendered (six individual scenes in directions \(+X\), \(-X\), \(+Y\), \(-Y\), \(+Z\), \(-Z\)) and then it will be transformed into a flat image using an equirectangular projection. This allows for the creation of 360 (VR) videos.
Planetarium mode#
The ![]() Planetarium mode tab in the preferences window contains settings related to the planetarium mode.
Planetarium mode tab in the preferences window contains settings related to the planetarium mode.
The following settings are available in the planetarium mode section:
Aperture angle [°] – adjust the aperture angle to suit your dome setup. Can be as high as 360 degrees.
Focus angle from zenith [°] – the angle from the zenith to put the focus of the view.
Cubemap side resolution – the planetarium mode also works with the cube map system used in Panorama mode, so here you can also adjust the cubemap side resolution.
Gaia Sky also supports the spherical mirror projection by defining a warp mesh file:
Select warp mesh file – select a warp mesh file, which contains the distortion data to compensate for the non-planar nature of the projection surface. More information in the spherical mirror projection section.
Data#
The  Data tab in the preferences window contains settings related to the data used in Gaia Sky.
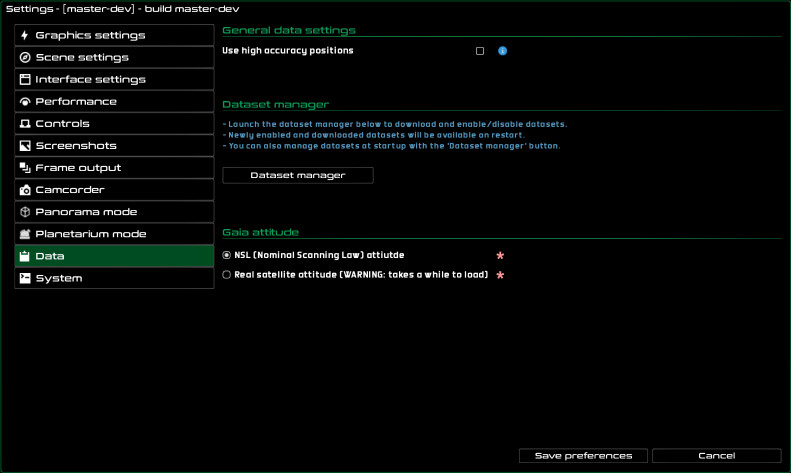
The data settings.#
General data settings#
Use high accuracy positions – enable high accuracy positions, which uses all terms in the VSOPxx and other ephemerides algorithms.
Pull current cloud data for supported objects – enable downloading current cloud textures for Earth (and possibly other supported objects). More information in the clouds data format section.
Show name conflicts at startup – version 3.7.2 introduced transparent handling of name conflicts. Name conflicts happen whenever two or more objects, usually from different catalogs or datasets, have the same name. In this case, only one of the objects is added to the index and can be looked up with the search function. Checking this box tells Gaia Sky to inform the user about name conflicts in the loaded datasets at startup by displaying a window with the detected conflicts.
Dataset manager#
From this tab, you can bring up the dataset manager window to download new datasets, and enable and disable the ones that you have available locally. To bring it up, click on the Dataset manager button.
Gaia attitude#
You have two options here:
NSL (Nominal Scanning Law) – analytical implementation of the nominal attitude of the satellite. It behaves the same as the real thing, but the direction to which the satellite is pointing is off.
Real satellite attitude – use the actual attitude of Gaia as described in the attitude files. Takes a while to load but it uses the correct phase angles and parameters.
System#
The  System tab contains preferences that affect the whole system, or items that do not fit anywhere else.

The system settings.#
Show debug info – enable and disable the debug info using the
Show debug infocheckbox. When the debug info is enabled, the program prints the frames per second and other useful information at the top-right of the screen.Ask for confirmation on exit – whether to ask for confirmation when trying to close Gaia Sky or not.
Shader disk cache – Gaia Sky implements an application-level shader disk cache that caches the binary, compiled shaders to disk to avoid re-compilation and save time. Most graphics drivers already implement this cache at driver level, so this setting is off by default. If you notice that the shader compilation stage at startup is very slow, you can try enabling this.
Clear shader cache – use this button to completely clear the shader cache of Gaia Sky. This will remove all cached binary shaders from the disk. The shaders will be re-cached in the next start up (only if the ‘Shader disk cache’ checkbox is checked).
Reset default settings – revert to the default settings. You will lose your current settings file and Gaia Sky will need to be relaunched for the changes to take effect.