Quick start guide
Tip
This guide is designed to be followed with the latest version of Gaia Sky!
The main aim of this quick start guide is to provide a concise on-ramp to the Gaia Sky platform by describing its operation and most common features.
Gaia Sky crash course: see this companion web presentation for a visual introduction to Gaia Sky.
The topics covered in this guide are the following:
Gaia Sky introduction:
Render modes (3D, planetarium, 360, re-projection).
External datasets (loading, filters, SAMP).
-
Video from still frames with
ffmpeg.
Before starting…
In order to follow this guide it is strongly recommended to have a local installation of Gaia Sky. To install Gaia Sky, follow the instructions for your operating system in  the installation section.
Welcome window
When we start up Gaia Sky for the first time, we are greeted with this view:
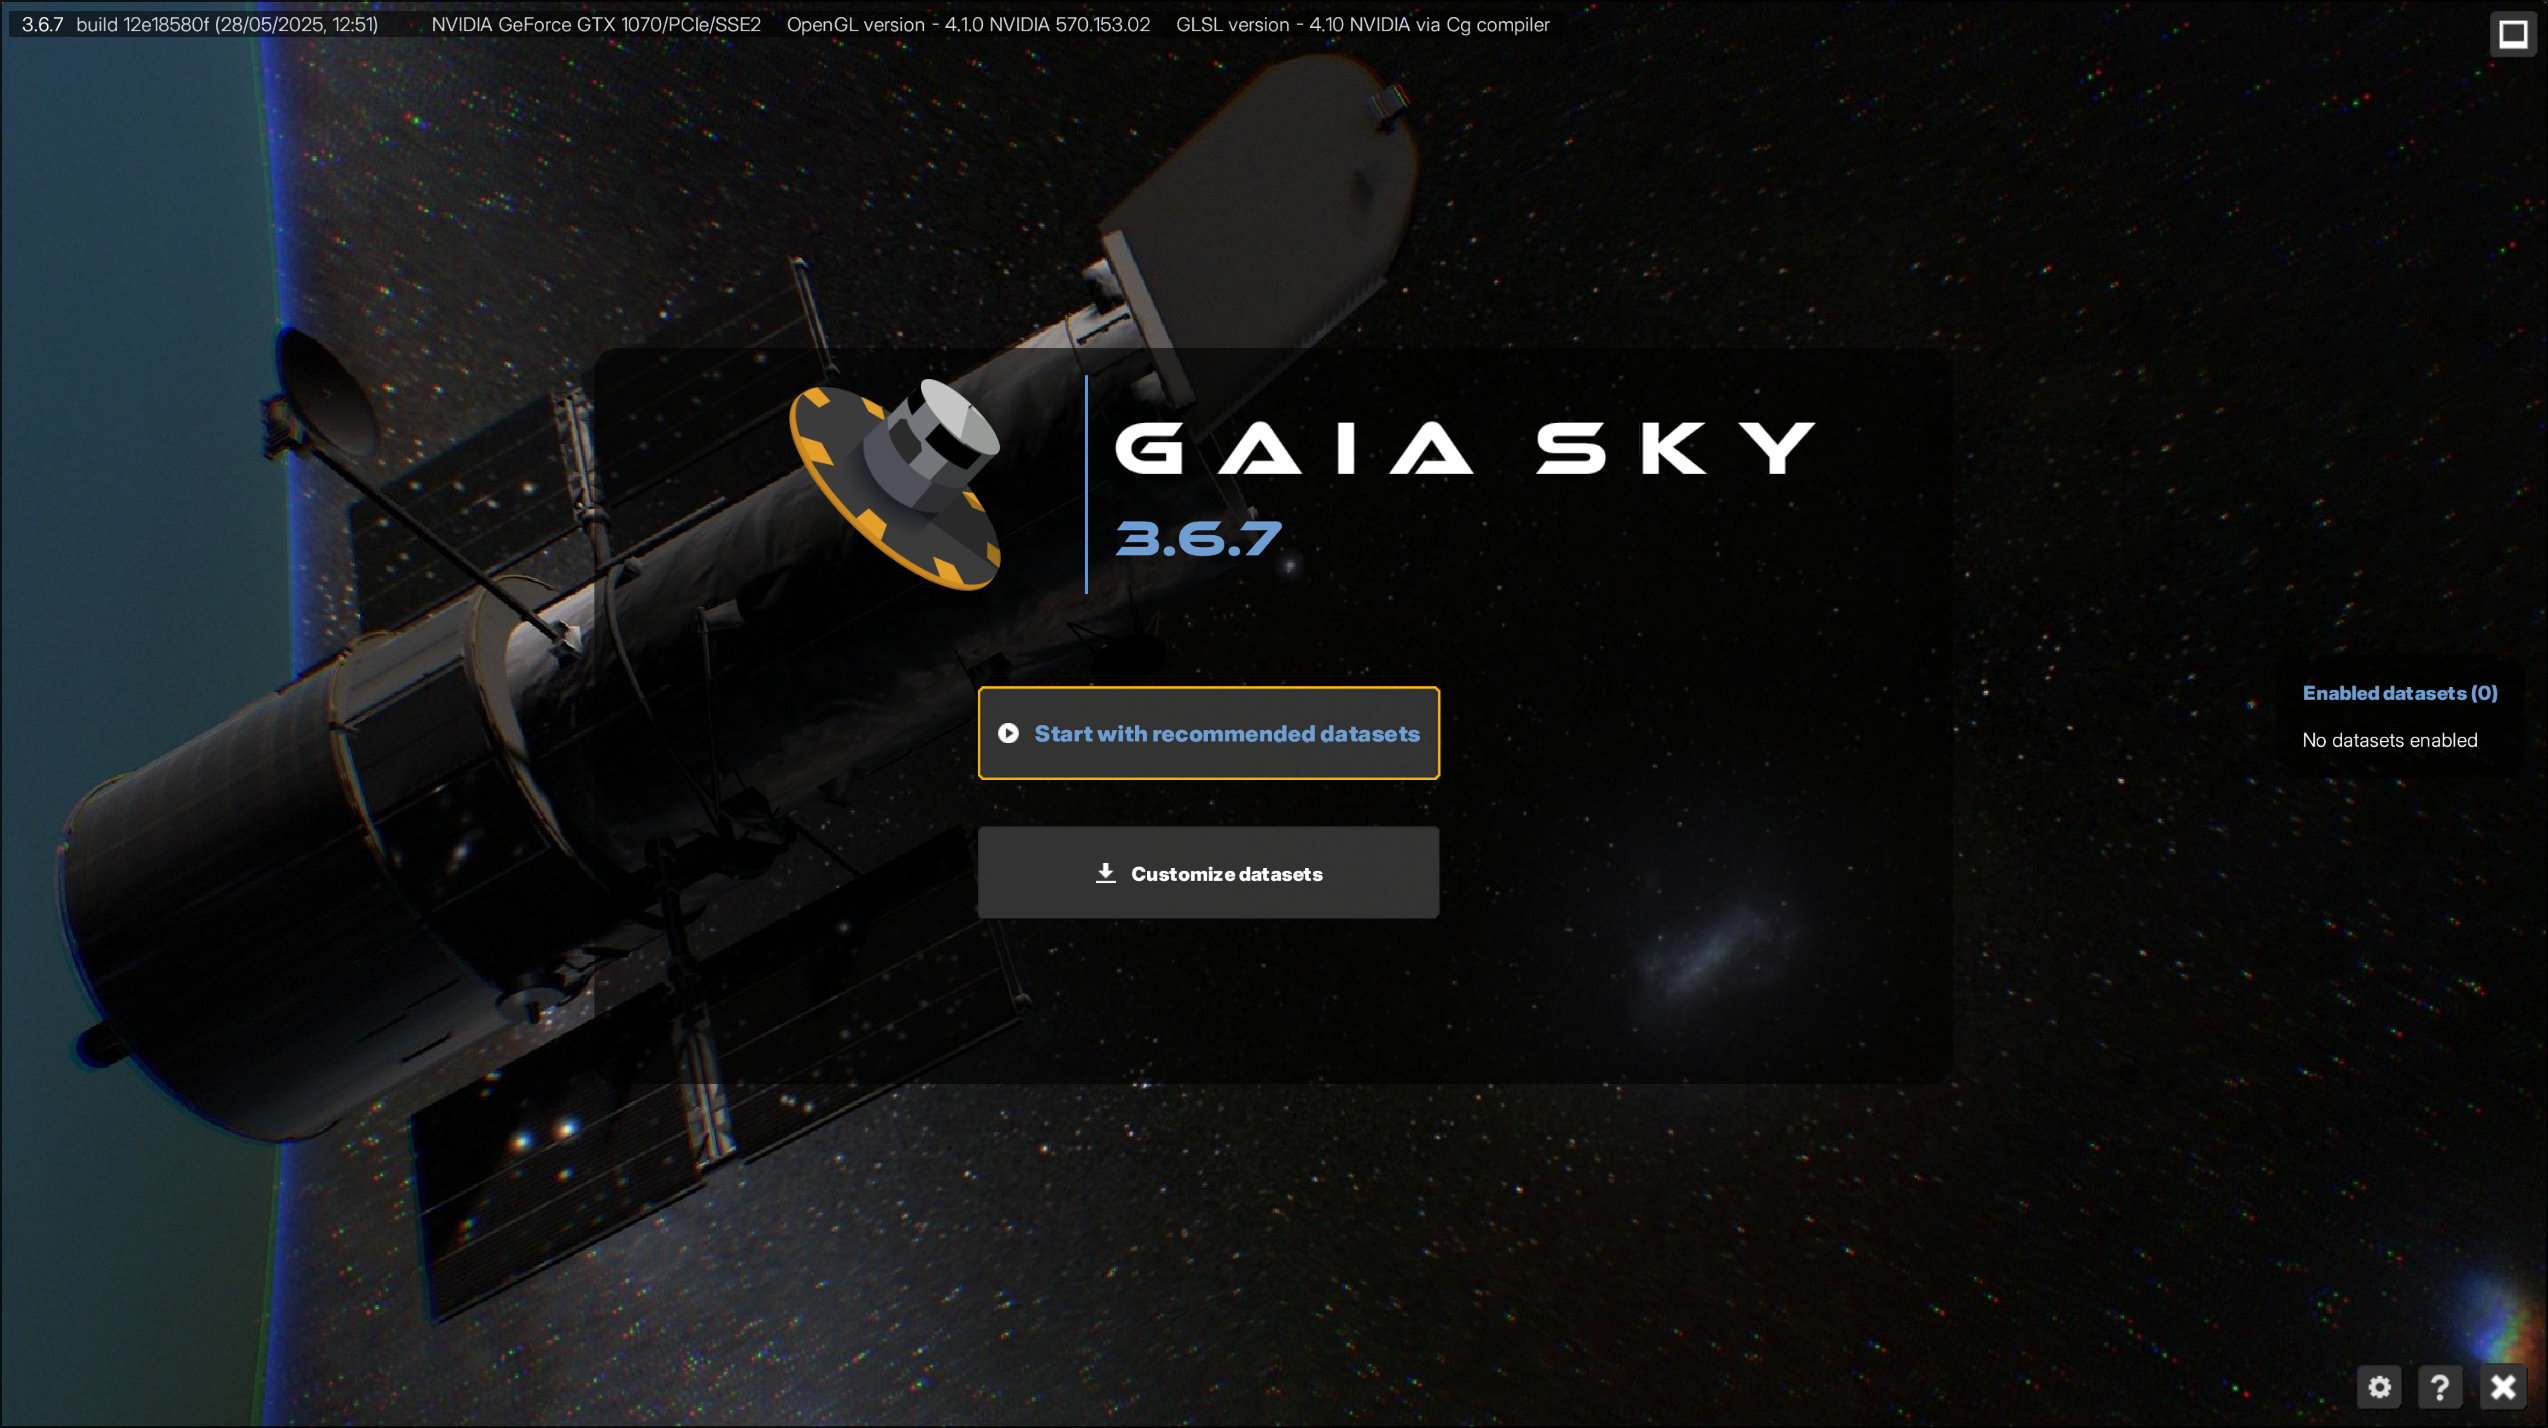
The onboarding screen displayed the first time Gaia Sky is run, with an option to start with the recommended datasets, and another to customize the experience.
From here, we have access to the global preferences (![]() , bottom-right), the help window (
, bottom-right), the help window (![]() , bottom-right), exit the program (
, bottom-right), exit the program (![]() , bottom-right). Also, there are two main actions:
, bottom-right). Also, there are two main actions:
 Start with recommended datasets – automatically download a selection of recommended datasets and start Gaia Sky.
 Customize datasets – access the dataset manager and choose and pick the datasets to download and enable.
If you click on the first button, Start with recommended datasets, a window pops up and automatically downloads some datasets for you. When the process is finished, Gaia Sky starts, also automatically.
If you click on the second button, Custmoize datasets, you will be graced with the following view:
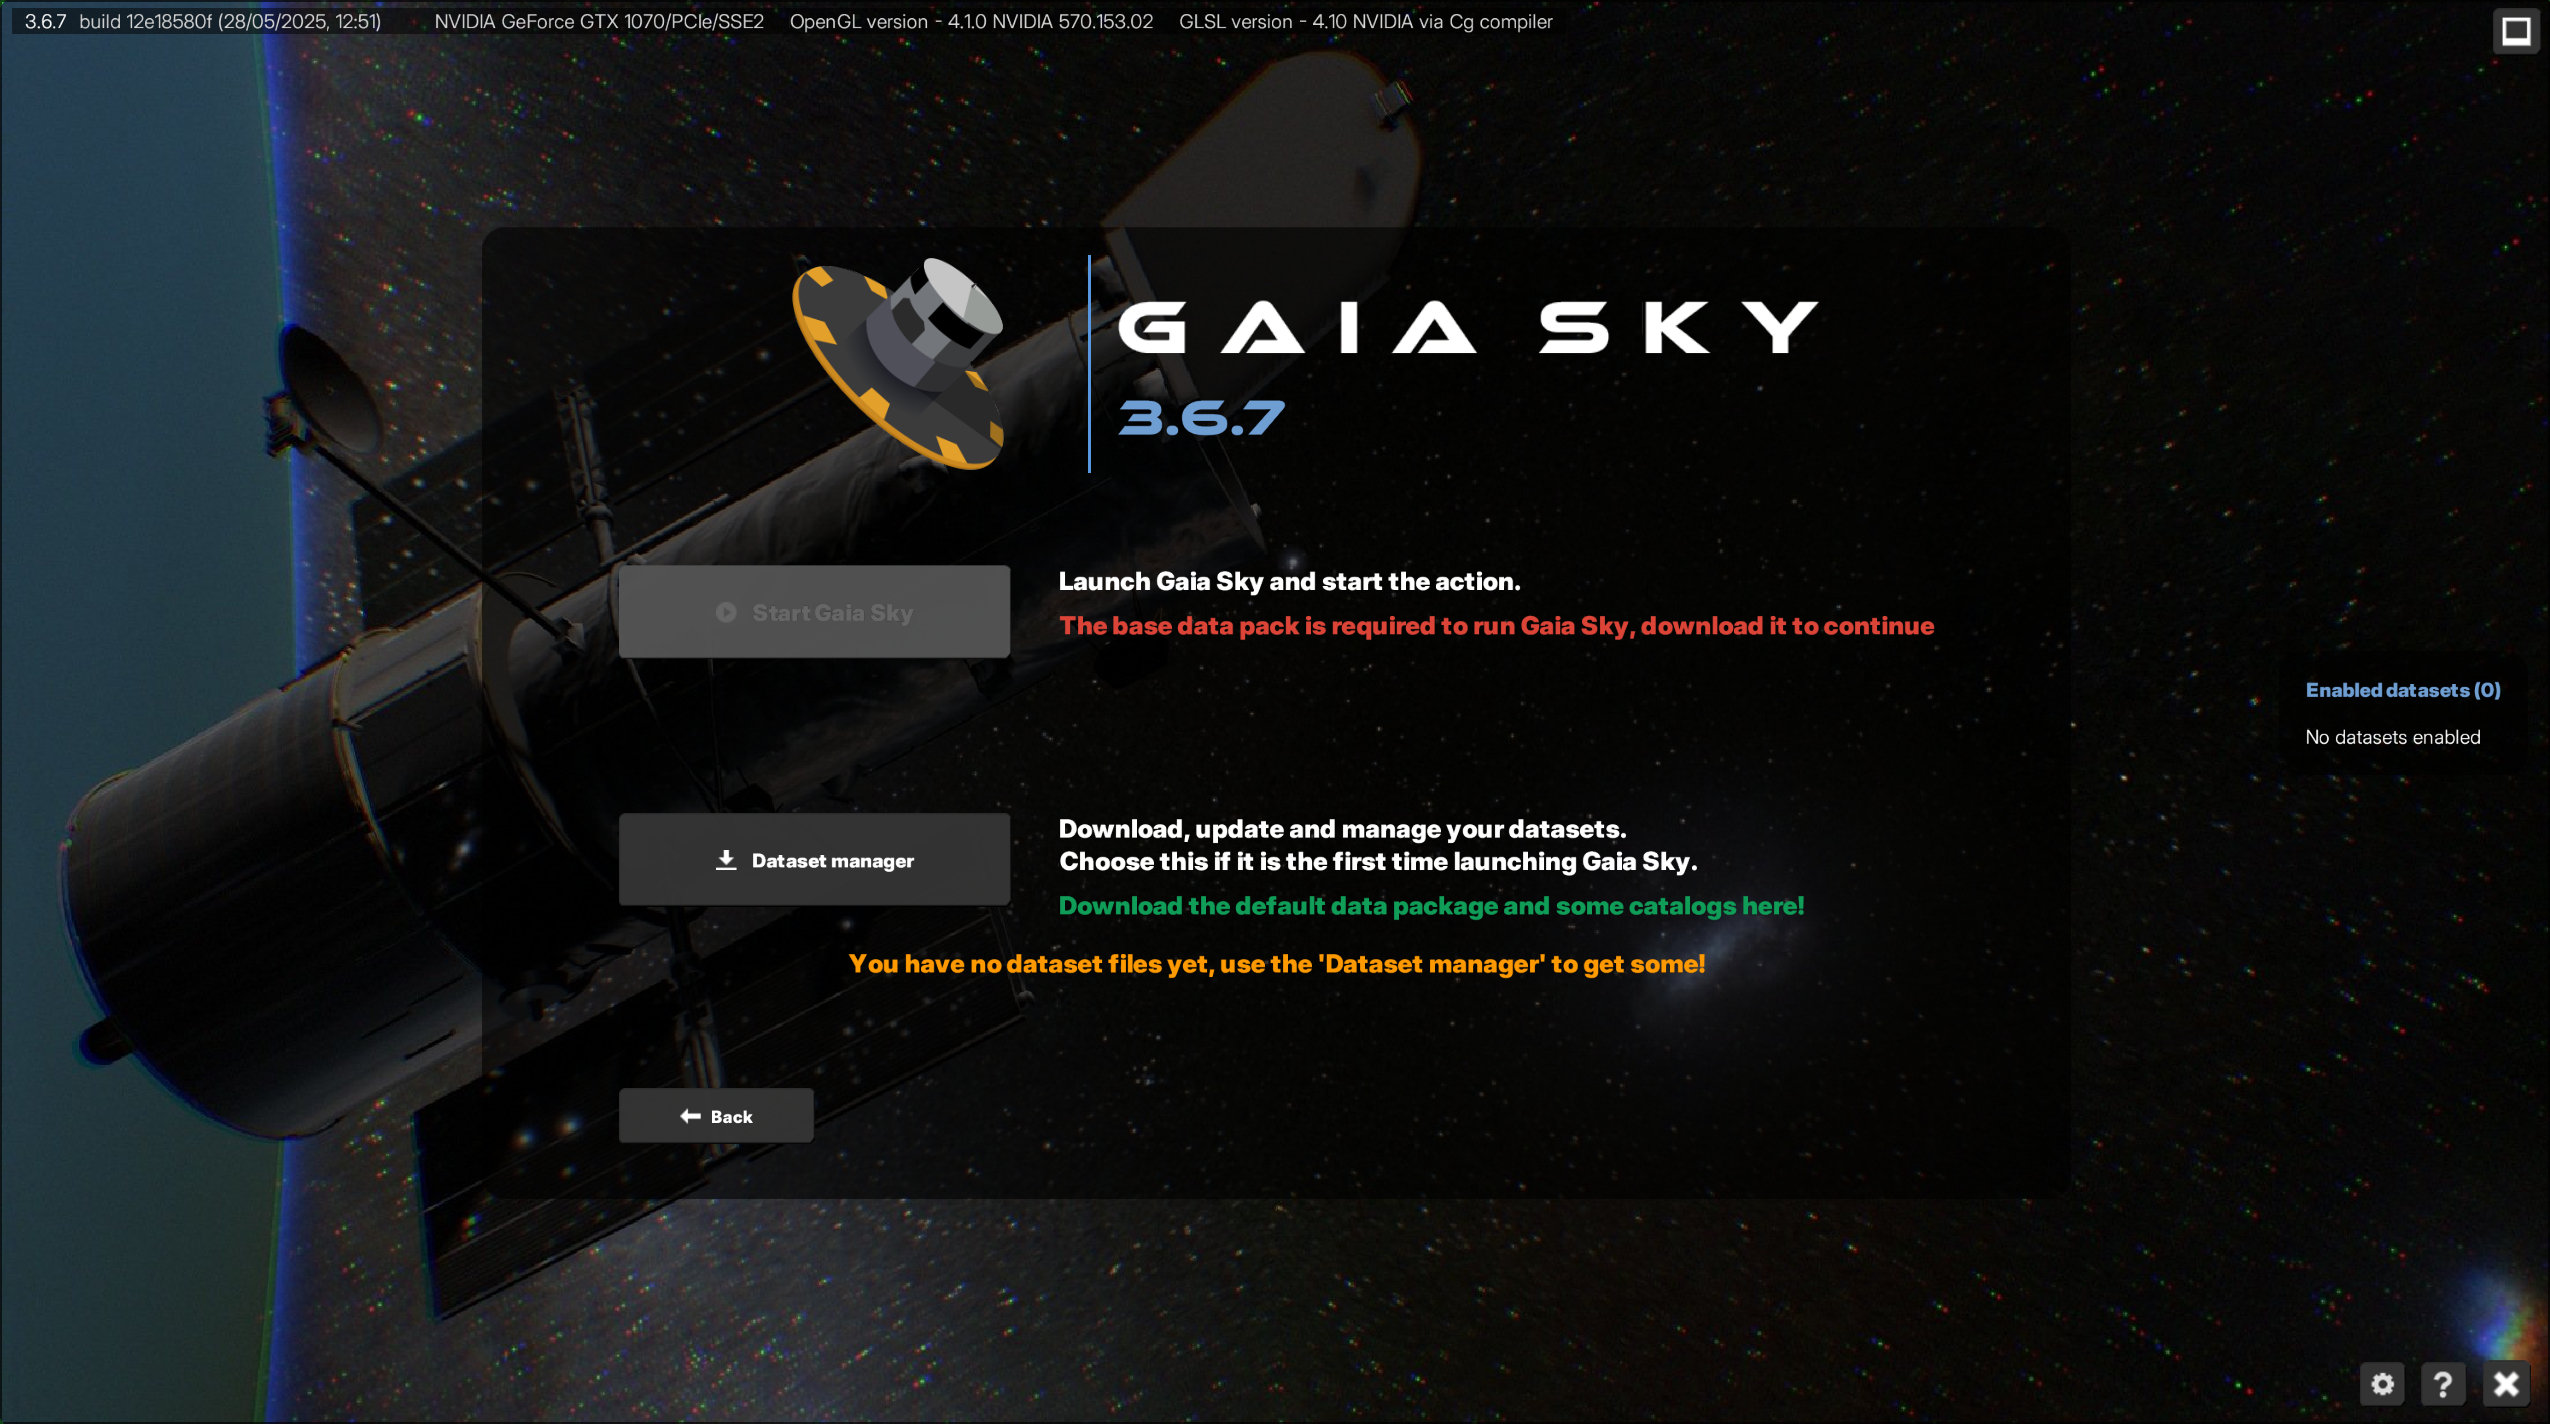
The welcome screen when no datasets are found locally.
From this screen, you can navigate to the previous one by clicking on the Back button. Also, you can access the dataset manager, Dataset manager and download datasets. This is covered in the next section.
Dataset manager
The Dataset manager is used to download, update, delete and enable/disable datasets. It consists of two tabs:
Available for download – contains datasets that are available to be downloaded and installed.
Installed – contains the datasets currently available locally.
The datasets are downloaded directly from our servers over an encrypted HTTPS connection, and SHA256 checksums are used to verify the integrity of downloaded files.
The first time we start Gaia Sky we need to download at least the Base data pack (dataset key: default-data) to be able to start the program. This is a REQUIRED step. The base data pack contains essential data like most of the Solar System (planets, moons, orbits, asteroids, etc.), the Milky Way, grids, constellations and other important objects.
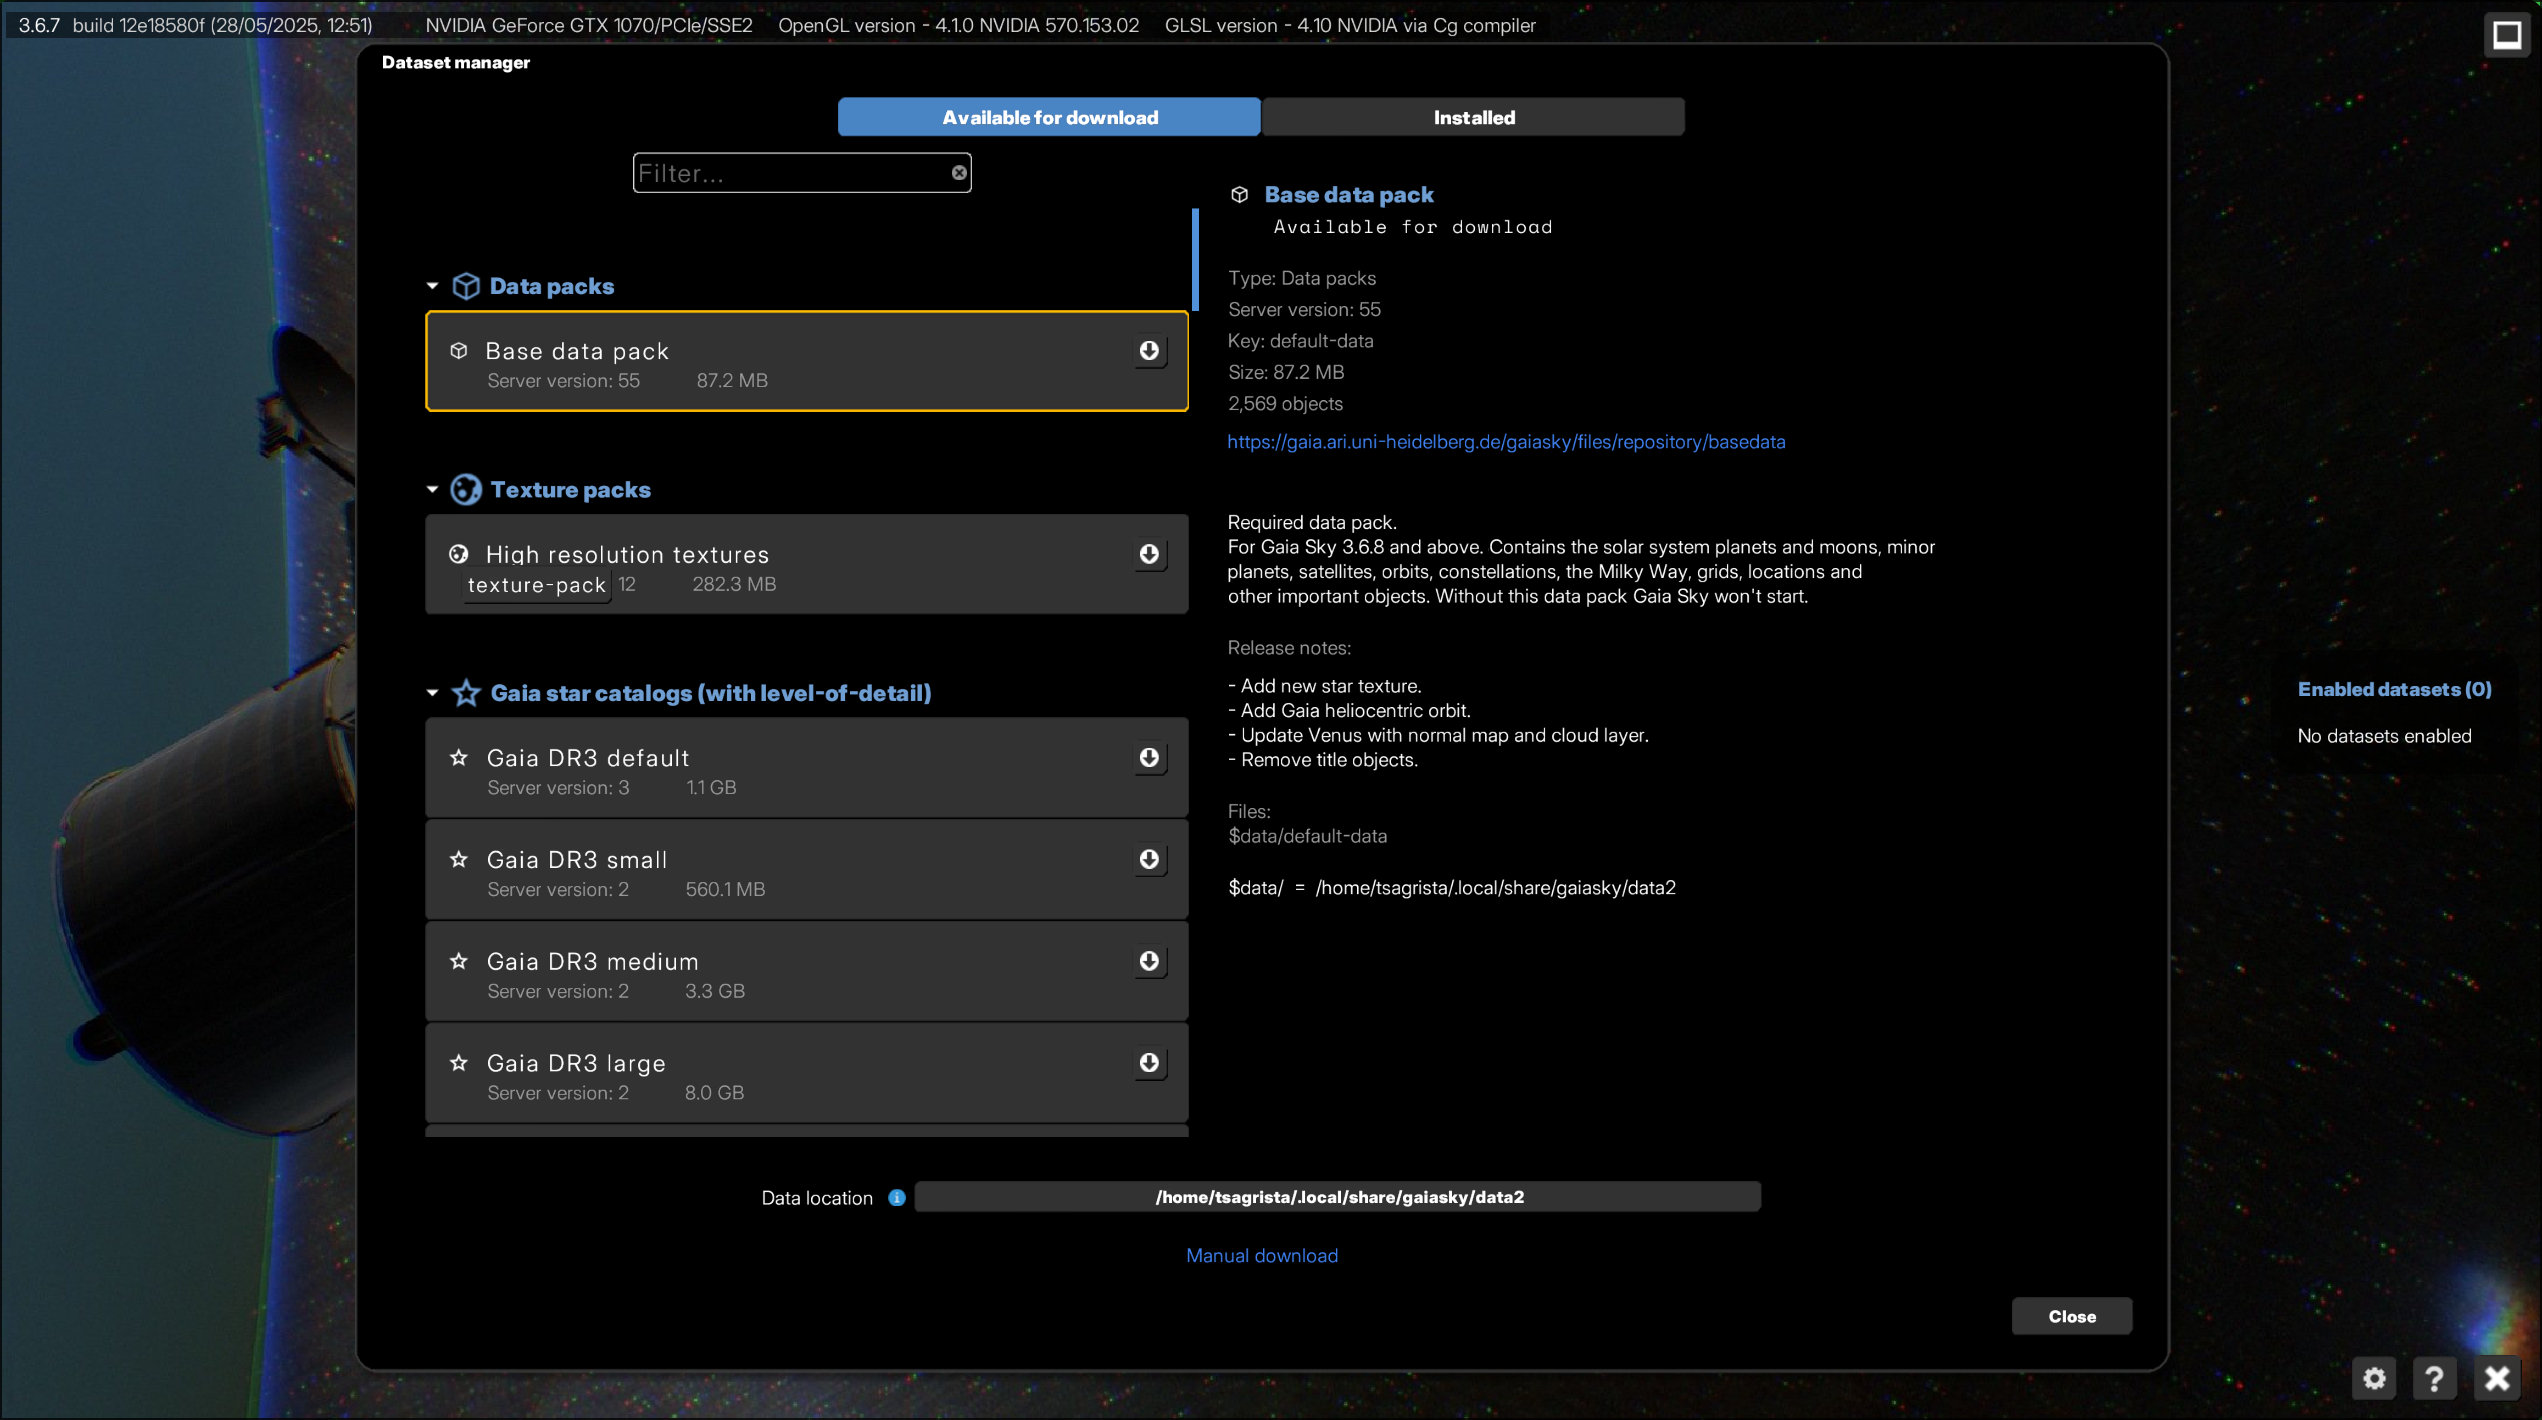
The dataset manager with the base data pack selected.
We may download any dataset in the Available for download tab by clicking on the ![]() icon .
icon .
Feel free to explore the available datasets.
The Installed tab shows the datasets that we have already downloaded and are available locally.
Enable/disable a dataset using the checkbox in the dataset pane. Enabled datasets are loaded when Gaia Sky starts.
Remove a dataset by right clicking with your mouse on it and selecting
 Remove.
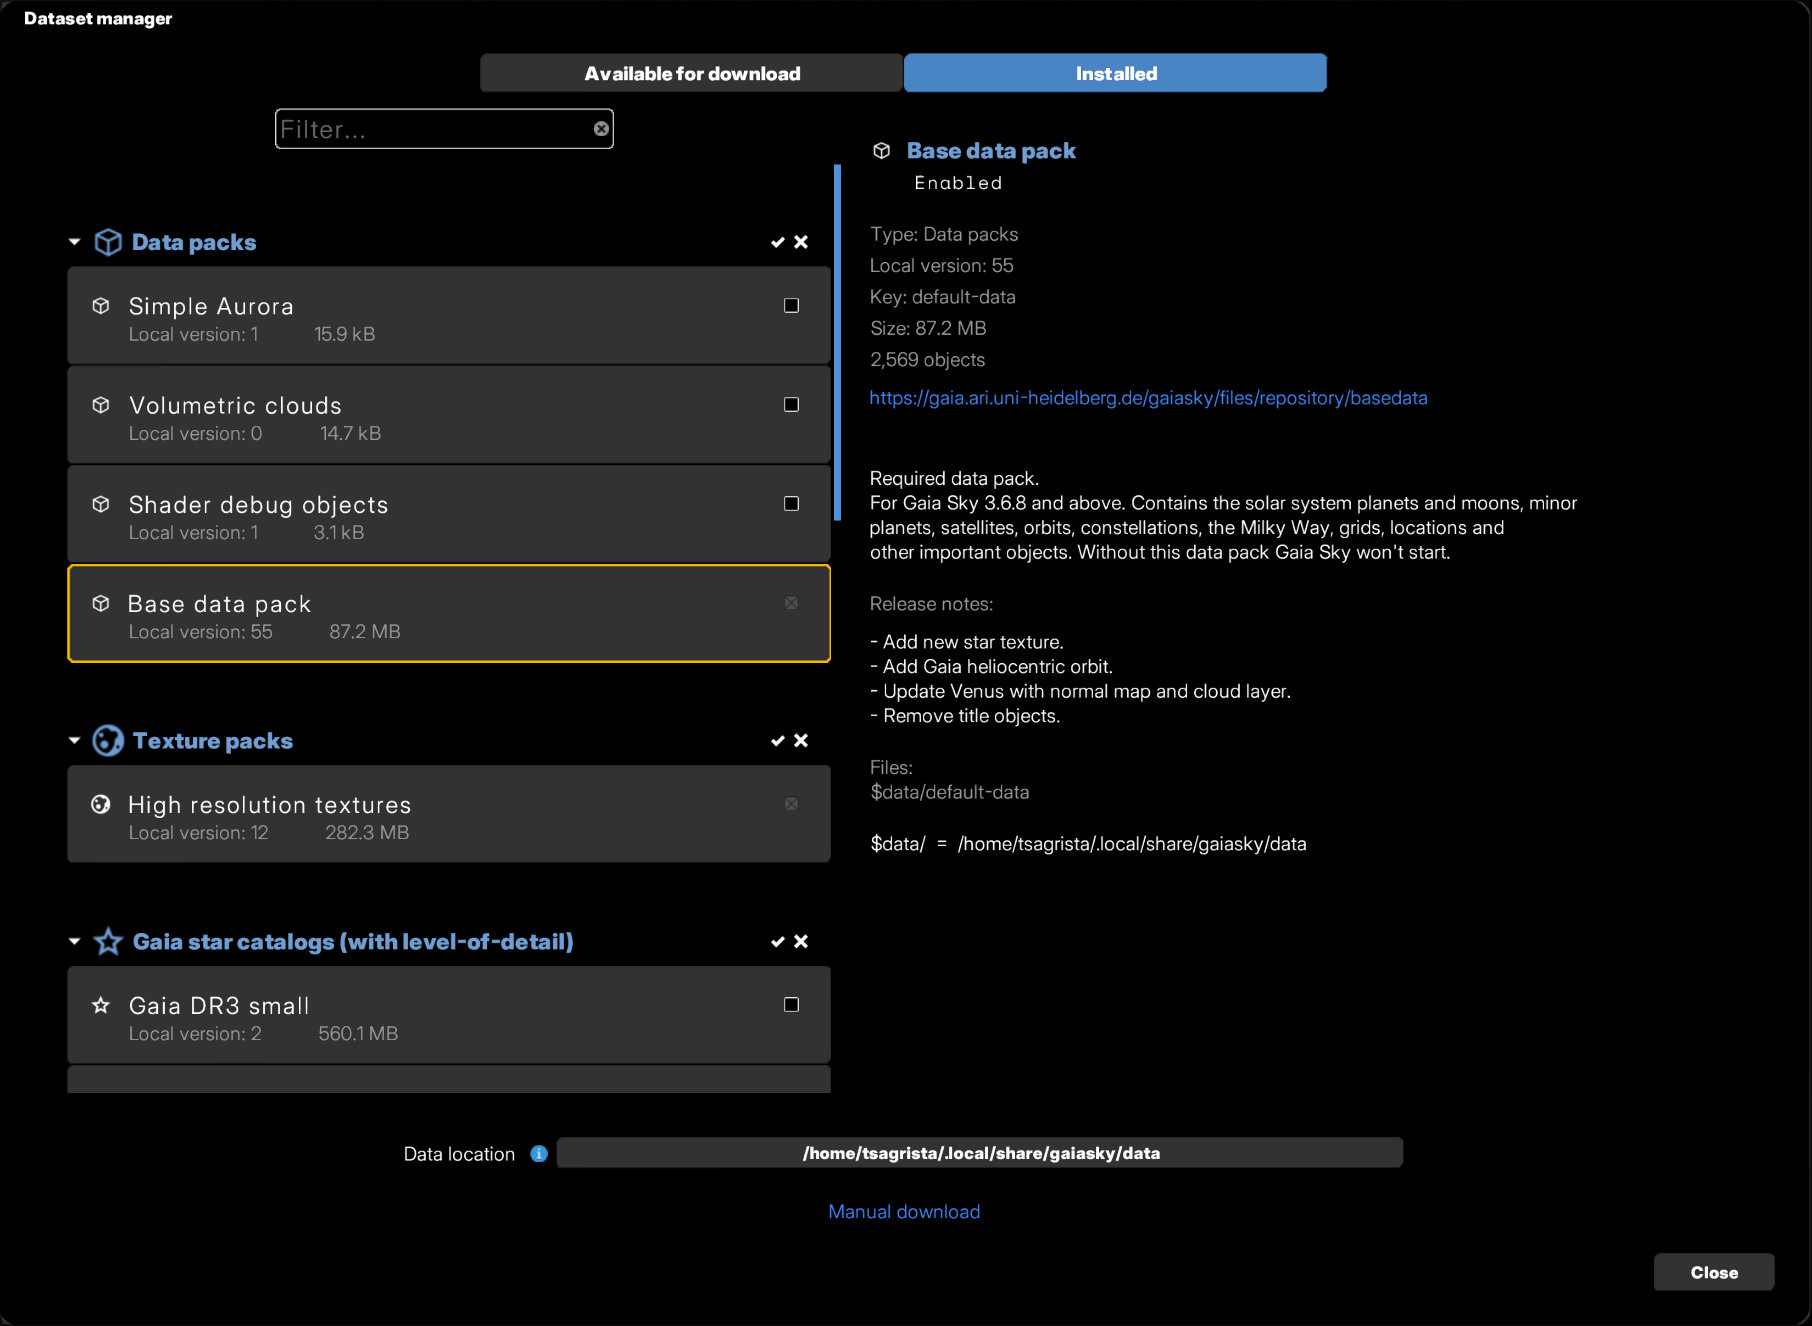
Enable and disable datasets from the Installed tab.
Now, close the dataset manager and Start Gaia Sky.
Basic controls
When Gaia Sky is ready to go, we are presented with this screen:
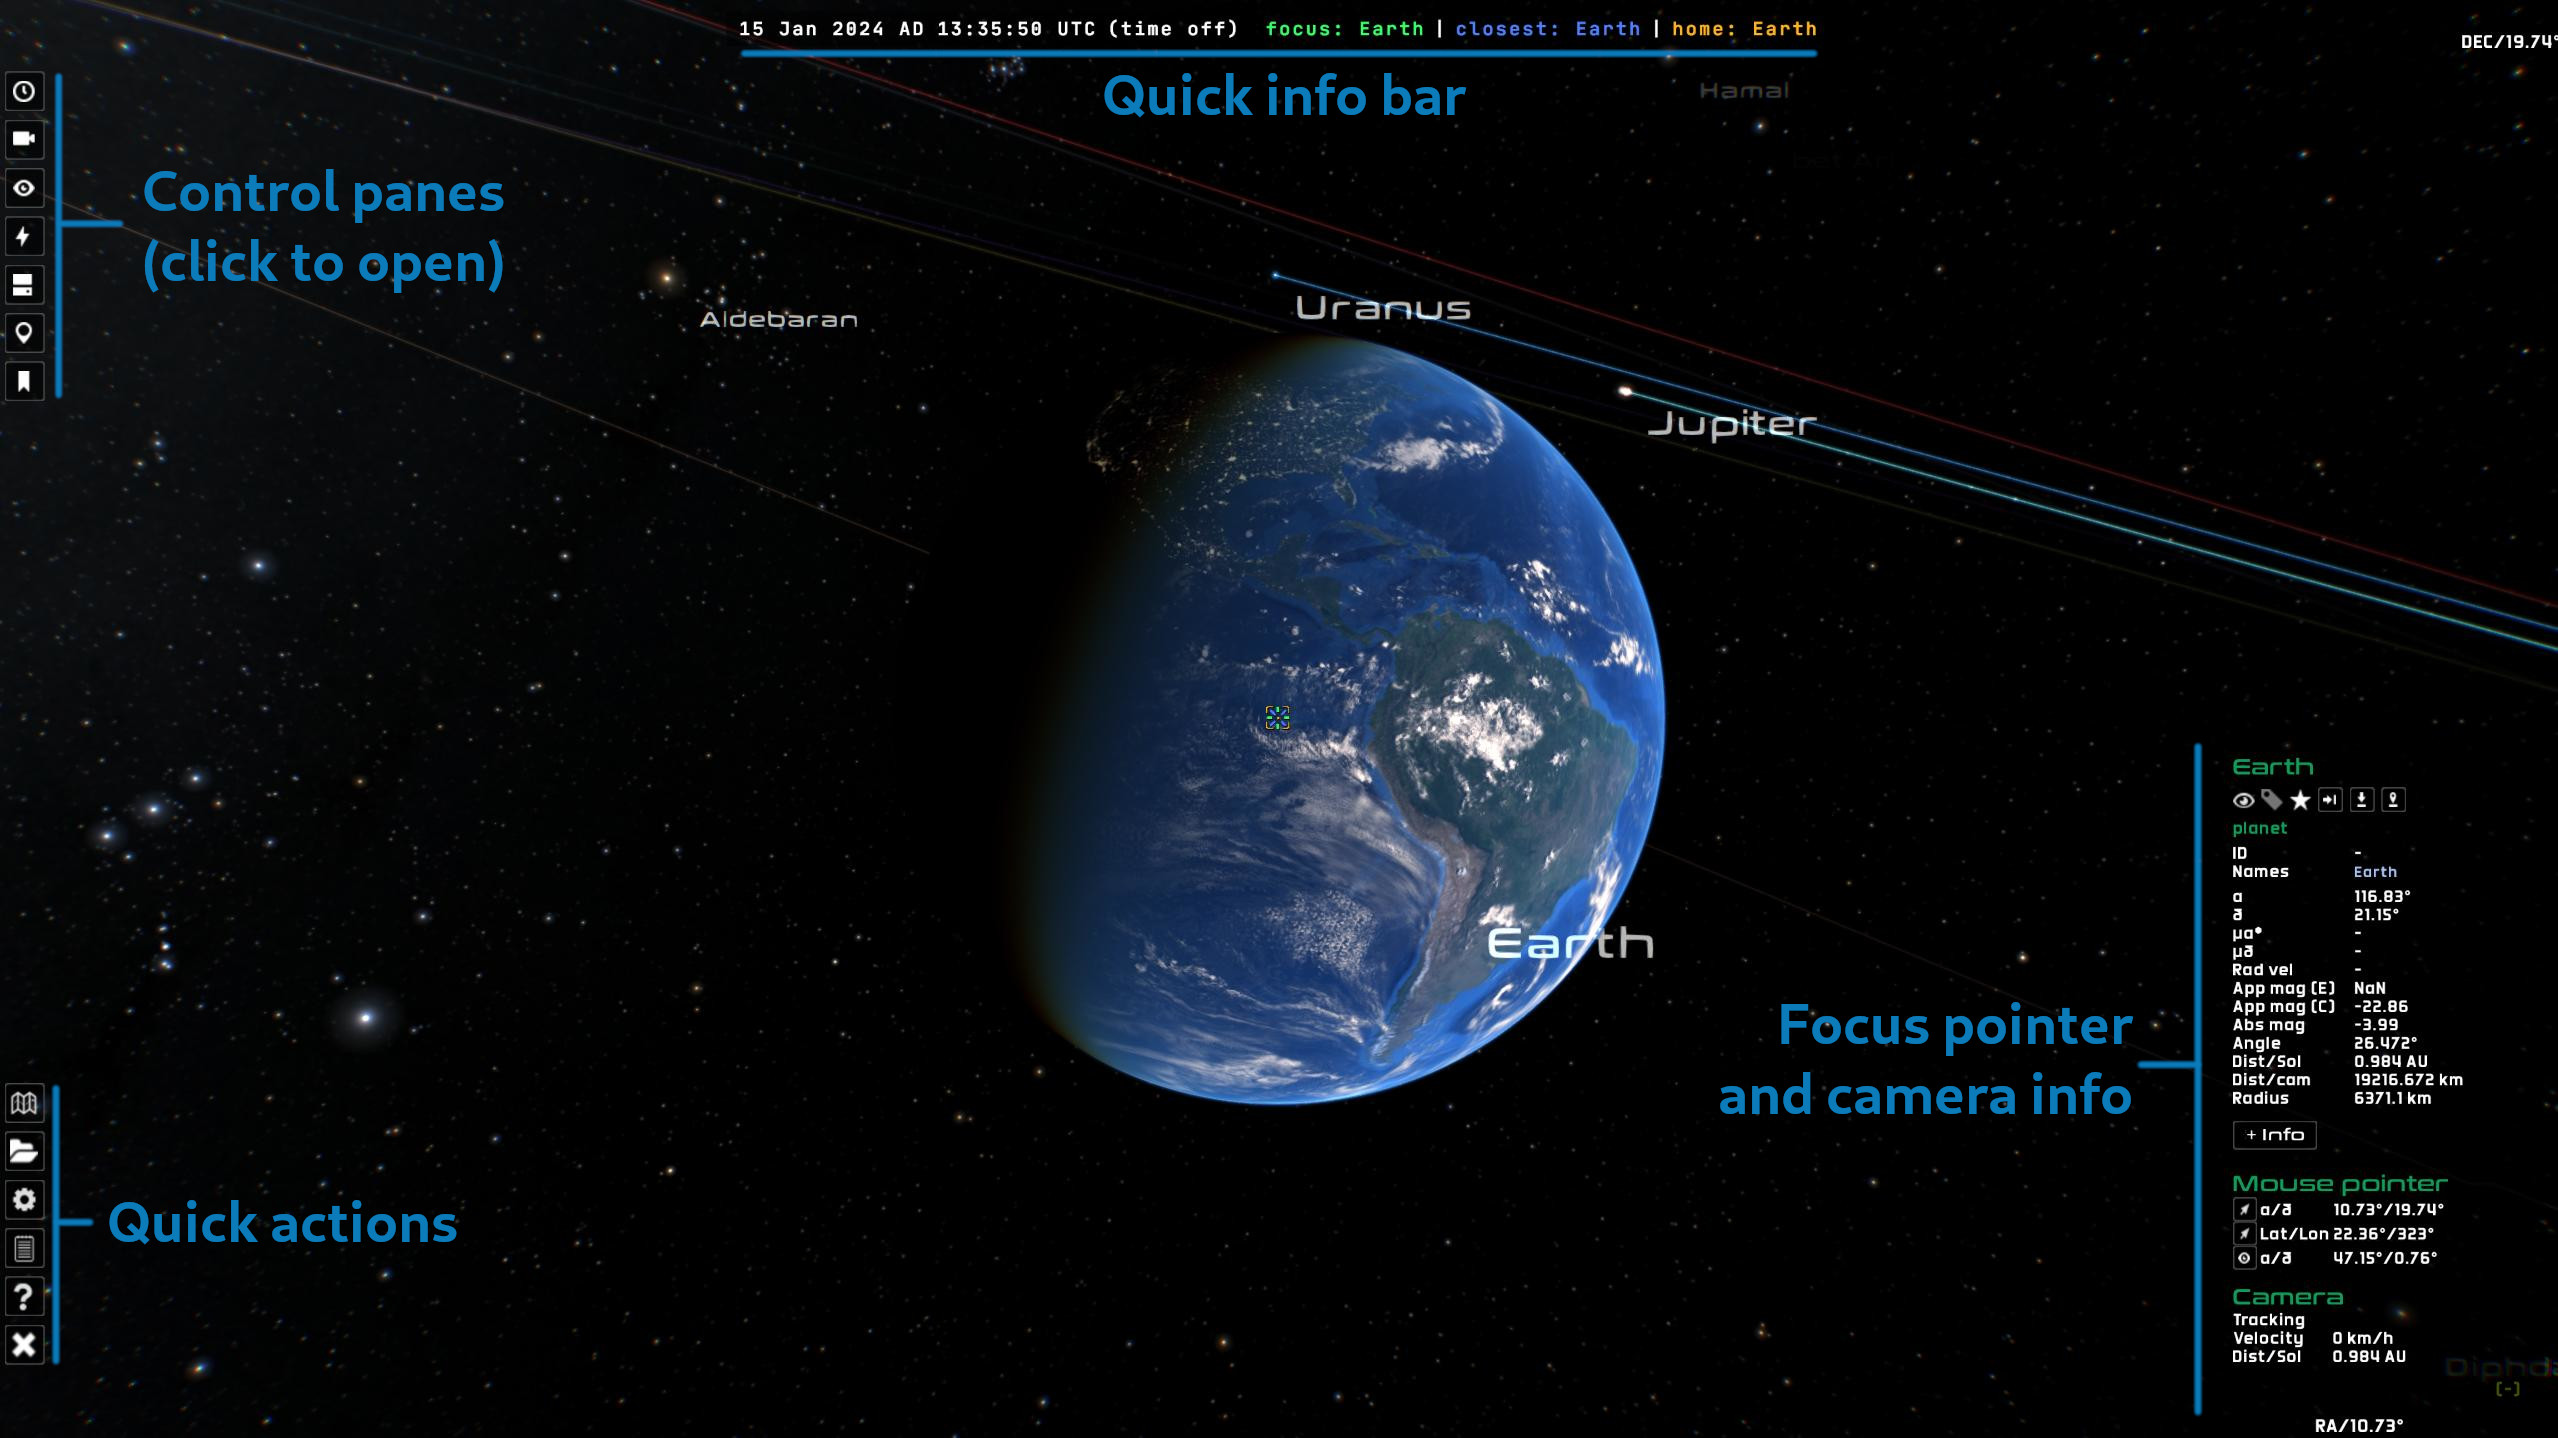
Gaia Sky starts focussed on the Earth.
In it, we can see a few things already:
To the bottom-right, the camera info panel tells us that we are in focus mode, meaning that all our movement is relative to the focus object. The default focus of Gaia Sky is the Earth.
To the top, the quick info bar tells us that our focus is the Earth, and that the closest object to our location is also the Earth. Additionally, we see that our home object is, again, the Earth.
Anchored to the top-left, we see some buttons that give access to the control panes. If we click on one of these buttons, the respective pane opens. We will use them later.
Movement
But right now let’s try some movement. In focus mode the camera orbits around the focus object, always pointing in the direction of the focus. Try clicking and dragging with your left mouse button. The camera should orbit around the Earth showing parts of the surface which were previously hidden. You may notice that the whole scene rotates. Now try scrolling with your mouse wheel. The camera moves either farther away from (scroll down) or closer to (scroll up) the Earth. We can always press and hold z to speed-up the camera considerably. This is useful to traverse long distances quickly.
Now, if we click and drag with your right mouse button, you can offset the focus object from the center, but your movement will still be relative to it.
You can also use your keyboard arrows ← ↑ → ↓ to orbit left or right around the focus object, or move closer to or away from it.
You can use shift with a mouse drag in order to roll the camera.
Docs
See the controls section of the user manual for more.
Selection
You can change the focus by simply double clicking on any object on the scene. You can also press f to bring up the search dialog where you can look up objects by name. Try it now. Press f and type in “mars”, without the quotes, and hit esc. You should see that the camera now points in the direction of Mars. To actually go to Mars simply scroll up until you reach it, or click on the  icon next to the name in the focus info panel. If you do so, Gaia Sky takes control of the camera and brings you to Mars.
If you want to move instantly to your current focus object, hit ctrl + g.
Any time, we can use the Home key to return back to Earth (in fact, we return to the home object, which is defined in the configuration file).
The user interface
The user interface of Gaia Sky consists of a few panes, buttons and windows. The most important of those are the control panes, accessible via a series of buttons anchored to the top-left.

Gaia Sky user interface with the most useful functions
Docs
See the user interface section of the user manual for more information.
Control panes
The control panes (previously called control panel in the old UI—it can still be used but is off by default) are made up of seven different panes:
 Time – shortcut: t.
 Camera – shortcut: c.
 Type visibility – shortcut: v.
 Visual settings – shortcut: l.
 Datasets – shortcut: d.
 Location log.
 Bookmarks – shortcut: b.
Each pane can be expanded and collapsed by clicking on the button or by using the respective keyboard shortcut (listed in the button tooltip).
Anchored to the bottom-left of the screen we can find six buttons to perform a few special actions:
 Toggle the mini-map – shortcut: Tab.
 Load a dataset – shortcut: Ctrl + o.
 Open the preferences window – shortcut: p.
 Show the session log – shortcut: Alt + l.
 Show the help dialog – shortcut: h or F1.
 Exit Gaia Sky – shortcut: Esc.
Camera info panel
The camera info panel, also known as focus info pane, is anchored to the bottom-right of the main window.
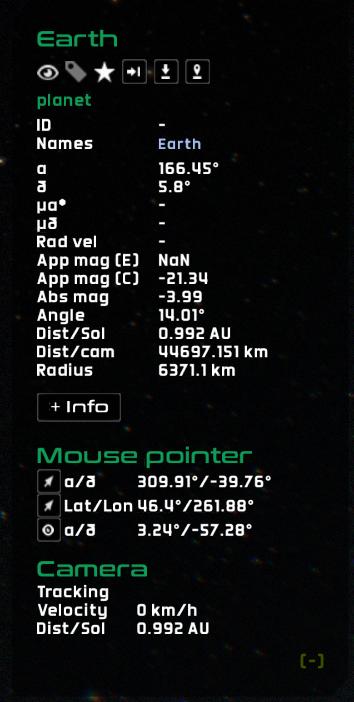
The camera info pane when the camera is in focus mode. In this state, it is also referred to as focus info pane, and it displays information on the focus (top), the mouse pointer (middle), and the camera position and state (bottom).
Docs
See the camera info panel section of the user manual.
Quick info bar
To the top of the screen, we can see the quick info bar which provides information on the current time, the current focus object (if any), the current closest object to our location and the current home object. The colors of these objects (green, blue, orange) correspond to the colors of the crosshairs. The crosshairs can be enabled or disabled from the interface tab in the preferences window (use p to bring it up).

The quick info bar is anchored to the top of the window and displays useful information at a glance.
Docs
See the quick info bar section for more information.
System info panel
Gaia Sky has a built-in system information panel that provides system information and is hidden by default. We can bring it up with ctrl + d, or by ticking the Show debug info” check box in the  System tab of the preferences window. By default, the debug panel is collapsed.

Collapsed system info panel
Expand the system info panel with the + symbol to get additional information.

Expanded system info panel
The debug panel shows information on the current graphics device, system and graphics memory, the amount of objects loaded and on display, the octree (if a LOD dataset is in use) or the SAMP status.
Additional debug information can be obtained in the system tab of the help dialog (? or h).
Docs
See the system info panel section for a full description.
Time controls
Tip
Open the time pane by clicking on the clock button, or by pressing t.
Gaia Sky can simulate time. Play and pause the simulation using the  /
/ Play/Pause buttons in the time pane, or toggle using Space.
The Time warp slider lets us modify the speed at which the simulation time runs w.r.t. real time. Use , or  and . or
  to divide by 2 and double the value of the time warp respectively. If we keep either . or , pressed, the warp factor will increase or decrease steadily.
Use the Reset time and warp button to reset the time warp to x1, and set the time to the current real world time (UTC).
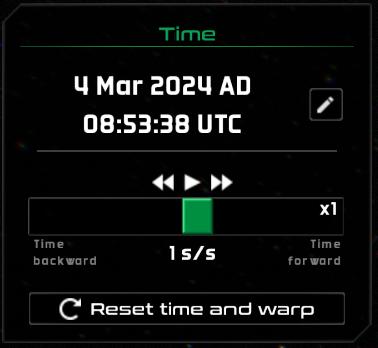
The time pane in the controls window of Gaia Sky.
Now, go ahead and press Home. This will bring us back to Earth. Now, start the time with or Space and drag the slider slightly to the right to increase its speed. We see that the Earth rotates faster and faster as we move the slider to the right. Now, drag it to the left until time is reversed and the Earth starts rotating in the opposite direction. Now time is going backwards!
If we set the time warp high enough we will notice that as the bodies in the Solar System start going crazy, the stars start to slightly move. That’s right: Gaia Sky also simulates proper motions.
Camera modes
We have already talked about the focus camera mode, but Gaia Sky provides some more camera modes:
0 - Free mode: the camera is not locked to a focus object and can roam freely. The movement is achieved with the scroll wheel of the mouse, and the view is controlled by clicking and draggin the left and right mouse buttons
1 - Focus mode: the camera is locked to a focus object and its movement depends on it
2 - Game mode: similar to free mode but the camera is moved with wasd and the view (pitch and yaw) is controlled with the mouse. This control system is commonly found in FPS (First-Person Shooter) games on PC
3 - Spacecraft mode: take control of a spacecraft (outside the scope of this tutorial)
The most interesting mode is free mode which lets us roam freely. Go ahead and press 0 to try it out. The controls are a little different from those of focus mode, but they should not be to hard to get used too. Basically, use the left mouse button to yaw and pitch the view, use shift to roll, and use the right mouse button to pan.
Docs
See the camera modes section of the user manual.
Special render modes
There are three special render modes: 3D mode, planetarium mode, panorama mode and orthosphere view. We can access these modes using the buttons at the bottom of the camera pane or the following shortcuts:
 or ctrl + s - 3D mode
 or ctrl + p - Planetarium mode
 or ctrl + k - Panorama mode
 or ctrl + j - Orthosphere view
Docs
See the stereoscopic mode, the planetarium mode, the panorama mode, and the orthosphere view sections of the user manual.
Type visibility
Tip
Expand and collapse the visibility pane by clicking on the eye button or with v.
The visibility pane offers controls to hide and show object types. Object types are groups of objects that are of the same category, like stars, planets, labels, galaxies, grids, etc. The pane also contains a button at the bottom that gives access to the per-object visibility window, which enables visibility control for individual objects.
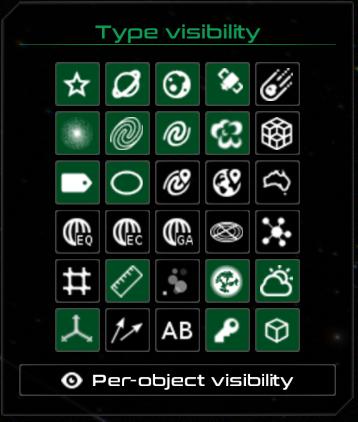
The visibility pane contains controls to hide and show types of objects.
For example, we can hide the stars by clicking on the ![]() stars button. The object types available are the following:
stars button. The object types available are the following:
 – Stars
 – Planets
 – Moons
 – Satellites
 – Asteroids
 – Star clusters
 – Milky Way
 – Galaxies
 – Nebulae
 – Meshes
 – Equatorial grid
 – Ecliptic grid
 – Galactic grid
 – Labels
 – Titles
 – Orbits
 – Locations
 – Cosmic locations
 – Countries
 – Constellations
 – Constellation boundaries
 – Rulers
 – Particle effects
 – Atmospheres
 – Clouds
 – Axes
 – Velocity vectors
 – Others
Velocity vectors
One of the elements, the velocity vectors, enable a few properties when selected.
Number factor – control how many velocity vectors are rendered. The stars are sorted by magnitude (ascending) so the brightest stars will get velocity vectors first
Length factor – length factor to scale the velocity vectors
Color mode – choose the color scheme for the velocity vectors
Show arrowheads – Whether to show the vectors with arrow caps or not
Tip
Control the width of the velocity vectors with the line width slider in the visual settings pane.
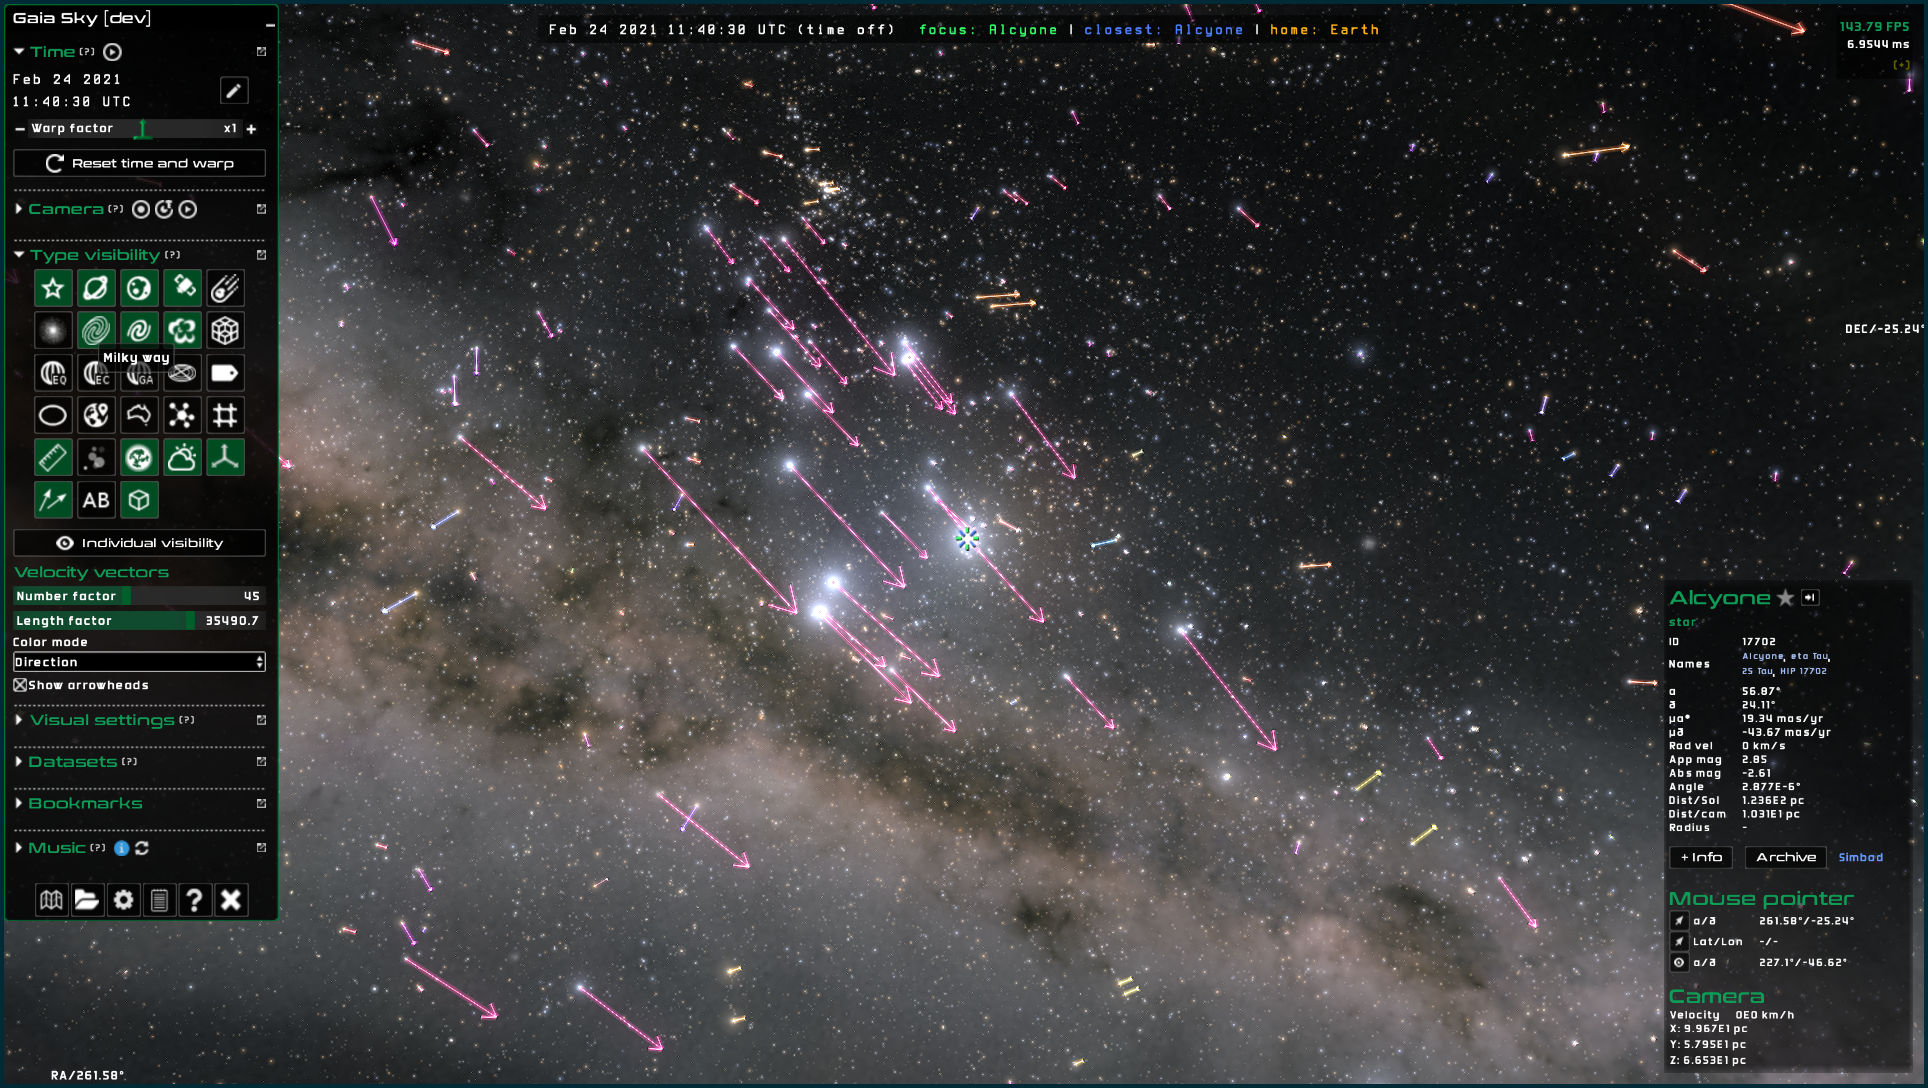
Velocity vectors in Gaia Sky
Docs
See the velocity vectors section of the user manual.
Visual settings
Tip
Expand and collapse the visual settings pane by clicking on the bolt button or with l.
The visual settings pane contains a few options to control the shading of stars and other elements:
Star brightness – control the brightness of stars.
Magnitude multiplier – exponent of power function that controls the brightness of stars. Controls the brightness difference between bright and faint stars.
Star glow factor – close-by star size.
Point size – size of point-like stars and other objects.
Base star level – the minimum brightness level for all stars.
Ambient light – control the amount of ambient light. This only affects the models such as the planets or satellites.
Line width – control the width of all lines in Gaia Sky (orbits, velocity vectors, etc.).
Label size – control the size of the labels.
Elevation multiplier – scale the height representation for planets with elevation maps.
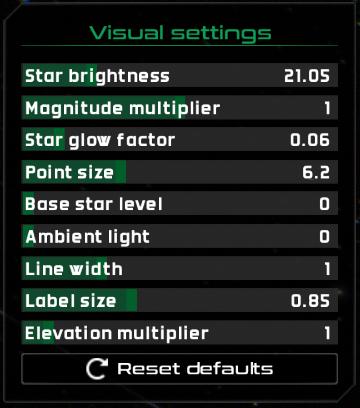
The visual settings pane.
External datasets
We can also load datasets into Gaia Sky at run time. Right now, the VOTable, CSV and FITS formats are supported. Gaia Sky needs some metadata in the form of UCDs or column names in order to parse the dataset columns correctly.
Docs
See to the STIL data loader section of the Gaia Sky user manual for more information on how to prepare your datasets for Gaia Sky.
The datasets loaded in Gaia Sky at a certain moment can be found in the datasets pane of the control panel. Open it by clicking on the button or by pressing d.

Datasets pane of Gaia Sky.
There are four main ways to load new datasets into Gaia Sky:
Directly from the UI, using the
button (anchored to the bottom-left) or pressing ctrl + o.Through SAMP, via a connection to another astronomy software package such as Topcat or Aladin.
Via a script, using one of the dataset loading API calls.
Creating a dataset in the Gaia Sky format so that it appears in the dataset manager (see here.
Docs
See the data format section to know how to create a Gaia Sky dataset (advanced!).
Loading a dataset from the UI – Go ahead and remove the current star catalog by clicking on the ![]() icon in the datasets pane. Now, download a raw Hipparcos dataset VOTable, click on the
icon in the datasets pane. Now, download a raw Hipparcos dataset VOTable, click on the ![]() icon (or press ctrl + o) and select the file. In the next dialog just click Ok to start loading the catalog. In a few moments the Hipparcos new reduction dataset should be loaded into Gaia Sky.
icon (or press ctrl + o) and select the file. In the next dialog just click Ok to start loading the catalog. In a few moments the Hipparcos new reduction dataset should be loaded into Gaia Sky.
Loading a dataset via SAMP – This section presupposes that Topcat is installed on the machine and that the user knows how to use it to connect to the VO to get some data. The following video demonstrates how to do this (Odysee mirror, YouTube mirror):
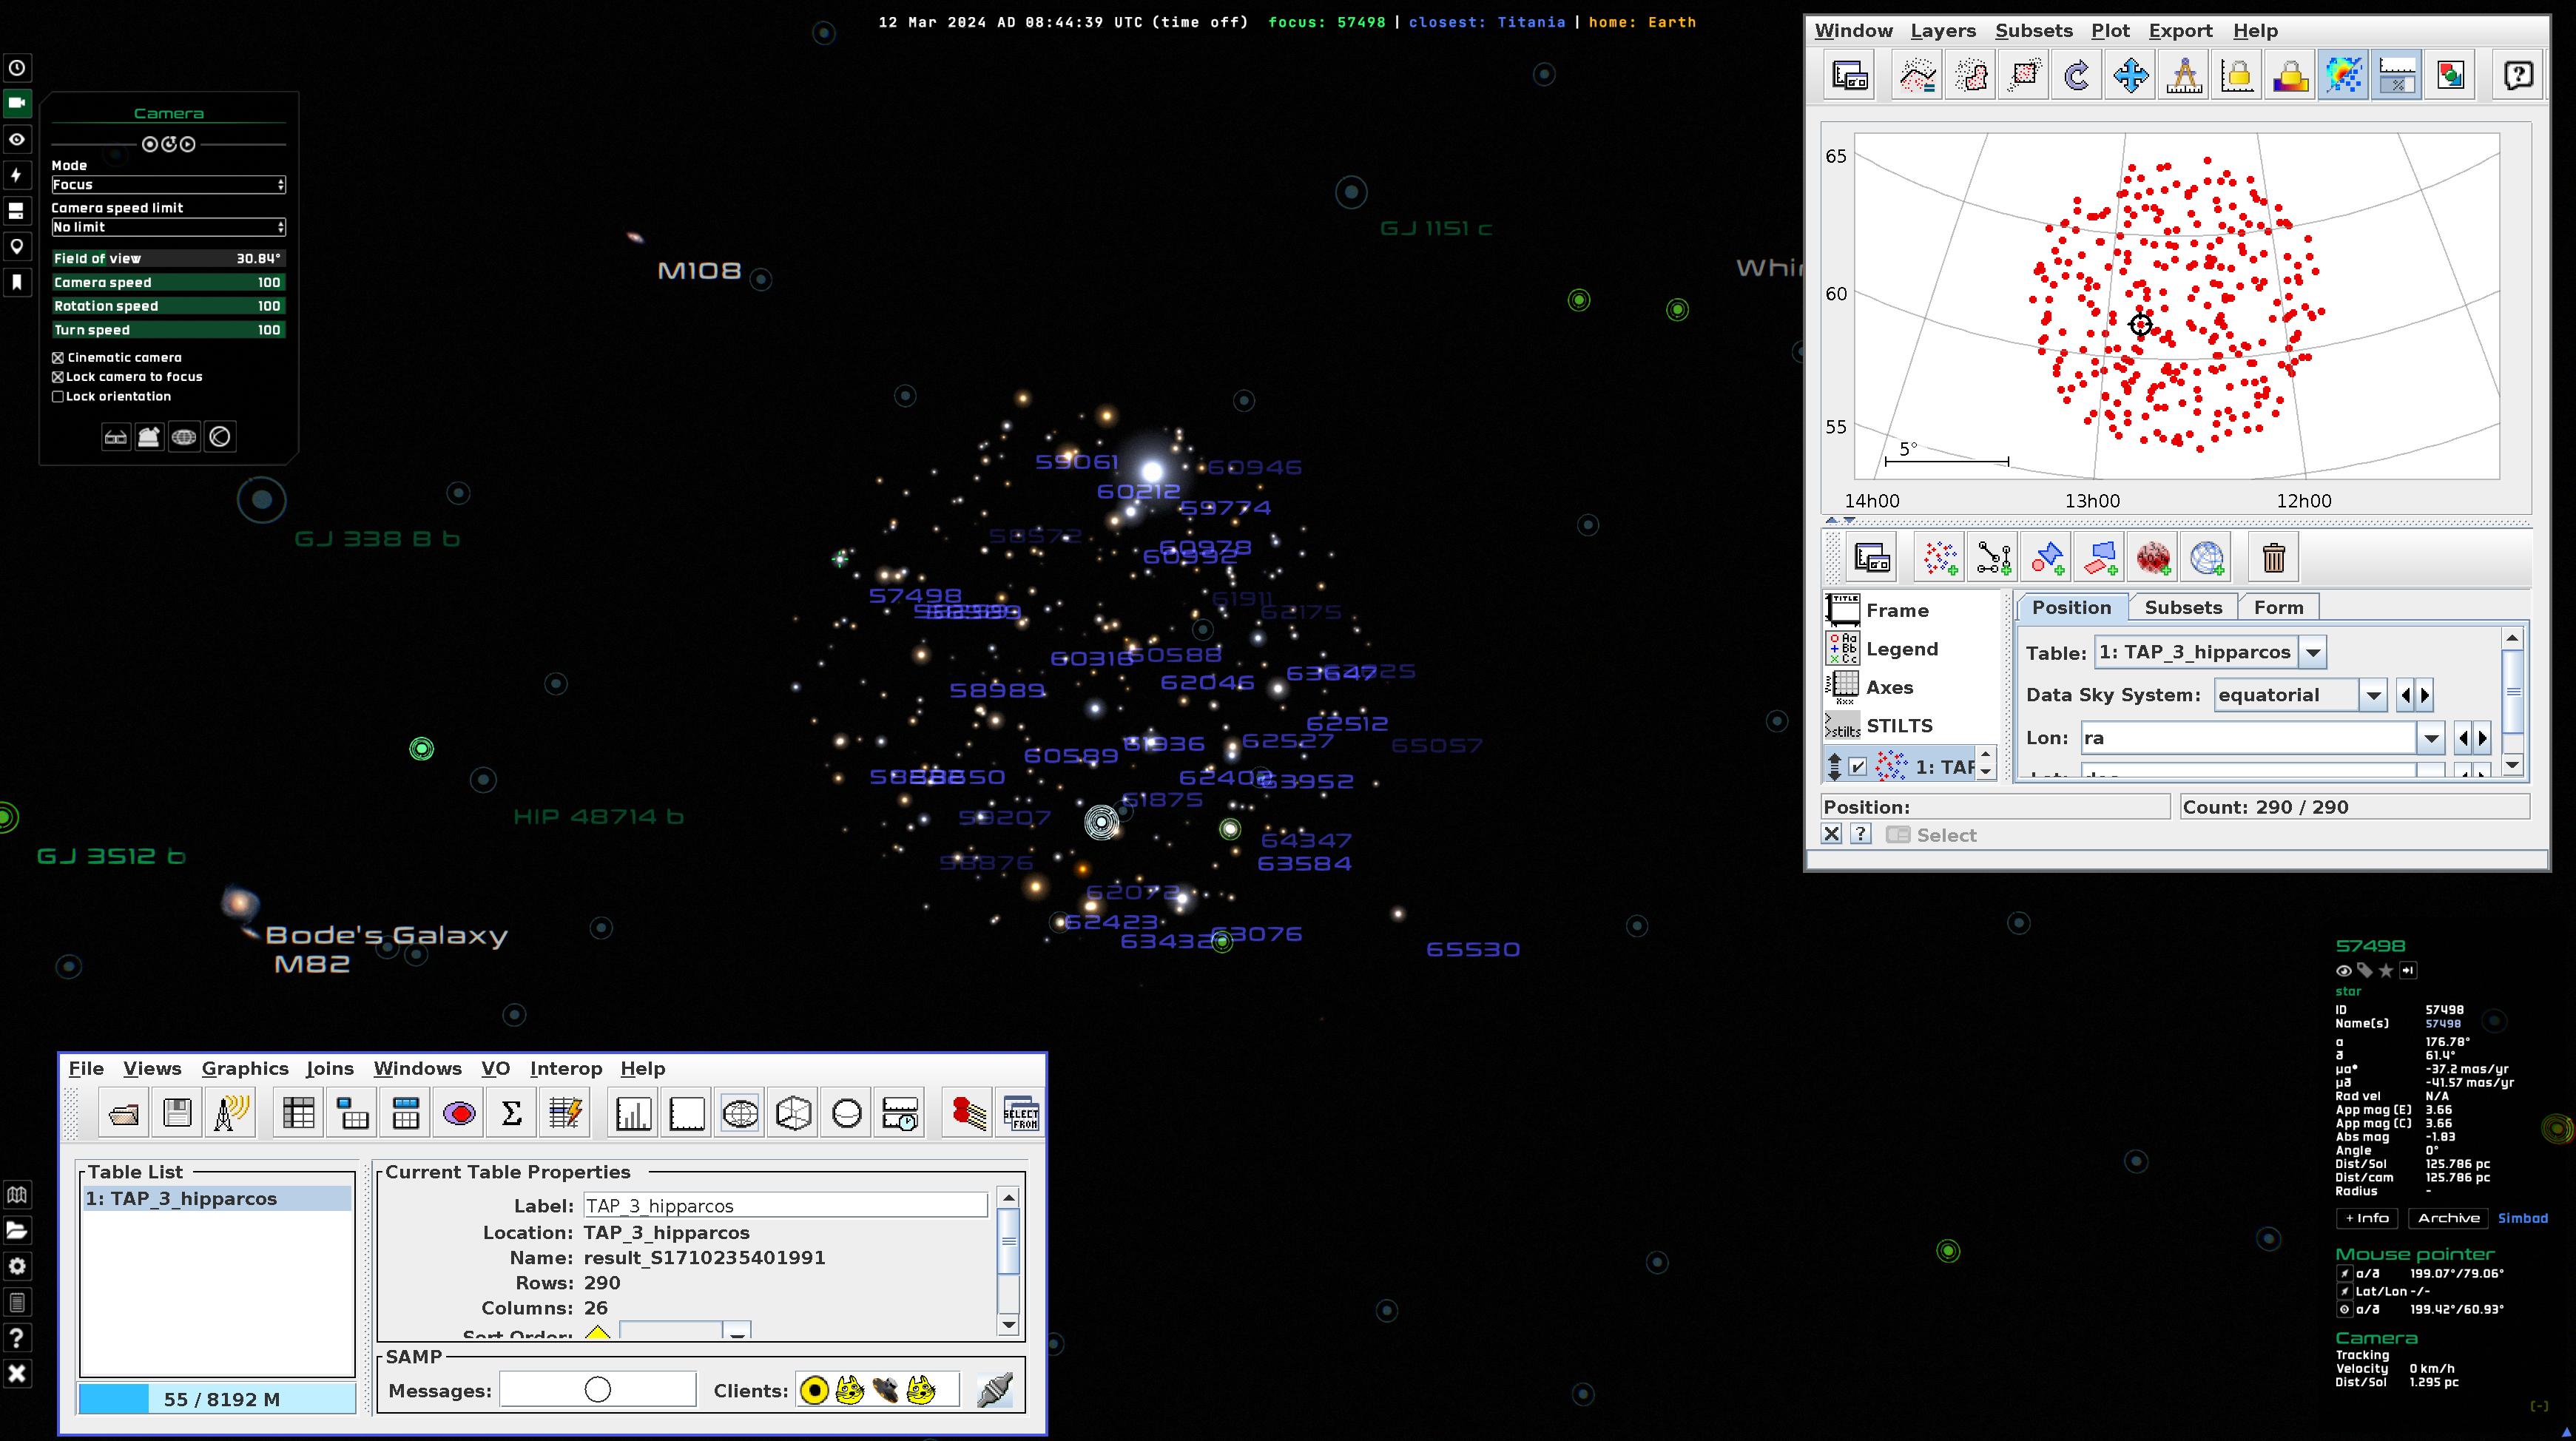
Loading a dataset from Topcat through SAMP (click for video)
Loading a dataset via scripting – Wait for the scripting section of this course.
Preparing a descriptor file – Not addressed in this tutorial. See the catalog formats section for more information.
Working with datasets
Tip
Expand and collapse the datasets pane by clicking on the hard disk button or with d.
All datasets loaded are displayed in the datasets pane in the control panel. A few useful tips for working with datasets:
The visibility of individual datasets can be switched on and off by clicking on the
 button
Remove datasets with the
buttonWe can highlight a dataset by clicking on the
 button. The highlight color is defined by the color selector right on top of it. Additionally, we can map an attribute to the highlight color using a color map. Let’s try it out:
Click on the color box in the Hipparcos dataset we have just loaded from Topcat via SAMP
Select the radio button “Color map”
Select the rainbow color map
Choose the attribute. In this case, we will use the number of transits, ntr
Click Ok
Click on the highlight dataset
icon to apply the color map
We can define basic filters on the objects of the dataset using their attributes from the dataset preferences window
 . For example, we can filter out all stars with \(\delta > 50^{\circ}\):
Click on the dataset preferences button
Click on Add filter
Select your attribute (declination \(\delta\))
Select your comparator (\(<\))
Enter your value, in this case 50
Click Ok
The stars with a declination greater than 50 degrees should be filtered out
Multiple filters can be combined with the AND and OR operators
External information
Gaia Sky offers three ways to display external information on the current focus object: Wikipedia, Gaia archive and Simbad.

Wikipedia, Gaia archive and Simbad connections
The +Info button opens a view that contains the local data on the object, and a preview of the Wikipedia article on this object, if it exists.
When the Archive button appears in the focus info pane, it means that the full table information of selected star can be pulled from the Gaia archive.
When the
Simbadlink appears in the focus info pane, it means that the objects has been found on Simbad, and we can click the link to open it in the web browser.
Scripting
Gaia Sky exposes an API that is accessible through Python (via Py4j) or through HTTP over a network (using the REST API HTTP server).
In this tutorial, we focus on the writing of Python scripts that tap into the Gaia Sky API. You will need Python 3 installed, along with the packages NumPy and Py4j.
We use the Python package manager pipenv. You can install it using pip:
pip install --user pipenv
Then, create a virtual environment (if it does not yet exist).
pipenv shell
Now, you may want to install numpy and py4j directly, or use the requirements.txt file in
the directory assets/scripts of the Gaia Sky repository to
install the dependencies.
# Either one or the other
pipenv install py4j numpy
pipenv install -r requirements.txt
Once this is ready, you can run a script with the Python 3 interpreter in your virtual environment. Of course, you need to launch Gaia Sky in the same computer for the connection to succeed. Right now, only local scripting is supported. If you need to operate Gaia Sky over the network, have a look at the REST API section.
To run a script named my-gaiasky-script.py, run this in a terminal:
python3 my-gaiasky-script.py
If everything works well, the connection should succeed and Gaia Sky should react accordingly.
But wait, we don’t have a script to run yet! Do not fret, in the next section we learn the basics of writing a script for Gaia Sky.
Docs
See the scripting section in the user manual.
A basic script
Writing a basic script is quite simple. Essentially, you need a header that imports Py4j and creates the connection object. Then, you can start using the connection object to run calls.
The following script simply connects to Gaia Sky and prints “Hello from a script!” to both Python and the Gaia Sky log.
from py4j.clientserver import ClientServer, JavaParameters

gateway = ClientServer(java_parameters=JavaParameters(auto_convert=True))
gs = gateway.entry_point

# User code goes here.
# We use the 'gs' object to access the API.

# Let's print something.
message = "Hello from a script!"
# Print to Gaia Sky.
gs.print(message)
# Print with Python.
print(message)

# Shutdown the gateway at the end.
gateway.shutdown()
Note that you need to shutdown the gateway at the end, this is important to clean things up and be able to run more scripts afterwards!
It is cool that we can print messages, but what other actions can we perform via scripting? Read on to know more about the API.
Gaia Sky API
The Gaia Sky API (here) contains many more calls to interact with the platform in real time from Python scripts or a REST HTTP server. The API includes calls to:
Add and remove messages and images to the interface,
start and stop time, and change the time warp,
add scene elements like shapes, lines, etc.,
load full datasets in VOTable, CSV, FITS, or the internal JSON format,
manage datasets (highlight, change settings, etc.),
manipulate the camera position, orientation and mode,
move the camera by simulating mouse actions (rotate around, forward, etc.),
activate special modes like planetarium or panorama,
create smooth camera transitions in position and orientation,
change the various settings and preferences,
back-up and restore the full configuration state,
take screenshots, use the frame output mode.
The API specification is documented in the links below:
Showcase scripts
The Gaia Sky repository contains many test and showcase scripts that may help with getting up to speed with Gaia Sky scripting. Many of them contain comments explaining what is going on:
Hands-on session
Here, we have a look at some real world scripts (full file listing), and write our own to later run them on Gaia Sky.
Scripting presentation (dropbox link).
The proposed scripts are:
Locating_the_Hyades_tidal_tails.py – a simple sequential script which exemplifies some of the most common API calls, and can be used to capture a video. The script requires the following data and subtitles files to run (save them in the same directory as the script):
line-objects-update.py – a script showcasing the feature to run scripting code within the Gaia Sky main loop, so that it runs synchronized with the main loop, every frame. This is used to run update operations every single frame. In our test script, we create a line between the Earth and the Moon, start the time simulation, and update the position of the line every frame so that it stays in sync with the scene.
Camera paths
Gaia Sky includes a feature to record and play back camera paths. This comes in handy if we want to showcase a certain itinerary through a dataset, for example.
Recording a camera path — The system will capture the camera state at every frame and save it into a .gsc (for Gaia Sky camera) file. We can start a recording by clicking on the ![]() icon in the camera pane of the control panel. Once the recording mode is active, the icon will turn red
icon in the camera pane of the control panel. Once the recording mode is active, the icon will turn red ![]() . Click on it again in order to stop recording and save the camera file to disk with an auto-generated file name (default location is
. Click on it again in order to stop recording and save the camera file to disk with an auto-generated file name (default location is $GS_DATA/camera (see the folders section in the Gaia Sky documentation).
Playing a camera path — In order to playback a previously recorded .gsc camera file, click on the ![]() icon and select the desired camera path. The recording will start immediately.
icon and select the desired camera path. The recording will start immediately.
Tip
Mind the FPS! The camera recording system stores the position of the camera for every frame! It is important that recording and playback are done with the same (stable) frame rate. To set the target recording frame rate, edit the “Target FPS” field in the camcorder settings of the preferences window. That will make sure the camera path is using the right frame rate. In order to play back the camera file at the right frame rate, we can edit the “Maximum frame rate” input in the graphics settings of the preferences window.
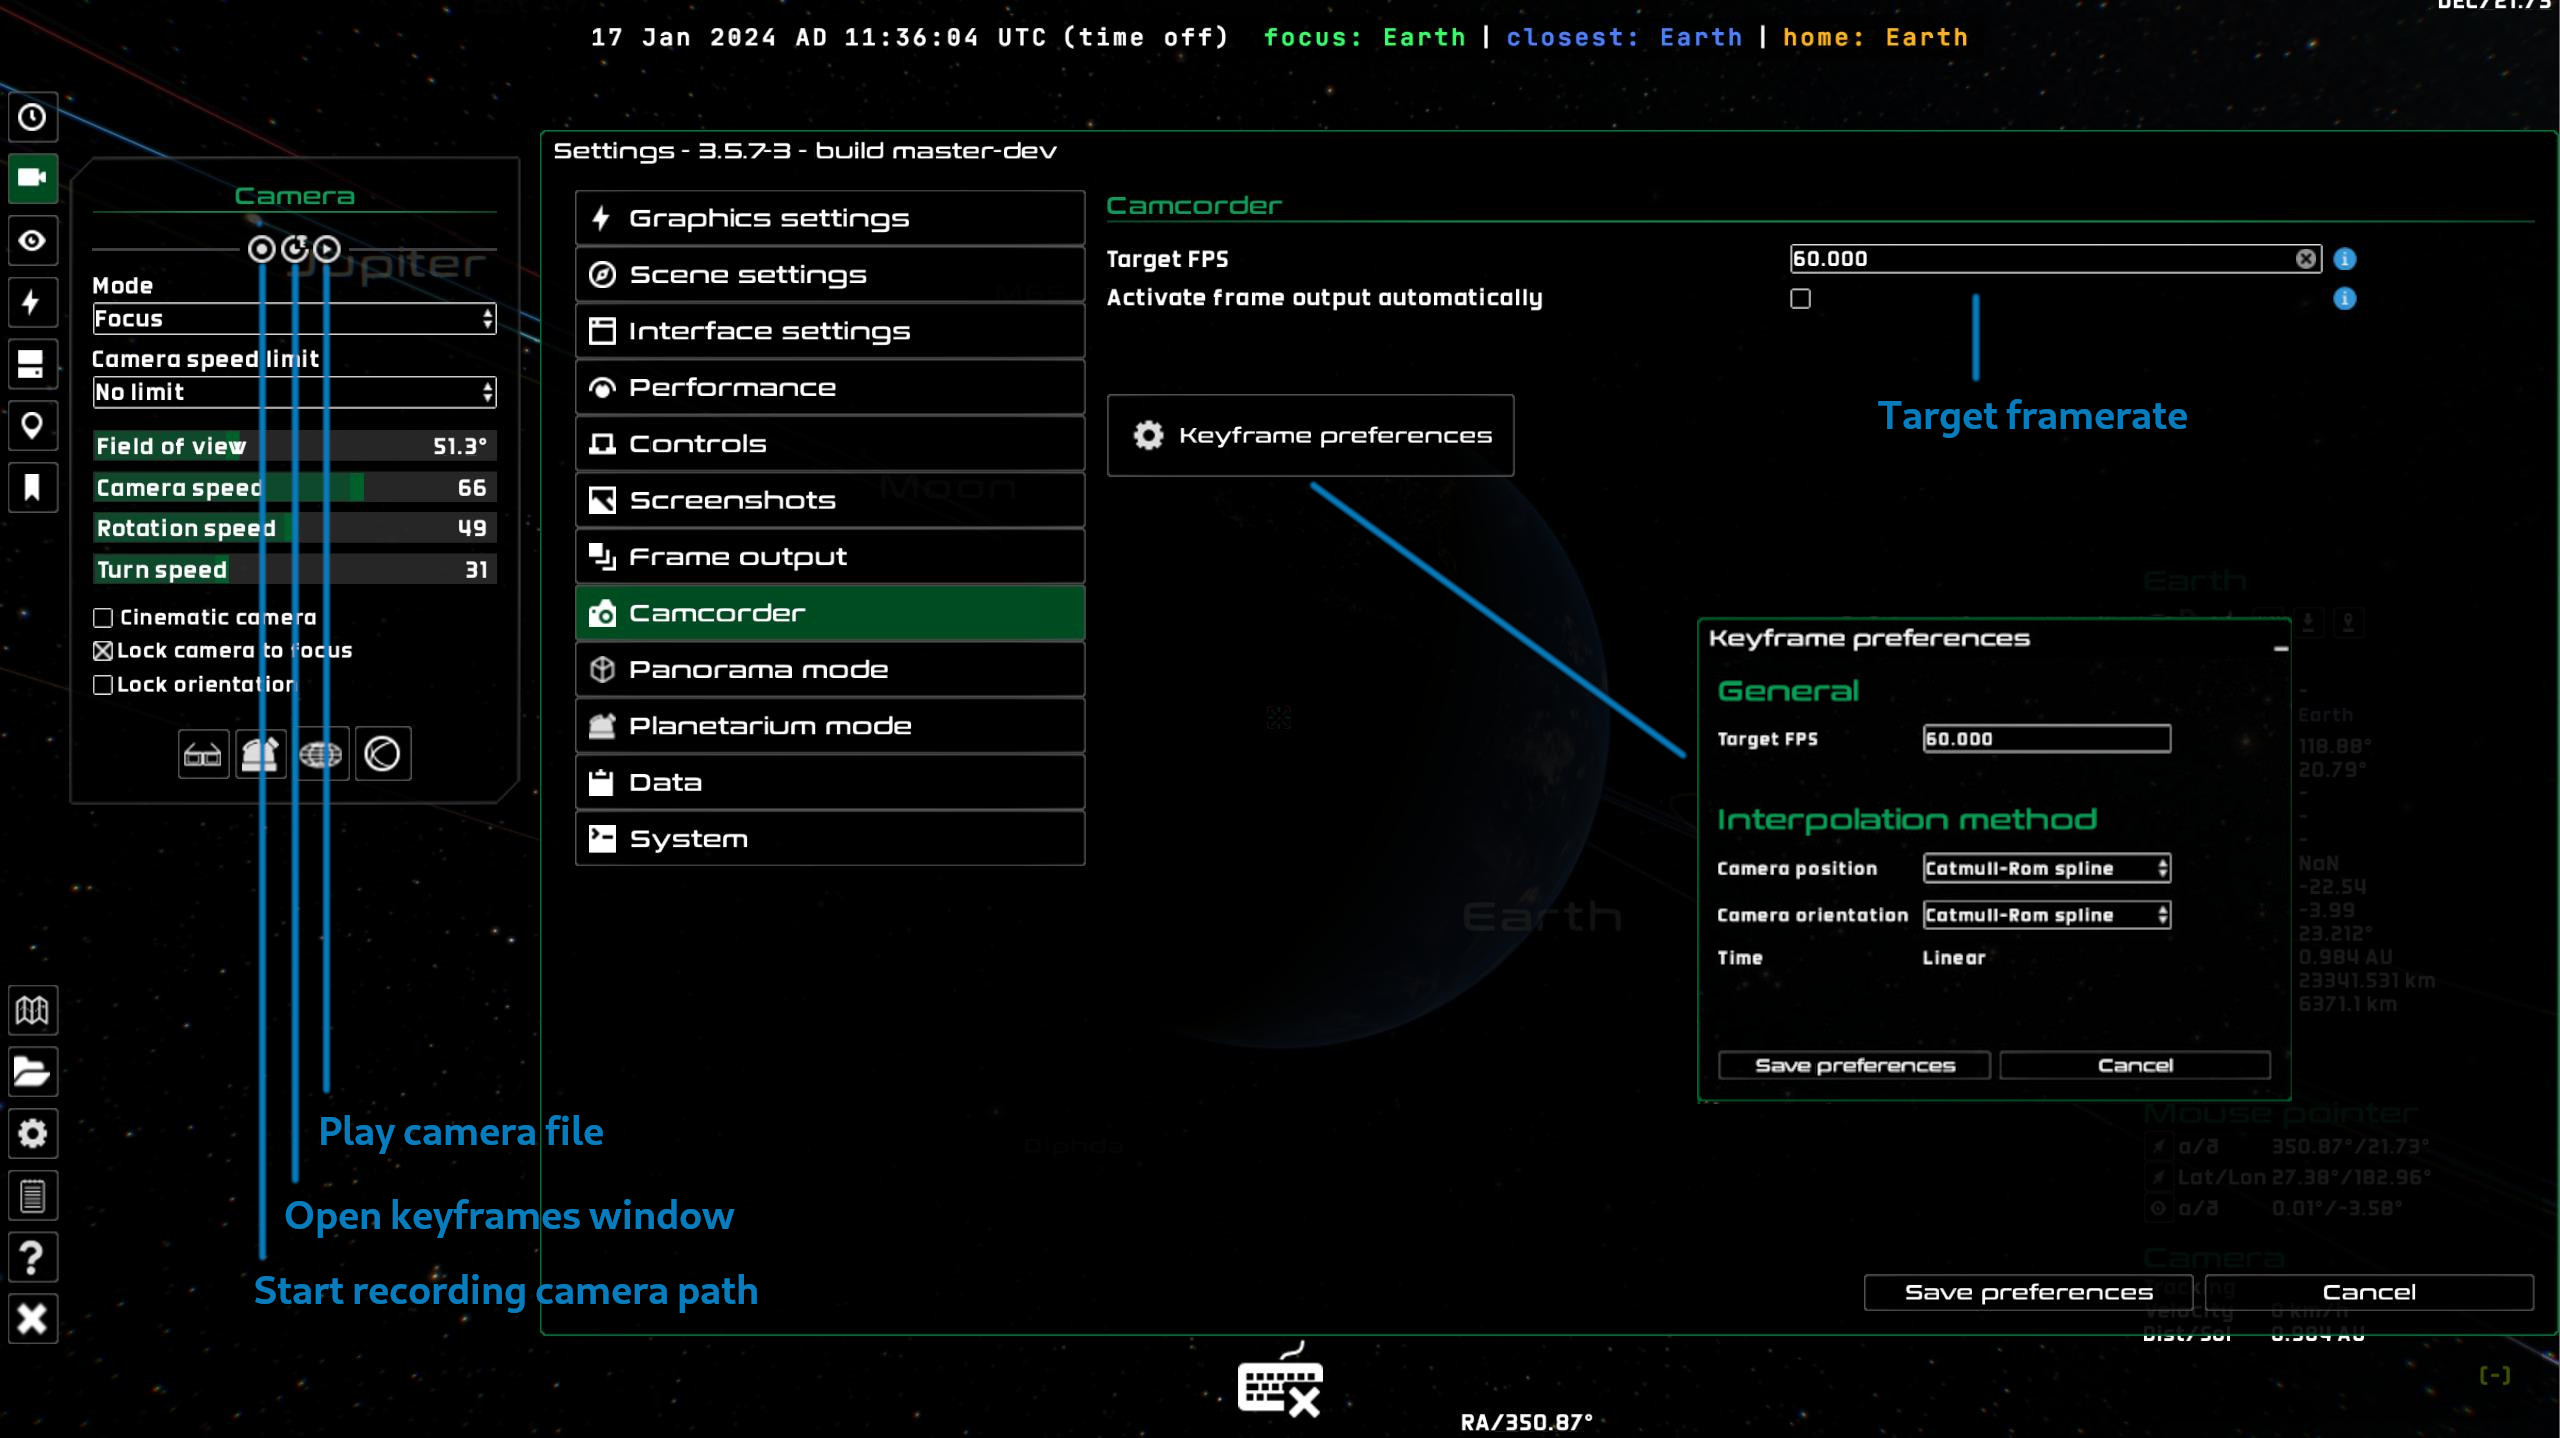
Location of the controls of the camcorder in Gaia Sky
Docs
See the camera paths section in the user manual.
Keyframe system
The camera path system offers an additional way to define camera paths based on keyframes. Essentially, the user defines the position and orientation of the camera at certain times and the system generates the camera path from these definitions. Gaia Sky incorporates a whole keyframe definition system which is outside the scope of this tutorial.
As a very short preview, in order to bring up the keyframes window to start defining a camera path, click on the icon ![]() .
.
Docs
See the keyframes system section in the user manual.
Frame output mode
In order to create high-quality videos, Gaia Sky offers the possibility to export every single still frame to an image file using the frame output subsystem. The resolution of these still frames can be set independently of the current screen resolution.
We can start the frame output system by pressing F6. Once active, the system starts saving each still frame to disk (frame rate goes down, most probably). The save location of the still frame images is, by default, $GS_DATA/frames/[prefix]_[num].jpg, where [prefix] is an arbitrary string that can be defined in the preferences. The save location, mode (simple or advanced), and the resolution can also be defined in the preferences.
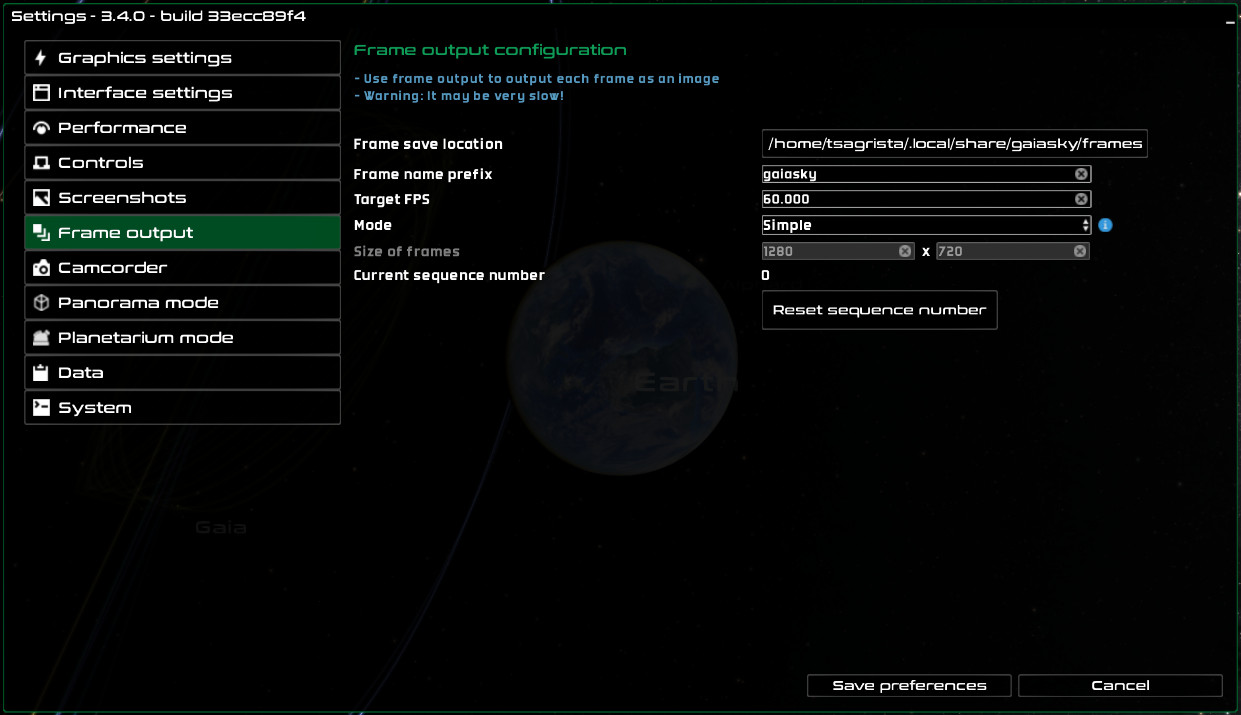
The configuration screen for the frame output system
Create a video with ffmpeg
Once we have the still frame images, we can convert them to a video using ffmpeg or any other encoding software. Additional information on how to convert the still frames to a video can be found in the capturing videos section of the Gaia Sky user manual.
Conclusion
Congratulations! You have reached the end of the quick start guide. You are now a totally legit Gaia Sky master ;)