

APIv2#
The Gaia Sky APIv2 (Javadoc) is the preferred interface to access Gaia Sky scripting.
Some of the advantages of APIv2 over APIv1 are:
It is modular.
It is well organized.
It uses Python’s snake_case instead of Java’s camelCase for function and parameter naming.
It uses consistent function names.
It uses consistent parameter names.
The APIv2 is modular, and its calls are organized into functional groups:
Base – Global attributes, settings, and printing.
Time – Simulation time and clock manipulation.
Camera – Movement, focus, and camera modes. Contains an inner module.
Interactive camera module – Functions to manipulate the camera in interactive mode.
Scene – Object manipulation and scene elements.
Data – Dataset loading and visibility management.
Graphics – Graphics system management.
Camcorder – Camcorder access and functions.
UI – User interface manipulation.
Input – Input system and event access.
Output – Output system access, like screenshots and frames.
Refsys – Reference system and unit conversions.
Geom – Geometry operations and algorithms.
Instances – Work with multiple connected instances in the master-replica model.
Gaia Sky provides a REST server that enables the remote execution of API calls over HTTP. This is described in the REST server section.
APIv2 reference#
The only up-to-date APIv1 documentation for each version is in the interface header files themselves. Below is a list of links to the different APIs.
Scripting with APIv2#
First of all, install the environment if you have not done so.
Using the APIv2 from a Python script is very easy. We use the single-threaded model of Py4J to connect to Gaia Sky from Python. These are the necessary steps to set up your script:
Import
ClientServerandJavaParametersfrompy4j.clientserver.Create a gateway and get its entry point.
Use the entry point to access the APIv2 modules.
Use the modules to access APIv2 methods.
Properly shut down the gateway. Since Gaia Sky spawns a new server per script, the gateway must be shut down at the end of the script so that the Python program can terminate correctly and Gaia Sky can create a new server to deal with further scripts listening to the Py4J port.
The following snippet exemplifies these 5 points in Python code.
# 1. Imports
from py4j.clientserver import ClientServer, JavaParameters

# 2. Create the gateway and entry point
gateway = ClientServer(java_parameters=JavaParameters(auto_convert=True, auto_field=True))
apiv2 = gateway.entry_point.apiv2

# 3. Access modules
# Base module
base = apiv2.base
# Camera module
camera = apiv2.camera
# Time module
time = apiv2.time

# 4. Call module methods
camera.go_to_object("Mars", 10.0, 5.0)
time.start_clock()

# More code goes here
[...]

# 5. Close
gateway.close()
Backing up and restoring settings#
Typically, scripts modify various program settings when they run (camera speed, star brightness, field of view, etc.). In order to leave Gaia Sky in the state it was before, scripts have the option to back up and restore the entire settings state of Gaia Sky. To do that, the APIv1 includes a few calls to push and pull settings states from an internal LIFO stack:
base.settings_backup() — push the current settings state to the settings stack.
base.settings_restore() — restore the top-most settings state from the settings stack so that they become immediately effective. This call re-initializes the user interface of Gaia Sky, so be aware that the UI will be reset.
base.settings_clear_stack() — clears the settings stack. Calling base.settings_restore() after this will have no effect.
These calls can be used at the start and end of scripts to back up and restore the user settings, so that everything is left unchanged after a script execution.
from py4j.clientserver import ClientServer, JavaParameters

gateway = ClientServer(java_parameters=JavaParameters(auto_convert=True, auto_field=True))
apiv2 = gateway.entry_point.apiv2
base = apiv2.base

# 1. Back up settings before anything
base.settings_backup()

# 2. Script does things and modifies the settings

# 3. Restore the settings backed up at point 1
base.settings_restore()

# 4. Close the connection
gateway.close()
Logging to Gaia Sky and Python#
When printing messages, you can either log to Gaia Sky or print to the standard output of the terminal where Python runs:
base.print("This goes to the Gaia Sky log")
print("This goes to the Python output")
In order to log messages to both outputs, you can define a function which takes a string and prints it out to both sides:
def pprint(text):
    base.print(text)
    print(text)

pprint("Hey, this is printed in both Gaia Sky AND Python!")
Method and attribute access#
Py4J allows accessing public class methods but not public attributes. In case you get objects from Gaia Sky, you can’t directly call public attributes, but need to access them via public methods:
# Get the Mars model object
body = scene.get_object("Mars")
# Get spherical coordinates as a Vector2
radec = body.getPosSph()

# DO NOT do this, it crashes!
base.print("RA/DEC: %f / %f" % (radec.x, radec.y))

# DO THIS instead
base.print("RA/DEC: %f / %f" % (radec.x(), radec.y()))
Strict parameter types#
As general advice, it is better to be strict with the parameter types. Use a floating point number when the method signature takes in a float or double,
and integers when it takes in an int or long. The scripting interface still tries to perform conversions under
the hood but it is better to do it right from the beginning. For example, this method from the refsys module of APIv2
double[] galactic_to_cartesian(double l, double b, double r);
may not work if called like this from Python:
refsys.galactic_to_cartesian(10, 43.5, 2)
Note that the first and third parameters are integers rather than floating point numbers. It is better to use explicit floating point numbers instead: like this instead:.. code:: python
refsys.galactic_to_cartesian(10.0, 43.5, 2.0)
Loading datasets from scripts#
Gaia Sky supports data loading from scripts using the STIL data provider. It is really easy to load a VOTable file from a script:
from py4j.clientserver import ClientServer, JavaParameters
gateway = ClientServer(java_parameters=JavaParameters(auto_convert=True, auto_field=True))
apiv2 = gateway.entry_point.apiv2
# Import modules
base = apiv2.base
data = apiv2.data

# Load dataset
data.load_dataset("dataset-name", "/path/to/dataset.vot")
# Async insertion, let's make sure the data is available
base.sleep(2)

# Now we can play around with it
data.hide_dataset("dataset-name")

# Show it again
data.show_dataset("dataset-name")

# Close connection
gateway.close()
Additionally, you can also load JSON data files and dataset descriptors made for Gaia Sky (see the JSON dataset format section).
Camera transitions#
Camera transition calls offer a way to smoothly interpoplate between the current camera state and a target camera state. A camera state is composed by the camera position and orientation (position, direction, and up vectors). In APIv2, we include a family of calls named camera.transition(...) (see here), which produce a transition from the current camera state, to the given camera position and orientation, in a given number of seconds (optionally different for position and orientation).
Additionally, two more calls are available to create transitions only in position and only in orientation:
camera.transition([params]) — Full camera state transition.
camera.transition_position([params]) — Position only.
camera.transition_orientation([params]) — Orientation only.
For the rest of this subsection, we refer to the base camera.transition(...) method, but it is applicable to all the variants.
Typically, when the transition must traverse large dynamic ranges of distances, it is necessary to smooth the transitions by starting slow and finishing slow, or starting fast and finishing fast. To that effect, we have included a sub-family of calls which include a smoothing type and factor for position and orientation. The transition duration is also separated by position and orientation.
- transition(double[] pos, String units, double[] dir, double[] up, double pos_duration, String pos_smooth_type, double pos_smooth_factor, double ori_duration, String ori_smooth_type, double ori_smooth_factor, boolean sync)
Duration — pos_duration and ori_duration are in seconds, and specify the duration for the interpolation in position and orientation, respectively. They may be different, but the call will not return until the longest of the two has finished (if sync is true).
Smoothing type — pos_smooth_type and ori_smooth_type determine the smoothing type. There are two types: logistic sigmoid and logit (additionally, none skips the smoothing). The logistic sigmoid type starts and ends slow, while the logit type starts and ends fast.
Check out this Graphtoy simulation. In it, \(f_2\) is the logistic sigmoid (yellow), and \(f_3\) is the logit type (green).
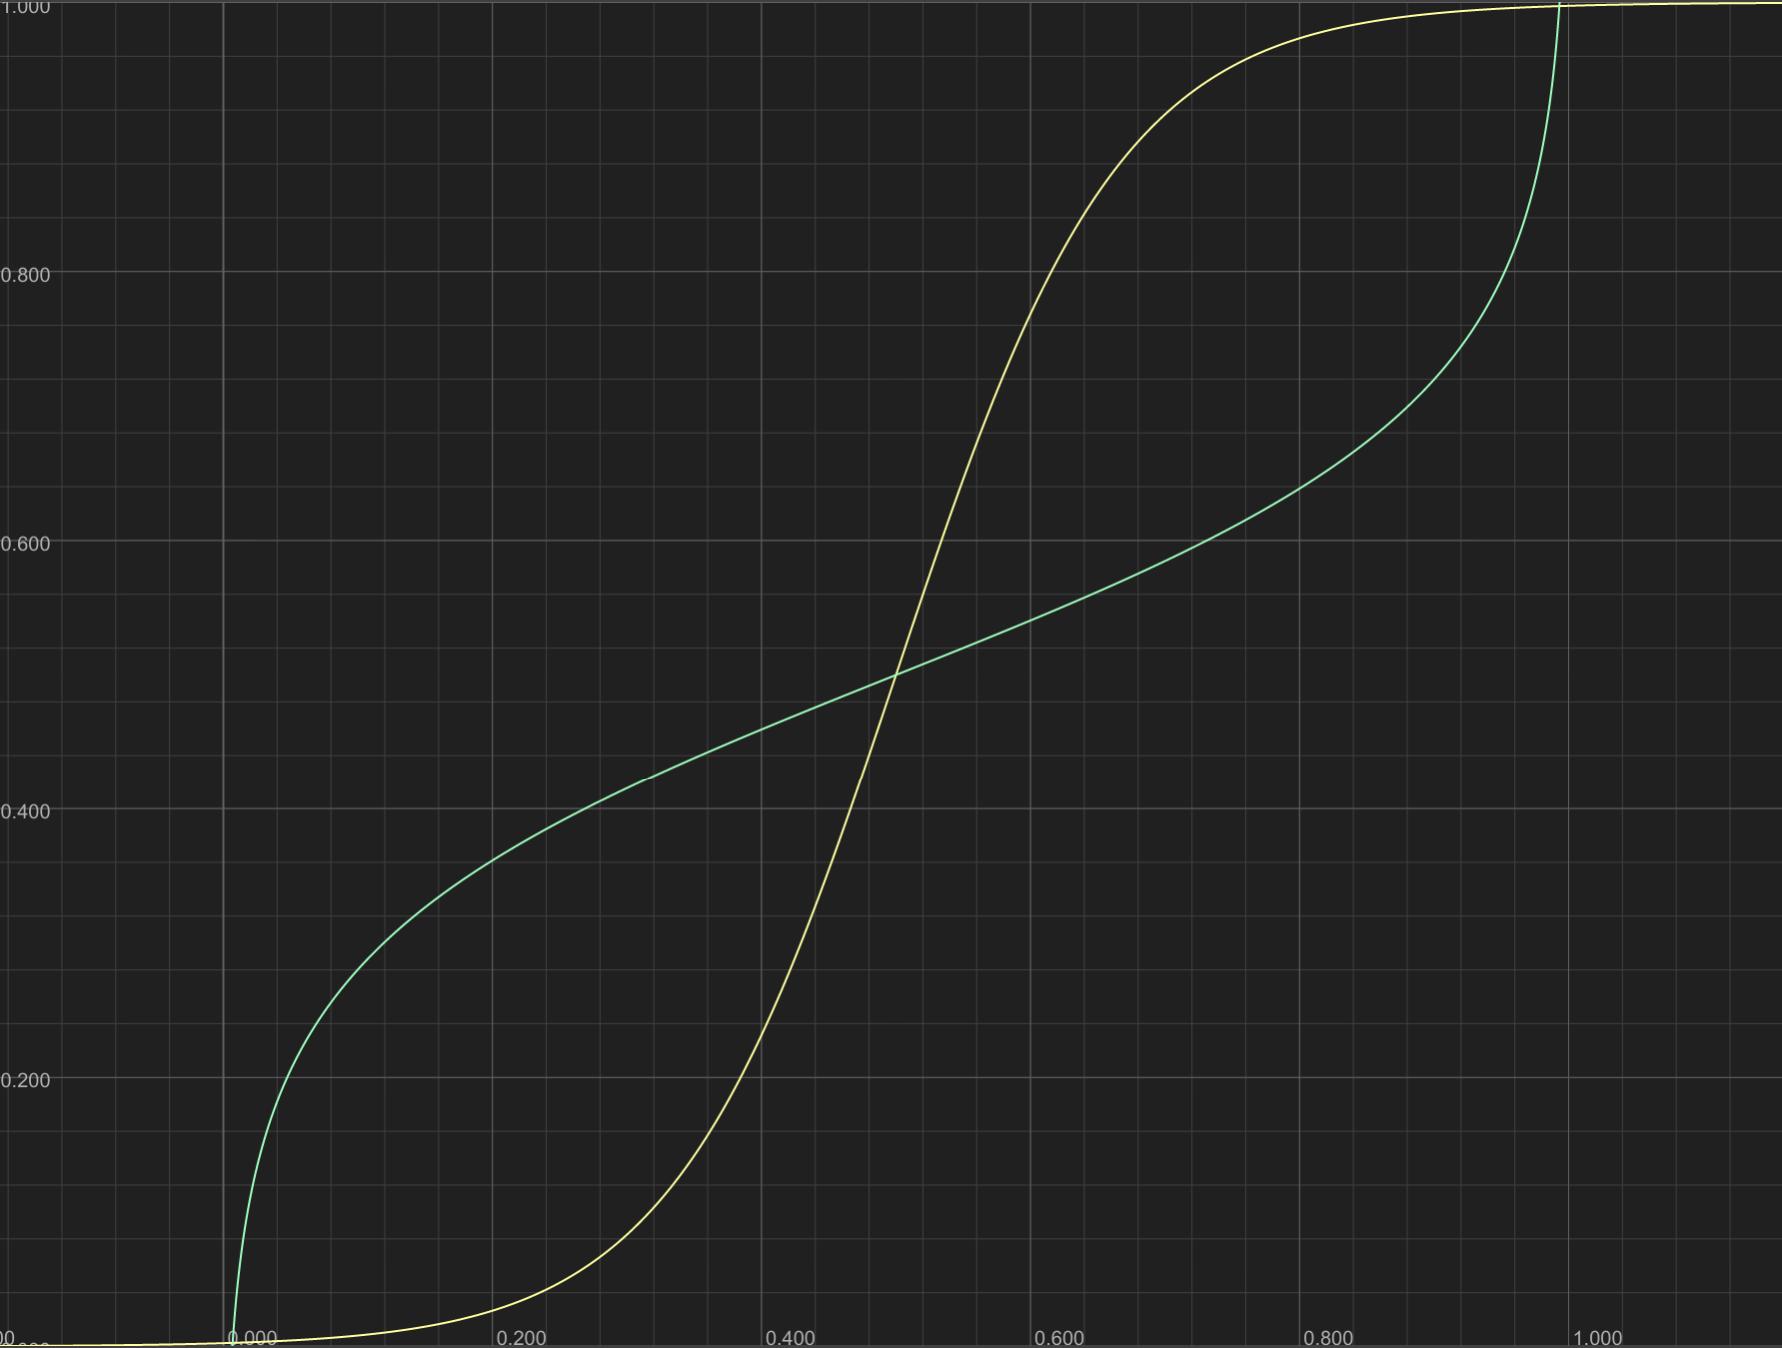
Smoothing types logistic sigmoid (in yellow) and logit (in green).#
The full transition path is mapped to x:[0,1], and we use y:[0,1] given by the smoothing function to generate the sampling.
Smoothing factor — pos_smooth_factor and ori_smooth_factor determine the smoothing factor. In logistic sigmoid the factor must be in [12, Inf]. In logit, the factor is in [0.09, 0.01]. You can use the Graphtoy utility above to see the effect of the different factors. You can see and modify the expressions in the text fields to the top-right.
Note
Find the target camera state values by putting the camera in the end position and orientation in Gaia Sky, and running the get-cam-pos.py script (under assets/scripts/tests/):
$  python get-cam-pos.py

Camera position:
 -  Internal:     [-5593.0417731364, 13008.1430225486, 1542.9688571213]
 -  Km:           [-5593041773.1363697052, 13008143022.5486202240, 1542968857.1212708950]
 -  AU:           [-37.3871749360, 86.9540651588, 10.3141097317]
 -  Light years:  [-0.0005911850, 0.0013749619, 0.0001630919]
 -  Parsecs:      [-0.0001812581, 0.0004215652, 0.0000500042]

Camera orientation:
 -  Direction:     [0.3965101844, -0.9104556836, -0.1176865406]
 -  Up:     [0.7060462888, 0.2205005155, 0.6729622283]
Then, you can create a transition from the current camera state, to the target camera state. Here we have used internal units (first data line in the above snippet).
camera.transition([-5593.0417731364, 13008.1430225486, 1542.9688571213],    # Position
                "internal",                                                 # Units
                [0.3965101844, -0.9104556836, -0.1176865406],               # Direction
                [0.7060462888, 0.2205005155, 0.6729622283],                 # Up
                10.0,                                                       # Transition duration in position [s]
                "logisticsigmoid",                                          # Smoothing type in position
                60.0,                                                       # Smoothing factor in position
                7.0,                                                        # Transition duration in orientation [s]
                "logisticsigmoid",                                          # Smoothing type in orientation
                12.0,                                                       # Smoothing factor in orientation
                True                                                        # Sync
                )
Field of view transitions#
Additionally to the camera transitions, the family of calls camera.transition_fov(...) (see here) may be used to create smooth transitions in the camera field of view angle. They work in the same way as the Camera transitions. FoV transitions typically happen between the current camera FoV and a given target value. duration, smooth_type, and smooth_factor have the same meaning as in regular camera transitions.
Synchronizing with the main loop#
Sometimes, when updating animations or creating camera paths, it is necessary to
sync the execution of scripts with the thread which runs the main loop (main thread).
However, the scripting engine runs scripts in separate threads asynchronously,
making it a non-obvious task to achieve this synchronization.
In order to fix this, a new mechanism has been added in Gaia Sky 2.0.3. Now, runnables
can be parked so that they run at the end of the update-render processing of each loop
cycle. A runnable is a class which extends java.lang.Runnable, and implements
a very simple public void run() method.
Runnables can be posted, meaning that they are run only once at the end of the current cycle, or parked, meaning that they run until they stop or they are unparked. Parked runnables must provide a name identifier in order to be later accessed and unparked.
base.park_runnable(name, runnable) — Runs at the end of every loop cycle.
Here is an example of the base scaffolding required to run code in sync with the main loop.
from py4j.clientserver import ClientServer, JavaParameters, PythonParameters

class MyRunnable(object):
    def run(self):
        # Your code here
        pass
    class Java:
        implements = ["java.lang.Runnable"]

gateway = ClientServer(java_parameters=JavaParameters(auto_convert=True, auto_field=True),
                      python_parameters=PythonParameters())
apiv2 = gateway.entry_point.apiv2
base = apiv2.base

apiv2.base.park_runnable("my_task", MyRunnable())
apiv2.time.sleep(5.0)
apiv2.base.unpark_runnable("my_task")

gateway.close()
In this example, we park a runnable which does nothing. You can add your own code
in the run() method. Note that here we need to pass a PythonParameters
instance to the ClientServer constructor.
A more useful example can be found here. In this one, a polyline is created between the Earth and the Moon. Then, a parked runnable is used to update the line points with the new positions of the bodies. Finally, time is started so that the bodies start moving and the line positions are updated correctly and in synch with the main thread.
Camera and scene runnables#
The Gaia Sky main loop updates first the camera position and orientation, and then updates the objects in the scene. In order to maintain sufficient precision, the scene is floated at the position of the camera, meaning that the camera is always effectively at the origin of coordinates, and the scene objects are moved around. This means that the effective position of every objects in the scene at every frame depends on the position of the camera.
So far, we have seen the base.park_runnable() method, which parks a runnable that runs only after the camera-scene update cycle. However, sometimes we need to modify the positions of objects in the scene with respect to other objects. If we use the current method, we will always be using the position in the last frame. However, we need to use the position in the current frame, and we can do so by introducing two new park methods:
base.park_camera_runnable(name, runnable) — Runs after camera update but before scene update. Use this to fetch the predicted position of an object to have the position in the current frame.
base.park_scene_runnable(name, runnable) — Runs after both camera and scene have updated. This is effectively the same as the base
base.park_runnable().
An example of this can be found here. It needs a couple of JSON data files (also in the repository).
Overriding object coordinates provider#
In APIv2, you can still override the position provider for any object by implementing the Python coordinates provider interface.
class MyCoordinatesProvider(object):
    def get_position(self, name, time):
        # Return a list [x, y, z] in internal units
        return [0.0, 1.0, 0.0]
    class Java:
        implements = ["gaiasky.util.coord.IPythonCoordinatesProvider"]

provider = MyCoordinatesProvider()
apiv2.scene.set_object_coordinates_provider("My Object", provider)