

Camera paths#
Gaia Sky offers the possibility to record camera paths out of the box and later play them back. These camera paths are saved in a .gsc (for Gaia Sky Camera) file in $GS_DATA/camera (see folders).
Camera path file format#
The format of the .gsc files is pretty straightforward. It is a comma- or white space-separated text file (both are supported), each row containing the state of the camera and the time for a given frame. The state of the camera consists of 9 double-precision floating point numbers, 3 for the position and 3 for the direction vector and 3 for the up vector. Lines starting with the character ‘#’ are ignored (with the exception of the frame rate annotation).
The first line in a camera path file may contain the target frame rate. If so, it should look like this:
#fps 60.0
#time,pos_x,pos_y,pos_z,dir_x,dir_y,dir_z,up_x,up_y,up_z
2021-12-03T10:15:30Z,17.663479293630523,7.669932047249439,-147.39800210363168,0.8908469033686479,0.15523508799939112,-0.42695885306703063,-0.15546522466942284,0.9872364428222099,0.03456544346939234
2021-12-03T12:15:30Z,17.66336523250385,7.669924111844091,-147.39824473603434,0.8930812247239476,0.15539061859390402,-0.4222081023601746,-0.15543885339145308,0.9872410377214266,0.03455280444582746
[...]
In that case, when the camera file is played back, the frame rate is automatically detected and used.
The reference system used for positions and directions is explained in the Internal reference system section. The position units are \(1*10^{-9} m\). The direction and up vectors are unit vectors.
The format of each row is as follows:
time, which may be in one of these formats:
long integer, defined as the number of milliseconds since epoch, 1970-01-01T00:00:00Z (UTC).ISO-8601 date stringthat contains an instant in UTC, like ‘2011-12-03T10:15:30Z’.
3x
double-precision float– \((p_x, p_y, p_z)\) position of the camera, in the internal reference system and internal units.3x
double-precision float– \((d_x, d_y, d_z)\) direction vector of the camera, in the internal reference system.3x
double-precision float– \((u_x, u_y, u_z)\) up vector of the camera, in the internal reference system.
Gaia Sky provides two ways to record camera paths: real time recording and keyframes. Keyframes are dealt with in the next sub-section. Here we look at the real time recording of camera paths using the integrated camcorder.
Camcorder#
The camcorder is located at the top of the camera pane. It offers buttons to do the following actions:
 /
/ – start and stop recording a camera path. When the REC button is gray, the camcorder is not recording. Press it to start recording a new camera path. When the camcorder is recording, the REC button is red. Press it to stop the current recording. When a recording is stopped, it is automatically saved to a file in the
 $GS_DATA/cameradirectory. The file name is auto-generated. – open the keyframes editor.
Recording camera paths#
In order to start recording the camera path, click on the ![]() REC button next to the Camera section title in the GUI Controls window. The REC button turns red,
REC button next to the Camera section title in the GUI Controls window. The REC button turns red, ![]() , which indicates the camera is being recorded.
, which indicates the camera is being recorded.
Hint
You can’t record camera paths while the camcorder is in playing mode.
In order to stop the recording and write the result to a file, click again on the ![]() REC button. The button turns grey and a notification pops up indicating the location of the camera file. Camera files are by default saved in the
REC button. The button turns grey and a notification pops up indicating the location of the camera file. Camera files are by default saved in the $GS_DATA/camera directory (see folders).
Frame rate#
Mind the FPS! The camcorder stores the time, position and orientation of the camera every frame. It is important that recording and playing back are done with the same (stable) frame rate.
To set the target recording frame rate, edit the Target FPS field in the camcorder settings of the preferences window. This makes sure the camera path is recorded using the target frame rate.
Camera path files are annotated with the target frame rate In order to play back the camera file at the right frame rate. When the frame rate is in the camera file, the playback system automatically uses it.
Keyframes editor#
The keyframe editor offers the possibility to create keyframes at specific positions
from which the camera file will be generated. In order start creating a keyframed
camera path, click on the ![]()
REC button in the camera pane of the control panel (marked with a red arrow in the screenshot below). A new window will pop up
from which you’ll be able to create and manage the keyframes.
Keyframes file format#
Keyframes can be saved and loaded to and from .gkf files using the keyframes file format. These files only contain the information on the keyframes themselves. Once the keyframes have been created, they can be exported  to a
to a .gsc camera path file. Both keyframe files and camera path files are stored by default in the $GS_DATA/camera folder (see folders).
The keyframes file format is a text format with comma-separated values. Lines starting with ‘#’ are ignored.. It contains a line for each keyframe. The reference system used for positions and directions is explained in the Internal reference system section. The position units are \(1*10^{-9} m\). The direction and up vectors are unit vectors.
Each line contains the following values:
double-precision float– keyframe duration since the last keyframe, in seconds. The duration of the first keyframe must be 0.0.simulation time of the keyframe, which may be in one of these formats:
integer, defined as the number of milliseconds since epoch, 1970-01-01T00:00:00Z (UTC).ISO-8601 date stringthat contains an instant in UTC, like ‘2011-12-03T10:15:30Z’.
3x
double-precision float– \((p_x, p_y, p_z)\) position of the camera in this keyframe, in the internal reference system and internal units.3x
double-precision float– \((d_x, d_y, d_z)\) direction of the camera in this keyframe, in the internal reference system.3x
double-precision float– \((u_x, u_y, u_z)\) up vector of the camera in this keyframe, in the internal reference system.OPTIONAL: 3x
double-precision float– \((t_x, t_y, t_z)\) position of the camera target, or point of interest, for this keyframe. This vector is only present if the camera was in focus mode when the keyframe was created or modified.integer– seam mark. This is 1 if the keyframe is a seam, and 0 otherwise.string– keyframe name.
So a valid line would be:
3.0,2011-12-03T10:15:30Z,1.0,1.0,1.0,0.0,1.0,0.0,0.0,0.0,1.0,0,Keyframe 1
Creating and editing keyframes#

Creating a keyframed camera path around Gaia. To the bottom-left, we see the keyframes editor window with some keyframes. The red arrow points to the button used to launch the keyframes editor.#
A visual representation of keyframes is displayed in the 3D world (see screenshot above) as lines (splines, orientations, etc.) and points (keyframe locations). The colors are as following:
Yellow lines – linear interpolation paths between keyframes.
Green lines – spline paths (either B-Splines or Catmull-Rom splines) between keyframes. They represent the true camera position. If the position interpolation is set to linear in the keyframes settings, the green lines coincide with the yellow lines. If the position interpolation is set to Catmull-Rom splines, the green line should hit every keyframe position perfectly. If the position interpolation is set to B-splines, the green line should only hit perfectly the path start and end points.
Red lines – for each keyframe, the red line represents the camera direction vector.
Blue lines – for each keyframe, the blue line represents the camera up vector.
Green points – represent keyframe locations for keyframes which are not currently selected.
Magenta points – represent the keyframe that is currently selected and acts as a camera focus, if any.
The keyframe visual representation is only displayed when the visibility of keyframes in enabled, so make sure that the visibility of Keyframes ![]() is on (you can use the Keframe visuals button in the keyframes editor directly).
is on (you can use the Keframe visuals button in the keyframes editor directly).
Keyframes can be selected and dragged with the right mouse button. The currently selected keyframe is highlighted in the keyframes list and also in the scene, using a magenta color. Here are the basic controls:
Right mouse – select keyframes (click) and move them around (drag).
Shift + Right mouse – drag to rotate the keyframe orientation around the up vector (in blue).
Ctrl + Right mouse – drag to rotate the keyframe orientation around the direction vector (in red).
Alt + Right mouse – drag to rotate the keyframe orientation around the perpendicular to the up and the direction vector (not represented in the scene).
Adding keyframes#
In order to add a new keyframe, click on the  Add keyframe at the end button. The new keyframe will be created after the current one (if any), and with the current camera state (position, orientation). If the camera is in focus mode, the keyframe name will appear in yellow, and the keyframe will have a target, or point of interest. See the OptFlowCam export section for more information.
The keyframe is also created with as many seconds after the previous keyframe as stated in the Seconds after prev. text field, and with the name given in the Name (optional) text field. If no name is entered, the default name of “Keyframe x” is used, where x is a monotonically increasing integer.
Keyframes list#
To the right of the keyframes editor is the keyframes list. It is a list of keyframes with their properties, along with some buttons to perform some actions. The list is sorted top-to-bottom in the same order as they are in the path. Each entry in the list has the following elements, in order, left to right:
 – move the keyframe up in the list. This moves the keyframe one position to the left in the path.
 – move the keyframe down in the list. This moves the keyframe one position to the right in the path.
Keyframe time – the time of the keyframe relative to the first one, in seconds. The first keyframe in the list always has the time 000.00. By default, keyframes are created 1.0 seconds after the previous one. Left click on the green keyframe time label to edit it on the fly. Once the edition is done, press Enter to persist.
(Frame number) – the frame number relative to the first keyframe. This is just the keyframe time times the target FPS (defined in the keyframe preferences).
 – hover over this icon to see the simulation time attached to this keyframe.
 – when this icon and the keyframe name are in yellow color, the keyframe has a target position (also referred to as ‘point of interest’). A keyframe has a target only when it was created when the camera was in focus mode. In that case, the keyframe target is the position of the camera focus object at the time. Targets are used only by the OptFlowCam export function. Refer to that section for more information.
Keyframe name – the name of the keyframe. By default, this will be “keyframe x”, where x is a monotonically increasing integer number in the keyframes list, starting at 1. Left click on the keyframe name label to edit it on the fly. As with the target icon, the keyframe name appears in yellow if the keyframe has a target position (point of interest). Targets are used only by the OptFlowCam export function. Refer to that section for more information.
 – go to the keyframe. Puts the camera in the state specified by the keyframe.
 – set keyframe to the current camera state. This allows to modify the given keyframe by setting it to the current state of the camera (including position, orientation and target, if any).
 – mark the keyframe as seam. In case the spline interpolation method is chosen, this will break the spline path.
- – add a new keyframe after this one, interpolating position, orientation and time with the next one. If the two keyframes have a target, the target position is also interpolated.
 – remove the keyframe.
Playback controls#
Below the keyframes list is a series of playback controls and a timeline slider. The slider is annotated with the current frame, and can be used to position the camera at any location in the path in real time. No need to export the camera path.
 Beginning – Move to the beginning of the timeline.
 Step back – Step one frame backward.
 Play/pause – Play or pause the camera path.
 Step forward – Step one frame forward.
 End – Move to the end of the timeline.
Export keyframes to camera paths#
To the top of the keyframes window there are a few buttons to load, export and save keyframes projects.
 Open… – load a new
 .gkfkeyframes file. The button opens a file picker in the default camera directory ($GS_DATA/camera, see system directories). Save… – save the current keyframes to a keyframes file
 .gkfin$GS_DATA/camera. You can choose the file name, but not the directory. If another file with the same name exists, a unique file name is generated from the given one.- Export… – export the current project to a camera path file
.gsc. Optionally, the OptFlowCam method can be used to export. The export process uses the settings defined in the kefyrame preferences. You can choose the file name, but not the directory. If another file with the same name exists, a unique file name is generated from the given one.  Normalize – recompute all keyframe times so that speed is constant. The total length and distance are unaltered.
 Preferences – see next section, Keyframes preferences.
Keyframes preferences#
The Preferences button (lower right in the Keyframes window) opens a window which contains some settings related to the keyframes system:
Target FPS – the target frame rate to use when generating the camera file from the keyframes.
Interpolation type – method used to interpolate between positions (orientations are always interpolated using quaternion interpolation). The time is always interpolated linearly to prevent unwanted speed-ups and slow-downs. Two types of interpolation are available:
Catmull-Rom splines – produce smoothed paths which hit every keyframe. In this mode, keyframes can be seams
. Seam keyframes break up the path into two sections, so that two splines will be used ending and beginning at the keyframe.B-splines – produce smoothed paths which do not hit every keyframe. In this mode, keyframes can be seams
. Seam keyframes break up the path into two sections, so that two splines will be used ending and beginning at the keyframe.Linear interpolation – keyframe positions are joined by straight lines. In this mode, the yellow and green lines above are the same.
Export keyframes with OptFlowCam#
Gaia Sky includes the option to use the OptFlowCam method [1] to export the keyframes to camera path files. This method works very well for smoothing paths which span over long distance ranges and extremely varying scales.
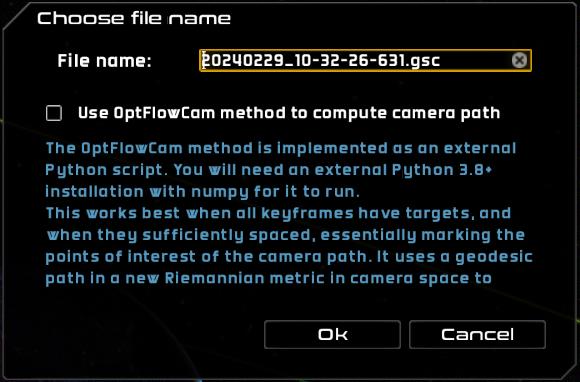
The keyframes export window contains a check box to activate the OptFlowCam post-processing.#
Note
OptFlowCam export is not available in Flatpak!
A few caveats need to be taken into account to use this functionality:
The OptFlowCam processing is implemented as an external Python script, so a local installation of Python 3.x must be in place and accessible via the operating system.
pipenvis also required, as we use to manage the dependencies of the Python script.Windows: install Python from the official website. Then, install pipenv by opening a command prompt (Win + R, type
cmd) and runningpip install pipenv. Make sure that bothpython3.exeandpipenv.exeare in your PATH.macOS: use
brewto install it:brew install python3 pipenv.Linux: use the package manager provided by your distribution. On Arch Linux, do
pacman -S python python-pipenv.
The technique works best if every keyframe has a target or point of interest (see sections above for more information), so make sure that all your keyframes are created when the camera is in focus mode. Otherwise, a default distance-to-target of 500.000 Km is assumed.
Note that the green line visually indicating the camera path is not respected in this mode. Only the keyframes themselves are guaranteed to be hit, but not so the interpolated positions between them.
Following up on the previous point, the method is not interactive, and only kicks in at export time. Do not use the visual path lines for guidance, as they are not updated with this method in real time.
Playing camera paths#
In order to play a camera file, click on the ![]() PLAY button at the top of the camera pane. A file picker dialog opens, where you can select the camera path file to play. The file picker opens by default in the
PLAY button at the top of the camera pane. A file picker dialog opens, where you can select the camera path file to play. The file picker opens by default in the $GS_DATA/camera folder (see folders).
You may also combine the camera file playback with the frame output system to save each frame as an image file to disk during playback. To do so, enable the Activate frame output automatically checkbox in the preferences dialog as described in the Camcorder section.
Hint
You can’t play camera paths while the camcorder is in recording mode.
Camera paths are recorded at a fixed frame rate. Starting in version 3.6.1, these files are annotated with the target frame rate, so that the player automatically uses it.