Camera paths
Gaia Sky offers the possibility to record camera paths out of the
box and later play them. These camera paths are saved in a .gsc
(for Gaia Sky Camera) file in $GS_DATA/camera (see folders).
Camera path file format
The format of the file is pretty straightforward. It consists of a
.gsc file with white spaces as delimiters, each row containing the
state of the camera and the time for a given frame. The state of the camera
consists of 9 double-precision floating point numbers, 3 for the
position and 3 for the direction vector and 3 for the up
vector.
The reference system used is explained in the Internal reference system section. The units are \(1*10^{-9} m\).
The format of each row is as follows:
long- time as defined by thegetTime()function ofjava.util.Date(here).double x3- position of the camera.double x3- direction vector of the camera.double x3- up vector of the camera.
Recording camera paths
Gaia Sky offers two possibilities as to how to record a camera path: real time recording and keyframes.
Real time recording
In order to start recording the camera path, click on the ![]()
REC
button next to the Camera section title in the GUI Controls window. The
REC button will turn red ![]() , which indicates the camera is being
recorded.
, which indicates the camera is being
recorded.
In order to stop the recording and write the file, click again on
the red REC button (![]() ). The button will turn grey and a notification
will pop up indicating the location of the camera file. Camera files are
by default saved in the
). The button will turn grey and a notification
will pop up indicating the location of the camera file. Camera files are
by default saved in the $GS_DATA/camera directory (see folders).
Hint
Mind the FPS! The camera recording system stores the position of the camera for every frame! It is important that recording and playback are done with the same (stable) frame rate. To set the target recording frame rate, edit the “Target FPS” field in the camcorder settings of the preferences window. That will make sure the camera path is using the right frame rate. In order to play back the camera file at the right frame rate, you can edit the “Maximum frame rate” input in the graphics settings of the preferences window.
Keyframe editor
The keyframe editor offers the possibility to create keyframes at specific positions
from which the camera file will be generated. In order start creating a keyframed
camera path, click on the ![]()
REC button in the camera pane of the control panel. A new window will pop up
from which you’ll be able to create and manage the keyframes.
Keyframe and camera files
Keyframes can be saved and loaded to and from .gkf files. These files only contain the information on the keyframes themselves. Once the keyframes have been created, they can be exported  to a
to a .gsc camera path file. Both keyframe files and camera path files are stored by default in the $GS_DATA/camera folder (see folders).
Creating and editing keyframes
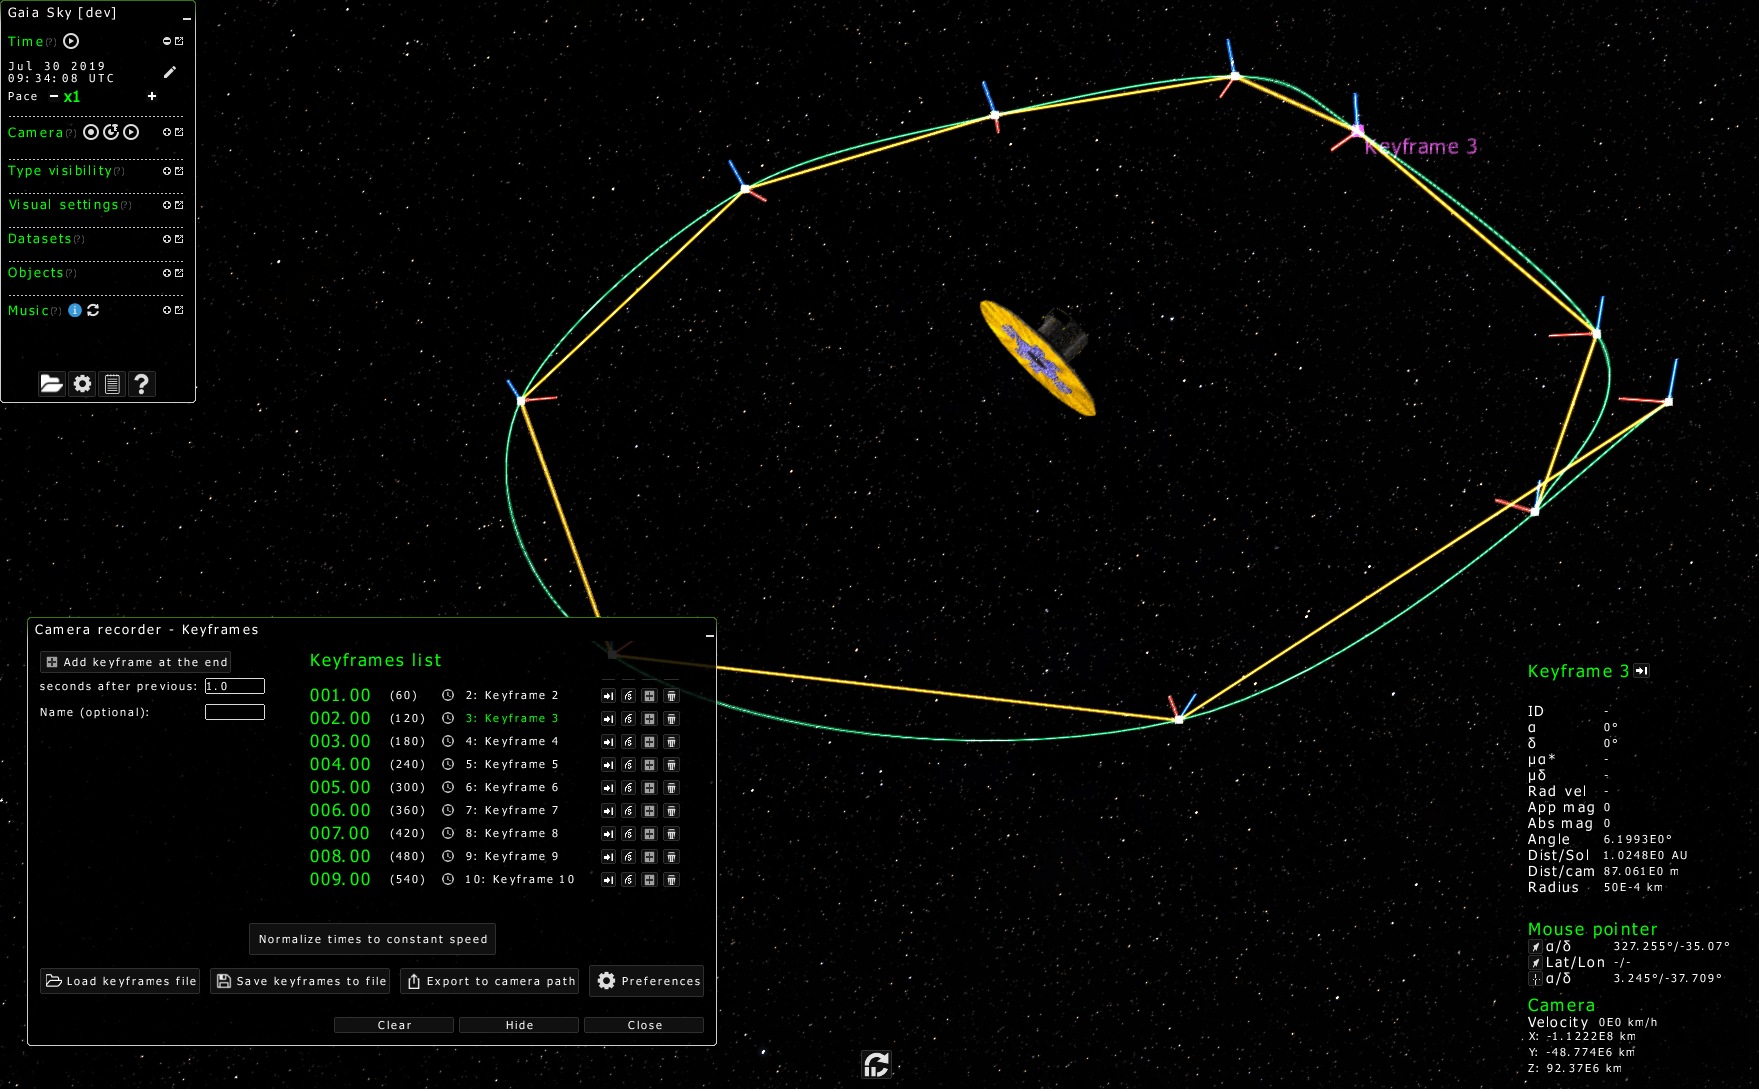
Creating a keyframed camera path around Gaia
A graphical representation of keyframes is displayed in the 3D world (see screenshot above). Make sure that the visibility of the component Others ![]() is enabled. The yellow lines join the keyframe positoins with straight lines, whereas the green line shows the true camera path which will be generated.
is enabled. The yellow lines join the keyframe positoins with straight lines, whereas the green line shows the true camera path which will be generated.
Keyframes can be selected and dragged with the right mouse button. The currently selected keyframe is highlighted in the keyframes list and also in the scene, using a magenta color. Here are the basic controls:
RIGHT_MOUSE – select keyframes (click) and move them around (drag).
Shift + RIGHT_MOUSE – drag to rotate the keyframe orientation around the up vector (in blue).
Ctrl + RIGHT_MOUSE – drag to rotate the keyframe orientation around the direction vector (in red).
Alt + RIGHT_MOUSE – drag to rotate the keyframe orientation around the perpendicular to the up and the direction vector (not represented in the scene).
Additionally, some actions can be performed directly on the keyframes list in the keyframes window. You can edit both the keyframe name and time (as elapsed time since previous) by clicking on them.
 – go to the keyframe. Puts the camera in the state specified by the keyframe
 – mark the keyframe as seam. In case the spline interpolation method is chosen, this will break the spline path.
 – add a new keyframe after this one, interpolating position, orientation and time with the next one.
 – remove the keyframe.
At the bottom of the keyframes window, there are a few buttons useful to load, export and save keyframes projects.
Normalize times to constant speed – recompute all keyframe times so that speed is constant. The total length and distance are unaltered.
 Load keyframes file – load a new
 .gkfkeyframes file. Save keyframes to file – save the current project to a
 .gkffile in$GS_DATA/camera.- Export to camera path – export the current project to a camera path using the settings defined in the settings dialog. See next section.
 Preferences – see next section, Keyframes preferences.
Keyframes preferences
The Preferences button (lower right in the Keyframes window) opens a window which contains some settings related to the keyframes system:
Target FPS – the target frame rate to use when generating the camera file from the keyframes.
Interpolation type – used for generating the positions and/or the orientations. The time is always interpolated linearly to prevent unwanted speed-ups and slow-downs. Two types of interpolation are available:
Catmull-Rom splines – produce smoothed paths which hit every keyframe. In this mode, keyframes can be seams
, meaning that the path is broken at that point.Linear interpolation – keyframe positions are joined by straight lines. In this mode, the yellow and green lines above are the same.
Playing camera paths
In order to play a camera file, click on the ![]()
PLAY icon next to the REC icon. This will prompt a list of available camera files in the $GS_DATA/camera folder (see folders).
You can also combine the camera file playback with the frame output system to save each frame to a JPEG image during playback. To do so, enable the Activate frame output automatically checkbox in the preferences dialog as described in the Camrecorder section.