

Procedural planets#
Gaia Sky offers a system to procedurally generate planetary surfaces, cloud layers and atmospheres. This can be applied to planets and moons to modify their looks. The elements that can be procedurally generated are, then, the model surface, the cloud layer and the atmosphere.
Hint
The techniques and methods behind the procedural generation of planetary surfaces in Gaia Sky are described in detail in this external article, and also in this other older article. The system has moved on in certain ways, but the basics are the same.
The procedural generation module is accessible via two distinct ways:
Using the procedural generation window to generate and modify surfaces, clouds and atmospheres interactively, in real time when Gaia Sky is running. The results are not persisted, and are lost on restart. There is an option to save the generated textures to disk as image files.
Specifying the procedural generation parameters for each object in the object’s descriptor file. This enables a textual definition of bodies and their procedural generation parameters. The files can be loaded at startup and distributed so that other Gaia Sky users can use them.

A few procedurally generated planets.#
In the next sections, we first learn how to use the interactive procedural generation in Gaia Sky, and then we present an overview of how the process works, and how to make use of it in data files.
Using procedural generation#
This section describes how to use the procedural generation module at runtime during a session.
You can bring up the procedural generation dialog by right-clicking on any planet and/or moon to bring up the context menu, and then clicking on Procedural generation…. A more straightforward way is to focus on the object and click on the  procedural generation icon in the camera info panel. This brings up the procedural generation window. In it, there are three tabs for surface, clouds and atmosphere.
Each tab has two sections:
Presets
Parameters
Use the controls in each tab to modify each of the procedural generation and atmospheric scattering parameters.
Randomize all parameters for the current element with the
 button at the top.
Launch a generation with the current parameters with the
 Generate [layer] button at the bottom.
To the bottom, there are three controls.
- Randomize all – randomize the surface, clouds and atmosphere of this planet or moon.
Generated texture resolution – this slider defines the texture resolution for the procedural generation. Higher resolution means more visual fidelity, but more GPU memory usage and longer processing times.
Export textures to disk as JPEG files after generation – export the generated textures to disk as JPEG image files. The actual saving to disk is done in a separate thread, so this should not slow things down by a lot. The default export location is
$data/procedural-planet-textures(see System Directories). The exported textures are named as follows:[name]-biome.jpeg– biome texture. Contains the elevation in the red channel, the humidity in the green channel, and the temperature in the blue channel. See Noise parametrization for more information.[name]-diffuse.jpg– the diffuse texture, containing the base color.[name]-specular.jpg– the specular map.[name]-cloud.jpg– the cloud layer.[name]-emission.jpg– the emission channel, if any.
Surface tab#
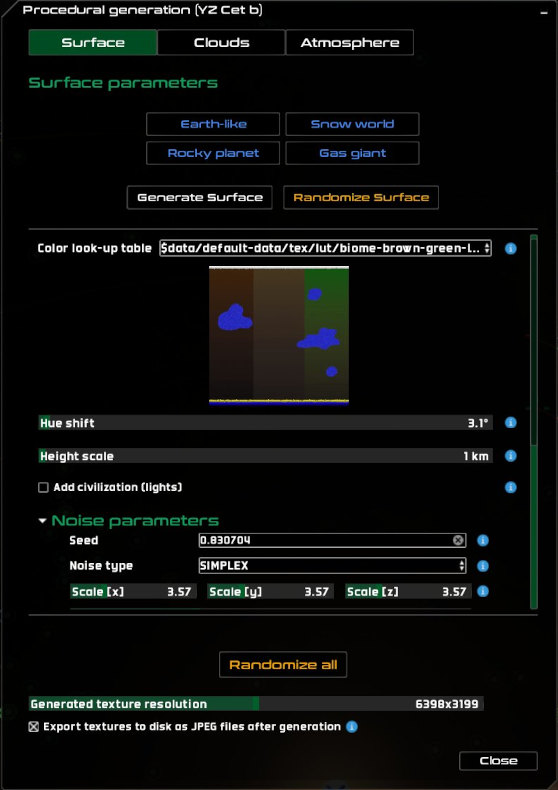
The surface tab#
The surface tab contains a few presets at the top, and the full parameter controls below it. The presets are:
- – generate an Earth-like planet with mountains and seas.
 – generate a barren dune and sand world.
 – generate a tropical planet full of islands and jungles.
 – generate a cold planet, with mostly snow. It may also have lakes and seas.
 – generate a planet of rock. May also have lava.
 – generate a molten lava hot world.
 – generate a gas giant.
 – generate an alien planet.
At the beginning of the preset buttons is the randomize surface button, which rolls the dice without restrictions.
In the Surface parameters section, we find the following controls to fine-tune the parameter values.
- Generate surface – generate the surface with the current noise parameters.
Color look-up table – the look-up table to use to generate the diffuse map for the surface.
LUT hue shift – an angle by which to rotate the look-up table colors in the HSL color space. This enables generating several different color palettes from the same table.
LUT saturation – saturation of the LUT.
Height scale – the physical height value (in km) to map to the value 1 in the elevation map.
Latitude influence on temperature – the temperature is generated in the blue channel in the biome texture. The latitude influence sets an additional constraint on the temperature, which decreases with the planet latitude by a certain amount. This amount is controlled by this slider. Increase it to have much colder polar regions, decrease it to make the polar regions disappear.
Add civilization (lights) – if enabled, the generation process creates an emissive map that simulates cities and civilizations by means of emissive regions (lights), visible on the dark side of the planet. On the light side of the planet, the cities can be seen in the diffuse texture.
To the bottom, we find the noise parameters to generate the surface. These are described in Noise parametrization.
Clouds tab#
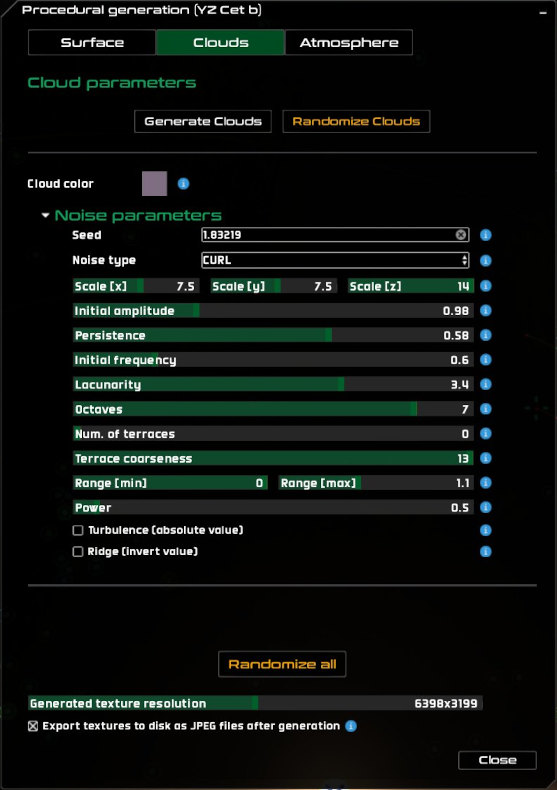
The clouds tab#
The clouds tab contains a button at the top:
- – randomize all parameters and automatically generate a new clouds layer.
Below the button, we find the Cloud parameters. In this section, we find the following:
- Generate clouds – generate the clouds layer using the current parameters.
Cloud color – a color picker used to indicate the base color of the clouds layer.
Below are the noise parameters used to generate the clouds. These are described in Noise parametrization.
Atmosphere tab#
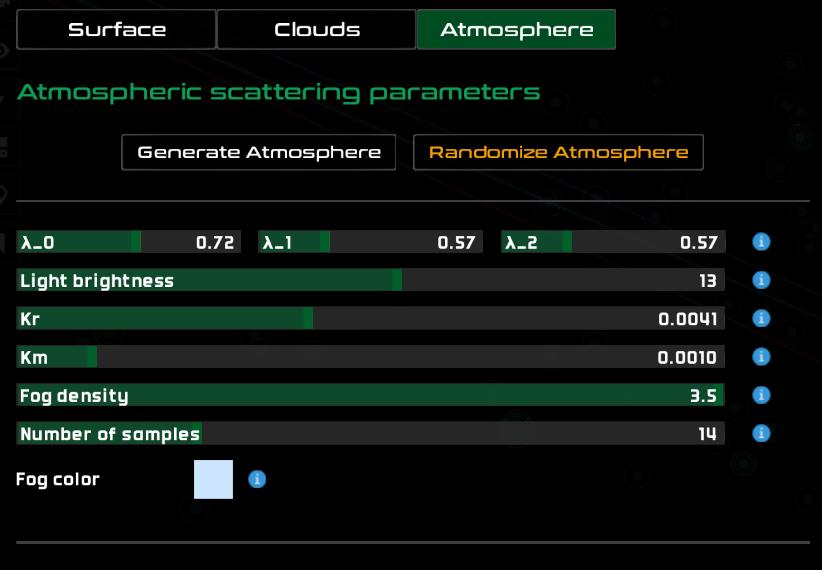
The atmosphere tab#
The atmosphere tab contains the Presets at the top.
Here, we find the button to randomize the atmospheric scattering parameters, and a succession of planet icons  in different colors to generate atmospheres using them.
In Atmospheric scattering parameters, we find the following controls:
in different colors to generate atmospheres using them.
In Atmospheric scattering parameters, we find the following controls:
- Generate Atmosphere – generate an atmosphere with the current atmospheric scattering parameters.
Wavelengths – the values of \(1\over{\lambda^4}\) for the red (\(\lambda_0\)), green (\(\lambda_1\)) and blue (\(\lambda_2\)) channels. These are the Rayleigh scattering rates of different light wavelengths.
Light brightness – the brightness of the illuminating star.
Kr – Rayleigh scattering constant.
Km – Mie scattering constant.
O₃ optical depth – ozone vertical optical depth at red (Chappuis band, ~600 nm). Controls ozone absorption in the stratosphere, producing a subtle purple/pink twilight glow. Higher values strengthen the effect. Earth reference: ~0.025.
Fog density – density of the simulated fog when inside the atmosphere.
Number of samples – number of samples to use to compute the atmospheric scattering in the shader.
Fog color – the color of the fog.

A few planets created using the randomize all button.#
Surface generation process#
The surface generation process starts with the generation of the elevation, humidity and temperature data. This process is known as the biome generation. The elevation data is a 2D array containing the elevation value in \([0,1]\) at each coordinate. The humidity and temperature data have the same form. First, let’s look at our sampling process.
Seamless (tileable) noise#
Usually, noise sampled directly is not seamless. The noise features do not repeat over a period, so it can not be stitched together without presenting seams. It can not be tiled. In the case of one dimension, the straightforward approach is to sample the noise using the only dimension available, in a line, in \(x\):

Sampling noise in 1D leads to seams#
However, if we go one dimension higher, to 2D, and sample the noise along a circumference embedded in this two-dimensional space, we get seamless, tileable noise.
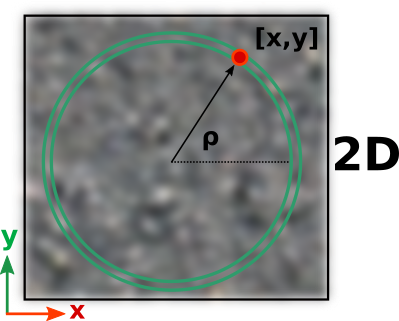
Sampling noise along a circumference in 2D space is seamless#
We can apply this same principle with any dimension \(d\) by sampling in \(d+1\). Since we need to create spherical 2D maps, we do not sample the noise function using the \(x\) and \(y\) coordinates of the pixel in image space. That would produce higher frequencies at the poles and lower frequencies around the equator. Additionally, the noise would contain seams, as it does not tile by default. Instead, we sample the 2D surface of a sphere of radius 1 embedded in a 3D volume, so we sample 3D noise. To do so, we iterate over the spherical coordinates \(\varphi\) and \(\theta\), and transform them to cartesian coordinates to sample the noise:
Note
The mathematical formulas above use the standard polar angle convention (\(\varphi\) from the \(z\)-axis, \(\theta\) as the azimuthal angle). The code snippet below uses latitude (\(\varphi\)) and longitude (\(\theta\)), which is the geospatial convention. Both conventions describe the same sphere surface and produce identical results.
The process is outlined in this code snippet. If the final map resolution is \(N \times M\), we use N \(\theta\) steps (longitude samples) and M \(\varphi\) steps (latitude samples).
for (phi = -PI / 2; phi < PI / 2; phi += PI / M){
    for (theta = 0; theta < 2 * PI; theta += 2 * PI / N) {
        n = noise.sample(cos(phi) * cos(theta), // x
                         cos(phi) * sin(theta), // y
                         sin(phi));             // z
    }
}
Noise parametrization#
The generation is carried out by sampling configurable noise algorithms at different levels of detail, or octaves. To do that, we have some important noise parameters to adjust:
Seed – a number which is used as a seed for the noise RNG.
Noise type – the base noise type. In Gaia Sky, this can be perlin [1], simplex [2], voronoi (worley) [3] or crater.
Scale – determines the scale of the sampling volume. The noise is sampled on the 2D surface of a sphere embedded in a 3D volume to make it seamless. The scale stretches each of the dimensions of this sampling volume.
Base/water level – the minimum level of the noise, mapped to the bottom of the LUT.
Remap after base level – remap everything above the base level to the [0,1] range.
Recursive detail (octaves) – the number of levels of detail. Each octave reduces the amplitude and increases the frequency of the noise by using the lacunarity parameter.
Continent/cloud fragmentation (frequency) – initial noise frequency.
Subdivision rate (lacunarity) – determines by which factor the frequency is increased in each successive octave.
Elevation/cloud granularity (persistence) – determines by which factor the amplitude is reduced in each successive octave. Higher values make subsequent octaves more prominent.
Plains height (only surface) – sets the elevation at which the plains arrive. Set to 0 to disable plains.
Plains slope (only surface) – sets the slope of the plains.
Domain warp strength – warp the sampling domain with the given strength.
Domain warp frequency – frequency of the noise channel used to warp the domain.
Sigmoid map – map the noise above base level using a sigmoid function (smoothstep).
Turbulence – apply an absolute value function to the noise.
Ridge – invert the noise values, creating ridge noise.
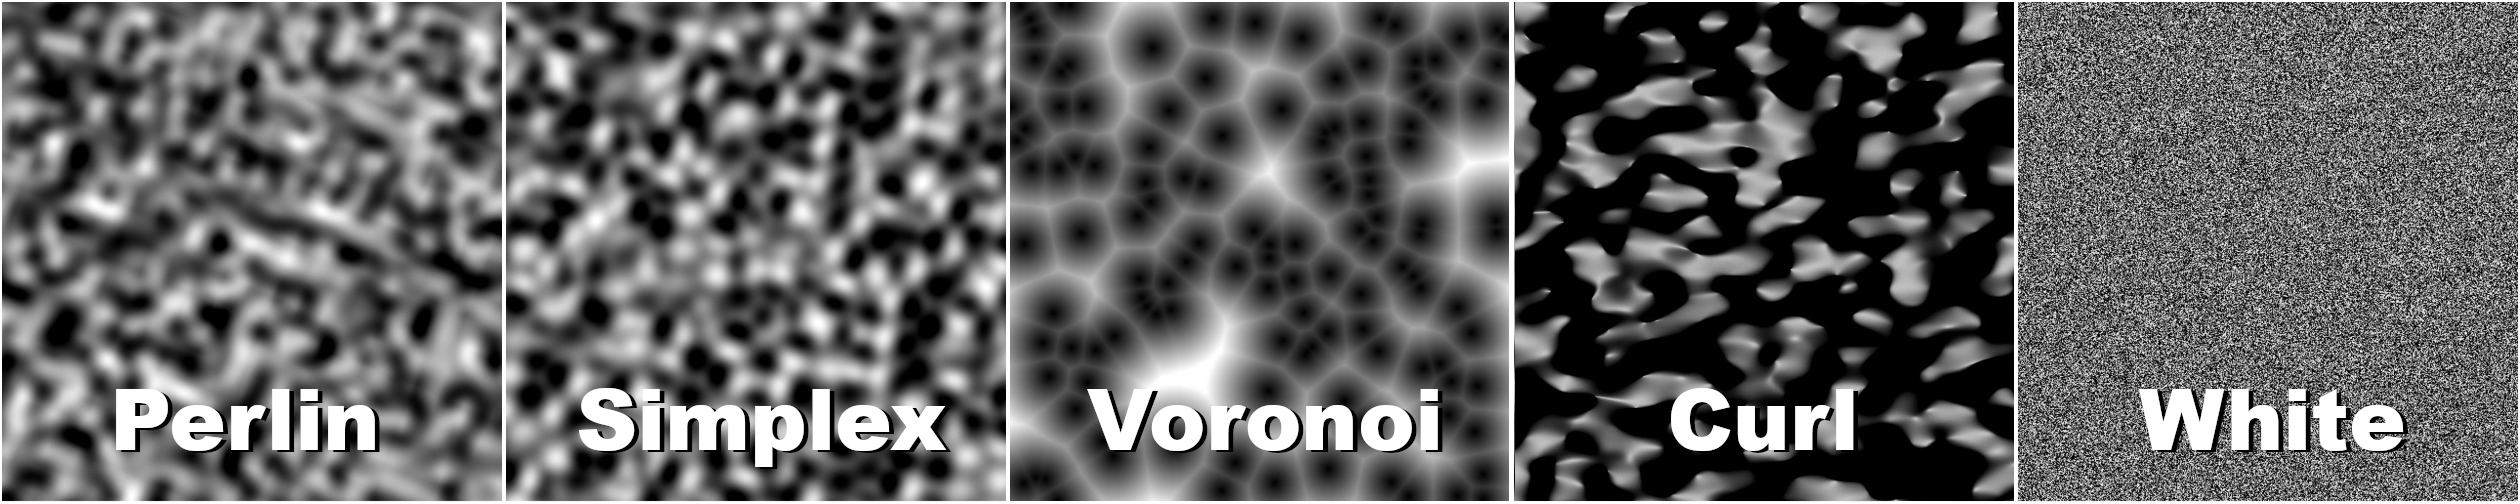
Some of the noise types available#
We generate three base noise maps, for elevation, humidity, and temperature. These three maps are combined into a single biome texture (elevation in red, humidity in green, temperature in blue), which is an intermediate product. The biome texture is then used to sample the 3D color look-up table to produce the final diffuse (color) texture. The elevation is used directly as the height texture. The humidity and temperature are used, together with the elevation, to determine the diffuse color of each final pixel using a 3D look-up table. The humidity value is mapped to the \(x\) coordinate (the first axis of the 3D LUT texture), the elevation value is mapped to \(y\) (the second axis), and the temperature is mapped to \(z\) (the third axis). These are texture coordinates within the 3D look-up table, not spatial coordinates of the planet. All coordinates are normalized to \([0,1]\) before sampling. The 3D look-up table is loaded into a 3D texture by using different temperature slices, each as a single JPG or PNG image.
The look-up can be hue-shifted by an extra hue shift parameter, in \([0^{\circ}, 360^{\circ}]\). Its saturation can also be adjusted dynamically. The hue shift and saturation operations happen in the HSL color space. Once the shift is established, we generate the diffuse texture by sampling the look-up table and shifting the hue. The specular texture is generated by assigning a full specular value to all areas where the height equals zero.
Finally, the normal map is generated, if needed, from the height map by determining elevation gradients in both X and Y. This is only generated when ‘elevation representation’ is set to ‘none’ in the settings. If it is set to ‘tessellation’ or ‘vertex displacement’, the normal vectors are computed from the slope of the triangles themselves and the normal map is not needed.
Footnotes
Descriptor files#
This section describes how to set up the procedural generation using JSON descriptor files and how to express the parameters seen in the previous section in these descriptor files. The format is thoroughly documented in this section.
The procedural generation parameters for surfaces and clouds are described in the material and cloud elements. The material element lives inside the model element. By contrast, there are no procedural generation parameters that can be set in the atmosphere element itself. It just holds the atmospheric scattering parameters. However, the atmosphere element as a whole can be randomized. Let’s see how to randomize these elements in the next section.
Randomize all#
The easiest way to add procedural generation to an object is by using the randomize element. It is an array which can contain the strings "surface", "cloud" and "atmosphere". It can optionally be accompanied by a seed element, specifying the seeds for each of the elements to be randomized. A seed is a 64-bit number used to initialize the RNG (random number generator) so that it always produces the same random number sequence. If you omit the seeds, the system will randomly generate them. Otherwise, they are matched to elements by their order of appearance in the arrays. If the seeds array is not long enough, the first seed is used. Let’s see an example:
{
    "name" : "Exonia f",

    "randomize" : [ "surface", "cloud", "atmosphere" ],
    "seed" : [111, 222, 333]
}
In the snippet above we have omitted all the usual elements (color, size, ct, etc.) except the name. The last two elements specify the components to randomize and their seeds. In this case, the model would take the seed 111, the cloud would take the seed 222 and the atmosphere would take the seed 333.
If any of the elements were not present in the randomize array, it would not be generated. If the element object is present, it will be picked up, but only if the randomize array does not contain it. The randomize array has precedence.
Surface description#
Some of the textures in the material element, making up the surface of the body, can be procedurally generated. The procedural generation parameters are specified in the material element inside the model element. Let’s see an example:
"model"                 : {
    "args" : [true],
    "modelType" : "cubesphere",
    "params" : {
        "divisions" : 200,
        "diameter" : 1.0,
        "flip" : false
    },
    "material" : {
        "height" : "generate",
        "diffuse" : "generate",
        "normal" : "generate",
        "specular" : "generate",
        "biomeLUT" : "earthlike",
        "LUTHueShift" : -15.0,
        "LUTSaturation": 1.2,
        "heightScale" : 14.0,
        "noise" : {
            "seed" : 993390,
            "scale" : 0.1,
            "type" : "simplex",
            "persistence": 0.5,
            "frequency" : 5.34,
            "lacunarity" : 2.0,
            "baseLevel": 0.45,
            "octaves" : 10,
        },
    }
}
Usually, the diffuse, height, normal and specular elements contain texture image file locations. However, if they are set with the special token "generate", they will be procedurally generated by the system using the process described above.
Color look-up table#
The color look-up table is specified in the biomeLUT element as a LUT name. The accepted names are:
earthlike
desert
ice
lava
rocky
tropical
alien
The hue shift is specified in LUTHueShift and contains the shift value in degrees. The saturation is in LUTSaturation and in the range of [0,2].
Noise parameters#
The noise parameters described in this section above can be specified in the noise attribute. The parameters translate 1-to-1 to what is described above, so they are pretty much already covered. If the noise parameters are not there, they are randomly initialized. These noise parameters are used to produce the elevation data and the humidity data.
Cloud description#
The clouds description is specified in the cloud attribute. It contains the size of the clouds sphere (in km) and the parameters for the model.
Then, in the inner cloud attribute we can either specify a texture image file, or we can use the reserved token "generate". If so, we can specify the noise parameters just like in the material. If the noise parameters are not there, they are randomized automatically.
"cloud" : {
    "size" : 2430.0,
    "cloud" : "generate",
    "modelType": "cubesphere",
    "params" : {
        "divisions" : 100,
        "diameter" : 2.0,
        "flip" : false
    },
    "noise" : {
        "seed" : 1234,
        "scale" : [1.0, 1.0, 0.4],
        "type" : "simplex",
        "baseLevel": 0.3,
        "persistence": 0.5,
        "frequency" : 4.34,
        "lacunarity": 2.0,
        "octaves" : 6,
    }
}
Atmospheric parameters description#
The format for the atmospheric scattering parameters is documented in this section. If the value atmosphere is in the array of randomize, the atmospheric scattering parameters will be randomized automatically.